

In this tutorial, I'll show you how to use a multimeter to resistance test the fuel injectors on the 1994-1999 3.1L Buick Century.
Since all six fuel injectors are mounted underneath the intake manifold plenum, you can't access them directly. The good news is that you don't have to remove the plenum to test them. We'll perform all of our resistance tests right at the 10-pin fuel injector wiring harness connector.
Once you've completed the tests, you'll know whether one (or more) of the six fuel injectors has an internal electrical problem or if they're all OK.
Contents of this tutorial:
ES  You can find this tutorial in Spanish here: Cómo Probar Los Inyectores De Combustible (1994-1999 3.1L V6 Buick Century) (at: autotecnico-online.com).
APPLIES TO: This tutorial applies to the following vehicles:
- 3.1L V6 Buick Century: 1994, 1995, 1996, 1997, 1998, 1999.
FUEL INJECTOR CIRCUIT WIRING DIAGRAMS:
- Fuel Injector Circuit Wiring Diagram (1994-1995 3.1L V6 Buick Century).
- Fuel Injector Circuit Wiring Diagram (1996 3.1L V6 Buick Century).
- Fuel Injector Circuit Wiring Diagram (1997 3.1L V6 Buick Century).
- Fuel Injector Circuit Wiring Diagram (1998-1999 3.1L V6 Buick Century).
2000-2005 FUEL INJECTOR TESTS:
Symptoms Of A Bad Fuel Injector
For your Buick Century's 3.1L V6 engine to run smoothly, each cylinder needs three things: air (compression), fuel, and a good spark.
Each fuel injector is responsible for delivering fuel to its assigned cylinder. If one of the injectors stops working because it's failed internally, that cylinder won't contribute its share of power. The result is a rough-running engine and a noticeable loss of performance.
On 1996-1999 models (OBD II), a failed injector may set one or more of the following fuel injector diagnostic trouble codes (DTCs):
- P0201: Injector 1 Control Circuit.
- P0202: Injector 2 Control Circuit.
- P0203: Injector 3 Control Circuit.
- P0204: Injector 4 Control Circuit.
- P0205: Injector 5 Control Circuit.
- P0206: Injector 6 Control Circuit.
In many cases, however, you'll see a cylinder misfire code instead of a specific fuel injector code. On 1996-1999 OBD II vehicles, the most common misfire DTCs are:
- P0300: Random/Multiple Cylinder Misfire.
- P0301: Cylinder #1 Misfire.
- P0302: Cylinder #2 Misfire.
- P0303: Cylinder #3 Misfire.
- P0304: Cylinder #4 Misfire.
- P0305: Cylinder #5 Misfire.
- P0306: Cylinder #6 Misfire.
Whether your 3.1L Buick Century is a 1994-1995 OBD-I or a 1996-1999 OBD-II model, a bad fuel injector can cause one or more of the following symptoms:
- Rough idle.
- Poor fuel economy.
- A strong fuel smell from the tailpipe.
- Lack of power, especially when accelerating or driving under load.
Location Of The Fuel Injector Harness Connector
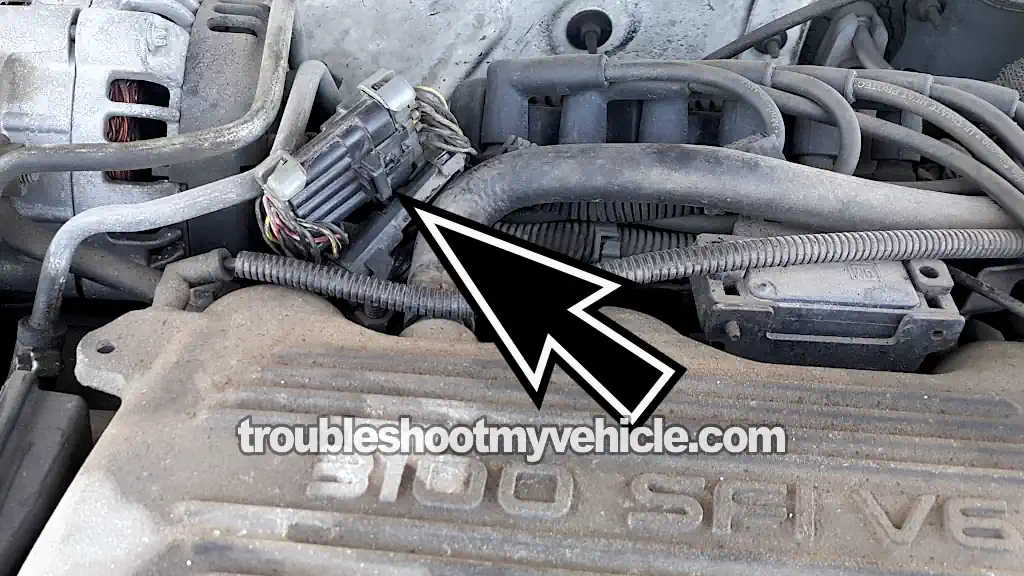
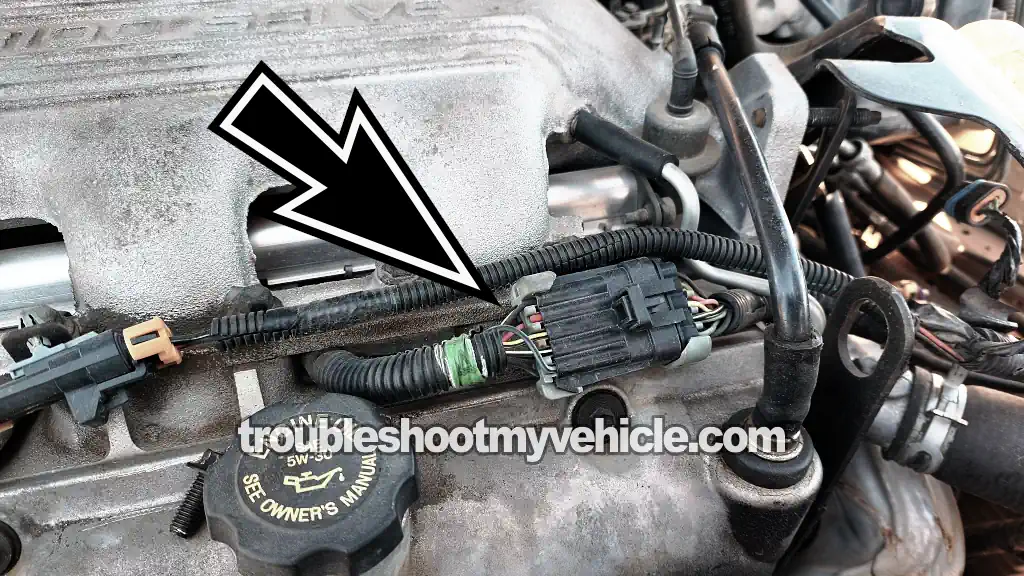
Since all six fuel injectors are mounted underneath the intake manifold plenum, you can't access them directly to resistance test them. The good news is that there's no need to remove the plenum to check whether they're OK.
Instead, we'll perform all of our tests through the 10-pin fuel injector wiring harness connector. Photo 1 of 3 in the image viewer above shows the terminal identification for this connector.
Its location depends on the model year. On 1994-1995 Buick Century models, the 10-pin connector is mounted on top of the valve cover that faces the radiator (see photo 3 of 3). On 1996-1999 models, it's located behind the alternator (see photo 2 of 3).
We'll be taking our measurements on the fuel injector wiring harness side of the connector, the half with the male spade terminals.
Where To Buy The Fuel Injectors And Save
The following link will help you comparison shop for the GM Genuine Parts fuel injector:

Disclosure: As an Amazon Associate, I earn from qualifying purchases. If my tutorials help you, using these links is an easy way to support the site at no extra cost to you. Thank you!
Not sure if the fuel injector will fit your particular GM vehicle? Don't worry, once you get to the site, they'll make sure it fits. If it doesn't, they'll find you the right one.
Testing The Fuel Injector Resistance
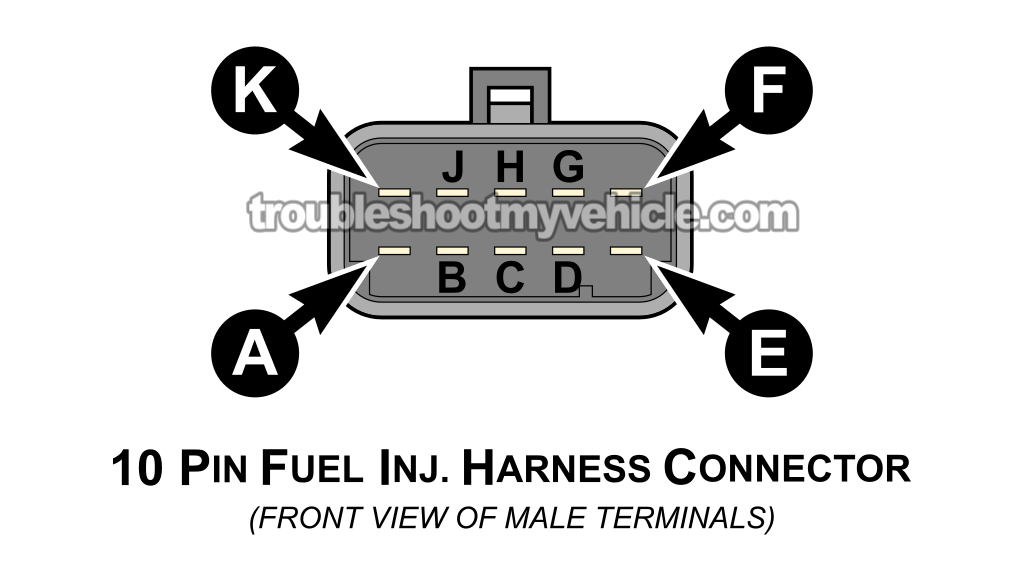
The factory specification for the fuel injectors is 11.8 to 12.6 Ohms (measured at 50-95° F / 10-35° C). Keep in mind that this specification applies when measuring the injector directly across its two terminals after it's been disconnected from the wiring harness.
Since we'll be measuring each injector through the 10-pin fuel injector wiring harness connector, the resistance readings may be slightly higher due to the resistance of the wiring between the connector and the injector. For this reason, don't get hung up on an exact Ohm value.
What we're really looking for is consistency. In other words, all six injectors should have very similar resistance values. If one injector measures noticeably higher or lower than the others, that's a strong indication that it has an internal electrical problem.
If you find one or more injectors with a resistance reading that's way out of line with the rest, you'll need to remove the intake manifold plenum and test that injector directly across its two terminals to confirm it's defective.
Alright, let's get the ball rolling:
- 1
Set your multimeter to the Ohms (Ω) function.
- 2
Disconnect the 10-pin fuel injector wiring harness connector.
NOTE: All resistance measurements are made on the fuel injector harness side of the connector (the half with the male spade terminals). - 3
Measure the resistance between terminals D and A to test fuel injector #1.
- 4
Measure the resistance between terminals D and B to test fuel injector #2.
- 5
Measure the resistance between terminals D and C to test fuel injector #3.
- 6
Measure the resistance between terminals D and K to test fuel injector #4.
- 7
Measure the resistance between terminals D and J to test fuel injector #5.
- 8
Measure the resistance between terminals D and H to test fuel injector #6.
Let's interpret your test results:
CASE 1: All six injectors have very similar resistance readings. This is the expected result and tells you that none of the injectors has an obvious internal electrical problem.
If still suspect a fuel injector problem, take a look at this section: How To Find The Bad Or Clogged Fuel Injector.
CASE 2: One injector has a resistance reading that's noticeably different from the others. This usually indicates that the injector is internally defective.
The next step is to remove the intake manifold plenum and measure the injector's resistance directly across its two terminals. If it's outside the factory specification of 11.8 to 12.6 Ohms, the injector is bad and should be replaced.
Removing The Intake Manifold Plenum
If you do end up removing the intake manifold plenum, here are a few tips that'll help the job go smoothly:
TIP 1: Cover the lower intake manifold openings with clean shop towels as soon as the plenum comes off. Once the plenum is removed, the intake runners are exposed. Covering them immediately helps prevent nuts, bolts, tools, or any other debris from accidentally falling into the engine.
If something does fall into one of the intake runners and the engine is started, it can cause severe engine damage. Taking a few seconds to cover the openings can save you from a very expensive repair.
TIP 2: Install the intake manifold plenum gaskets dry. Don't apply RTV silicone or any other type of gasket sealant. The plenum gaskets are designed to seal properly without it.
TIP 3: Torque the intake manifold plenum bolts to 11 ft-lbs (15 N·m). Using a torque wrench helps ensure the bolts are tightened evenly without over-tightening or under-tightening them.
TIP 4: Disconnect the negative (-) battery cable before removing the plenum. This is a simple safety precaution that helps prevent the engine from being accidentally cranked while you're working around the exposed intake manifold and fuel injectors.
How To Find The Bad Or Clogged Fuel Injector
When you're dealing with a cylinder misfire, it's easy to jump to the conclusion that the fuel injector is the problem. The truth is that a misfire can be caused by several different issues, and replacing the injector without testing it first can end up wasting both time and money.
The good news is that diagnosing a bad or clogged fuel injector isn't complicated if you approach the problem one step at a time. The strategy I'm about to share is the same one I've relied on throughout the years I've been wrenching on cars.
The idea is simple: eliminate the most common causes of the misfire first, and only then focus your attention on the fuel injector. Here's the process I follow.
- Identify the cylinder that's misfiring.
- On 1996-1999 Buick Century models, a scan tool or code reader will usually identify the affected cylinder by displaying a P0301 through P0306 trouble code.
- On 1994-1995 models, or if no cylinder-specific code is available, you'll need to identify the dead cylinder using a cylinder balance test or another diagnostic method.
- Verify that the cylinder has a good spark.
- A bad spark plug, damaged spark plug wire, or an ignition system problem can cause the exact same symptoms as a bad fuel injector.
- Before blaming the injector, make sure the cylinder is receiving a strong, consistent spark.
- This tutorial will help you get started: How To Test The Ignition Coil Packs (1994-2005 3.1L V6 Buick Century).
- Verify that the cylinder has good compression.
- If the cylinder has little or no compression, it will misfire no matter how well the fuel injector works.
- Although it's often overlooked, the compression test is one of the most important tests you can perform when diagnosing a cylinder misfire.
- You can find the compression test explained here: How To Test Engine Compression (1994-2005 3.1L V6 Buick Century).
- Check the fuel injector's internal resistance.
- Once you've confirmed that the cylinder has spark and compression, it's time to check the injector's internal resistance using the procedures in this tutorial.
- If one injector has a resistance reading that's noticeably different from the others, remove the intake manifold plenum and test that injector directly at its two terminals. If it's outside the factory specification, you've found the cause of the misfire.
- Check the injector's ability to deliver fuel.
- An injector can have the correct resistance and still be clogged or unable to deliver the proper amount of fuel.
- If the injector passes the resistance test, the next step is to remove it and check its spray pattern and fuel delivery.
- This Ford Taurus tutorial explains how to use a DIY tool to check fuel injector flow: Fuel Injector Spray Test (1990-2007 3.0L V6 Ford Taurus, Mercury Sable).
The important thing to remember is that every step builds on the one before it. Once you've identified the misfiring cylinder, you simply verify that it has the three things every cylinder needs to produce power: spark, compression, and fuel.
If the cylinder has good spark and good compression, then it's time to focus on the fuel injector. If the injector passes both its resistance test and its spray pattern test, you can confidently rule it out and continue looking elsewhere.
Following this step-by-step approach takes the guesswork out of diagnosing a cylinder misfire. Instead of replacing parts hoping to get lucky, you'll know exactly what's causing the problem before you spend a dime on repairs.
More 3.1L V6 Buick Century Diagnostic Tutorials
You can find a complete list of 3.1L V6 Buick Century diagnostic tutorials and wiring diagrams here:
Here's a list of articles you'll find there:
- How To Test The Fuel Pump (1994-2005 3.1L V6 Buick Century).
- How To Test The Ignition Coil Packs (1994-2005 3.1L V6 Buick Century).
- How To Test The TPS With A Multimeter (1997-2005 3.1L V6 Buick Century).
- How To Test Engine Compression (1994-2005 3.1L V6 Buick Century).

If this info saved the day, buy me a beer!
