TEST 8: Checking The IC Activation Signals

If you've reached this point, you have confirmed:
- None of the spark plug wires sparked (TEST 1).
- The ignition coil pack is getting 12 Volts (TEST 4).
In this section, we're gonna confirm the presence of the activation signals ignition coils 1, 2, and 3 with a 12 Volt automotive test light (non-powered test light).
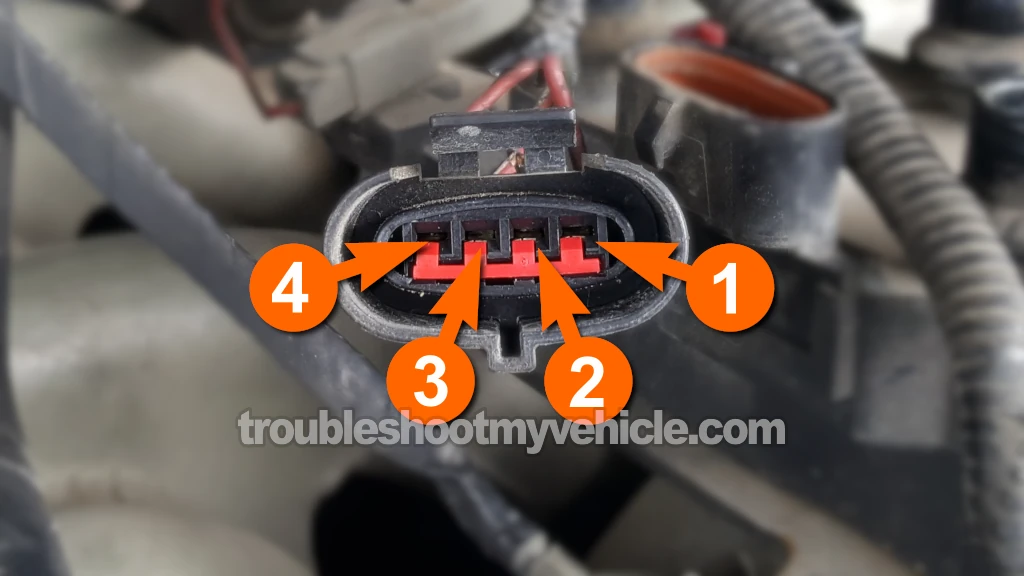
Here's the ignition coil's connector pinout:
- Terminal 2: DK BLU/LT GRN wire - IC activation signal cylinders 1 and 5.
- Terminal 3: PNK/WHT wire - IC signal activation cylinders 2 and 6.
- Terminal 4: RED/LT BLU - IC signal activation cylinders 3 and 4.
IMPORTANT: Be careful not to damage the female terminal or the connector with your 12V test light's probing tip. If the terminal or the connector get damaged, you'll need to replace the connector.
CAUTION: This test has to be performed with the engine cranking. Be careful and take all necessary safety precautions.
Alright, let's start:
- 1
Disconnect the ignition coil (IC) from its 4-wire electrical connector.
- 2
Connect the 12V test light's alligator clip to the battery positive (+) post.
- 3
With the test light's probing tip, gently probe terminal number 2.
- 4
Have your helper crank the engine.
- 5
The 12V test light should flash ON and OFF the whole time the engine is cranking.
- 6
Repeat steps 2 thru 5 on female terminals 3 and 4.
Let's find out what your test result means:
CASE 1: The 12V test light flashed ON and OFF the whole time the engine was cranking on each terminal. With this test result you can conclude that the PCM is providing the activation signals for all three ignition coils (within the coil pack).
You can conclude that the ignition coil pack is bad if you have:
- Confirmed that all six spark plug wires are not sparking (TEST 1).
- Confirmed that the ignition coil is getting power (TEST 4).
- Confirmed that the ignition coil pack is receiving all three IC activation signals (this test section).
CASE 2: The 12V test light did not flash on and off at any of the terminals while the engine was cranking. This test result usually means that the crankshaft position (CKP) sensor.
Your next step is to test the CKP sensor:
Other Things That Can Cause A Misfire

Quite a few other things, besides a bad ignition coil, can cause the engine in your Ford van to misfire. If all of your test indicate the ignition coil is not causing the misfire issue, here are a couple of suggestions that might help:
- Inspect the inside of the spark plug wire boots and the ceramic insulator of the spark plug for carbon tracks
- The the orange arrows in the photo above point to what carbon tracks look like.
- Replace the components as affected with carbon tracks.
- Engine compression test.
- One of the most overlooked diagnostic tests to find the root cause of misfire is the compression test.
- You'll need an engine compression tester of course.
- The engine between cylinders should not vary more 15%.
- How To Test Engine Compression (1997-2000 4.2L V6 Ford E150, E250).
- Fuel injector test.
- There are several methods to test them which are beyond the scope of this article, but the fastest way to test them is by checking the resistance (Ohms) value of each one and comparing them to each other.
- Any resistance that's not within the average of the others indicates the fuel injector is fried.
- You can buy a specific fuel injector tester online that activates by a predetermined pulse width and measuring the fuel pressure drop on a fuel pressure gauge.

If this info saved the day, buy me a beer!

