")
Sooner or later, the ignition coil pack is gonna fail, and when it does, you're either gonna have a misfire problem or an engine no-start issue.
Whatever of the two problems you're facing, this tutorial will help you diagnose the issue. You'll quickly find out if the issue is due to the ignition coil pack or the spark plug wires.
Contents of this tutorial:
- Symptoms Of A Bad Ignition Coil Pack.
- What Tools Do I Need To Test The Ignition Coil?
- Circuit Descriptions Of The Ignition Coil Pack.
- Ignition Coil Pack Basic Operating Theory.
- Precautions, Do's And Don'ts.
- Where To Buy The Ignition Coil And Save.
- TEST 1: Testing For Spark At The Spark Plug Wire.
- TEST 2: Testing For Spark At The Ignition Coil Pack.
- TEST 3: Testing For Spark At The Ignition Coil Pack (Paired Cylinders).
- TEST 4: Testing The Power (12 Volts) Circuit.
- TEST 5: Activation Signal For Cylinders 1 And 5.
- TEST 6: Activation Signal For Cylinders 2 And 6.
- TEST 7: Activation Signal For Cylinders 3 And 4.
- TEST 8: Checking The IC Activation Signals.
- Other Things That Can Cause A Misfire.
- More 4.2L Ford E150 And E250 Test Tutorials.
APPLIES TO: This tutorial applies to the following vehicles:
- 4.2L V6 Ford E150: 2001, 2002, 2003.
- 4.2L V6 Ford E250: 2001, 2002, 2003.
NOTE: The 1997-2000 4.2L V6 E150 and E250 vans use a different style of ignition coil pack. You can find that tutorial here:
F-Series Pickups: The tutorial for testing the ignition coil pack on the 2001-2008 4.2L V6 Ford F150 can be found here:
Symptoms Of A Bad Ignition Coil Pack
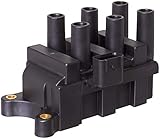
Your van's ignition coil pack is the component responsible for generating and supplying spark to all six cylinders.
Spark from the ignition coil pack's six towers is transferred to the spark plugs through spark plug wires, also known as high tension wires.
Eventually, the ignition coil or the spark plug wires will fail. When this happens, you'll notice one or more of the following symptoms:
- Misfire Codes: You'll see one or more of the following codes:
- P0300: Random Cylinder Misfire.
- P0301: Cylinder 1 Misfire.
- P0302: Cylinder 2 Misfire.
- P0303: Cylinder 3 Misfire.
- P0304: Cylinder 4 Misfire.
- P0305: Cylinder 5 Misfire.
- P0306: Cylinder 6 Misfire.
- Engine Performance Issues: You may see one or more of the following:
- The engine idles rough and wants to stall.
- When you accelerate the van, it has no power.
- Bad Gas Mileage: Since the engine isn't running all six cylinders, it has to work harder, thus consuming more fuel.
- Engine No-Start: The engine will crank but not start (if more than 3 ignition coil towers are not firing spark).
- Rotten egg smell: You'll notice a rotten egg smell coming out of the tailpipe from the unburned fuel overloading the catalytic converter.
What Tools Do I Need To Test The Ignition Coil?
One advantage we've got going, when testing the ignition coil pack, is that we don't need expensive diagnostic equipment. You'll need a few items, but nothing that'll break the bank:
- A multimeter: The multimeter will help you check that the ignition coil is getting power.
- A 12 Volt automotive test light: We'll use the test light to check for the ignition coil activation signals while cranking the engine.
- A spark tester: This the most critical tool to have and use to check the condition of the ignition coil pack. Any spark tester will do. The one I use and recommend is the OTC 6589 Spark Tester and you can buy it here:
- OTC 6589 Electronic Ignition Spark Tester (at: amazon.com).
- Battery jump start cables: We'll be using a battery jump start cable to Ground the spark tester.
- Spark plug wire pullers: This tool will help you remove the spark plug wires from the spark plugs and help you avoid the very common hassle of having the spark plug wire's metal terminal stay stuck on the spark plug.
You'll also need someone to turn the key and crank the engine while you observe the spark tester.
It's important to note that to diagnose a bad ignition coil pack on your Ford van, a spark tester is 'must have' tool. Using the wrong tool or method can lead to incorrect diagnostic conclusions, and this will have you wasting both time and money.
Circuit Descriptions Of The Ignition Coil Pack
The ignition coil pack connector has four male spade terminals, while its 4-wire connector has four female terminals.
Each terminal or wire has a specific function. Here’s a brief overview of these four circuits:
| Terminal | Wire | Description |
|---|---|---|
| 1 | Dark blue with light green stripe (DK BLU/LT GRN) | IC Activation Signal Cylinders 1 & 5 |
| 2 | Pink with white stripe (PNK/WHT) | IC Activation Signal Cylinders 2 & 6 |
| 3 | Red with light blue stripe (RED/LT BLU) | IC Activation Signal Cylinders 3 & 4 |
| 4 | Red with light green stripe (RED/LT GRN) | 12 Volts (in START/RUN) |
Ignition Coil Pack Basic Operating Theory
To be able to effectively troubleshoot the ignition coil pack as good or bad, it's essential to understand that it consists of three ignition coils. Each of these coils fires sparks to two cylinders at the same time (this is known as the Waste Spark Method).
The component that controls when the ignition coil pack fires spark to the engine's six spark plugs is your van's fuel injection computer.
Here's a brief explanation of what happens when you turn the key to crank and start the engine:
- The ignition coil pack gets power in the form of 12 Volts.
- These 12 Volts get fed to each of the three individual ignition coils that make up the coil pack.
- These 12 Volts are known as the ignition coil's primary current.
- The engine starts to crank, inducing the crankshaft position (CKP) sensor to start producing and sending its CKP signal to the PCM.
- Once the PCM receives the CKP signal (along with other necessary sensor information), it starts to switch each ignition coil's primary current ON and OFF.
- This switching ON and OFF the primary current (by the PCM) is accomplished by interrupting its Ground path.
- This turning ON and OFF of the primary current is what that makes the ignition coil fire spark and is what I refer to as the ignition coil's activation signal.
- Each ignition coil within the coil pack gets its own activation signal from the PCM.
- As each ignition coil, within the ignition coil pack, gets its activation signal, it fires spark to two 'paired cylinders' at the exact same time (in what's known as the Waste Spark method).
- Cylinders 1 and 5 get spark simultaneously from coil 1.
- Cylinders 2 and 6 get spark simultaneously from coil 3.
- Cylinders 3 and 4 get spark simultaneously from coil 2.
Although you don't need to memorize all of these details, the most important thing you do need to know (to successfully test the ignition coil pack) is that the two cylinders that get spark at exact same time are known as 'paired cylinders'.
These are the paired cylinders:
- Cylinders 1 and 5.
- Cylinders 2 and 6.
- Cylinders 3 and 4.
Precautions, Do's And Don'ts
Testing the ignition coil pack isn't hard, but life can get more complicated than necessary if you don't take a few precautions.
Most of the tests I'll show you require the engine to be cranked to check for spark or an ignition coil activation signal. So, be alert and keep your fingers, hands, and tools away from any moving engine parts (like pulleys, the serpentine belt, and fan blades).
Here are a few tips and suggestions:
- Use A Spark Tester: This is the safest way to check for spark and the only method that'll give you an accurate test result. Here are a couple of other tips/suggestions:
- Don't use a regular spark plug instead of a spark tester to test for spark.
- Don't remove the spark plug wire from the spark plug or the ignition coil while the engine is cranking to check for spark.
- Use Spark Plug Wire Pullers: Use a spark plug wire puller to disconnect the spark plug wire (high tension wire) from the spark plug. This tool will save you a lot of grief!!
- Start Your Diagnostic From TEST 1: Don't skip around from test to test unless instructed to do so by the TEST you're currently on.
- Use The Correct Tool: Use the recommended/indicated tools for all of your tests.
Where To Buy The Ignition Coil And Save
The following links are all to parts of well known automotive brands:


Disclosure: As an Amazon Associate, I earn from qualifying purchases. If my tutorials help you, using these links is an easy way to support the site at no extra cost to you. Thank you!
NOTE: Not sure if the ignition coil pack fits your particular Ford pickup? Don't worry. Once you get to the site, they'll make sure it fit by asking you the details of you specific vehicle. If it doesn't fit, they'll find you the right one.
TEST 1: Testing For Spark At The Spark Plug Wire
")
Alright, to get this show on the road, we’ll check if each of the six spark plug wires is sparking. To do this, we'll disconnect the spark plug wire from its spark plug and connect a spark tester to it.
One important thing I want to let you know is that removing the spark plug wire without a spark plug wire puller can damage the wire. Specifically, what happens is that the metal terminal inside the wire can stay stuck on the spark plug.
If the terminal stays stuck, you’ll have to reattach it to the wire, which is a hassle. In some cases, you might even need to replace the entire wire set if reattaching isn’t possible or practical.
I'm not saying you need to buy a spark plug wire puller right away, just letting you know that using one can prevent this very common problem that happens when pulling the spark plug wire off of the spark plug.
One last thing before we start, use a spark tester -any spark tester will do. I recommend the HEI spark tester for its accuracy and ease of use. You don't have to adjust it or interpret the color of the spark, making the process simple. You can see it and buy it here: OTC 6589 Electronic Ignition Spark Tester (at: amazon.com).
These are the test steps:
- 1
Remove the spark plug wire (high tension cable) from the spark plug.
- 2
Attach your spark tester to high tension wire.
- 3
Connect the spark tester to the battery negative (-) terminal with a battery jump start cable.
- 4
Have your helper crank the vehicle as you stand at a safe distance from the engine.
The engine may or may not start, either way be careful. - 5
As the vehicle cranks or starts, observe the spark tester.
- 6
You're gonna get one of two results: Spark or NO spark.
- 7
Now repeat this test on the other spark plug wires.
IMPORTANT: Read the following options carefully to interpret your NO SPARK result or results. Remember that some cylinders get spark from the same ignition coil within the coil pack (since the coil pack is made up of 3 individual ignition coils that have two towers each). So if you get a NO SPARK result from two spark plug wires, you need to verify if they're from paired cylinders or from unpaired cylinders.
CASE 1: You got spark from all six spark plug wires. This tells you that the ignition coil pack and spark plug wires are OK. The cause of your misfire condition isn't due to a bad ignition coil pack. Go to: Other Things That Can Cause A Misfire to see further tips and suggestions.
CASE 2: You got NO spark from only one spark plug wire. The next step is to check for spark directly on the coil pack tower that feeds that spark plug wire with spark. Go to: TEST 2: Testing For Spark At The Ignition Coil Pack.
CASE 3: You got NO spark from the spark plug wires that connect to spark plugs for paired cylinders 1 & 5. The next step is check for spark directly on both towers (one at a time of course).
For this test go to: TEST 3: Testing For Spark At The Ignition Coil Pack.
CASE 4: You got NO spark from the spark plug wires that connect to spark plugs for paired cylinders 2 & 6. The next step is check for spark directly on both towers (one at a time of course).
For this test go to: TEST 3: Testing For Spark At The Ignition Coil Pack.
CASE 5: You got NO spark from the spark plug wires that connect to spark plugs for paired cylinders 3 & 4. The next step is check for spark directly on both towers (one at a time of course).
For this test go to: TEST 3: Testing For Spark At The Ignition Coil Pack.
CASE 6: You got NO spark from two spark plug wires and they DO NOT connect to paired cylinders. The next step is to test each coil pack tower directly for spark one at a time.
For this test go to: TEST 2: Testing For Spark At The Ignition Coil Pack.
CASE 7: You got NO spark from none of the spark plug wires. This usually indicates that power is missing from the power circuit or that the crankshaft position sensor is bad.
To find out, go to: TEST 4: Testing The Power (12 Volts) Circuit.