The intake air temp (IAT) sensor is one of the easiest sensors to test on your 3.9L V6 Dodge Ram pickup.
You just need a multimeter —no scan tool needed. You're probably gonna be surprised at how simple it is to check if it's working or not.
I'll walk you through the steps to test it. I'll also go over a few common problems that set off an IAT sensor code (P0112 or P0113).
NOTE: The intake air temp (IAT) sensor is also called the air charge temp (ACT) sensor.
Contents of this tutorial:
- Symptoms Of A Bad Intake Air Temperature (IAT) Sensor.
- What Does The Intake Air Temperature (IAT) Sensor Do?
- Common Intake Air Temperature (IAT) Sensor Problems.
- Quick Checks Before Testing The IAT Sensor.
- Where To Buy The IAT Sensor And Connector.
- Checking Temperature To Resistance Value Relationship.
- More 3.9L V6 Dodge Ram Pickup Tutorials.
APPLIES TO: This tutorial applies to the following vehicles:
- 3.9L V6 Dodge Ram 1500 Pickup: 1998, 1999, 2000, 2001.
- 3.9L V6 Dodge Ram 2500 Pickup: 1998, 1999, 2000, 2001.
Symptoms Of A Bad Intake Air Temperature (IAT) Sensor
When the IAT sensor goes bad, the PCM throws an IAT-related trouble code —and yup, that check engine light's gonna come on. You'll usually see one of these:
- P0112: Intake Air Temp (IAT) Sensor Voltage Low.
- P0113: Intake Air Temp (IAT) Sensor Voltage High.
But a bad IAT sensor doesn't stop at lighting up the check engine light (CEL). It messes with how the engine runs in a bunch of ways:
- Hard starts: When the sensor feeds in the wrong air temp —especially in extreme heat or cold— your engine's gonna have a hard time starting.
- No power: Feels like the engine's got no muscle.
- Rough idle: It might shake and run rough. You'll notice it most when you're in Drive and idling (like when waiting for the light to change).
- Engine stalling: It can cut out on you. Could happen while the engine is just idling or right as you hit the gas.
- No-start: Sometimes, the engine just cranks but doesn't start.
- Bad gas mileage: With the PCM dumping in extra fuel, you're gonna burn through gas faster than usual.
What Does The Intake Air Temperature (IAT) Sensor Do?
The IAT sensor's a thermistor. That means it's a resistor that changes resistance depending on the air temp it's exposed to. Its job is to tell the PCM how warm or cold the engine's incoming air is.
The PCM sends out 5 Volts to the sensor. As the air gets hotter or colder, the sensor's resistance changes, which alters the voltage signal going back to the PCM.
The computer tracks that voltage change and compares it to internal data to figure out the real air temp entering the engine.
Now, your 3.9L V6 Dodge Ram pickup uses a speed-density fuel system —not one based on a MAF sensor. That means it doesn't measure air flow directly. It calculates it.
To pull that off, the PCM relies on three main sensors. With that info, it knows exactly how much fuel to inject.
Here's what it looks at:
- Engine RPM from the crankshaft position (CKP) sensor.
- Intake manifold pressure from the MAP sensor.
- Air temperature from the IAT sensor.
In a nutshell, the PCM uses data from the IAT, MAP, and CKP sensors to manage the air/fuel mixture, tweak ignition timing, and keep your Dodge Ram's engine running smooth.
Common Intake Air Temperature (IAT) Sensor Problems
Sooner or later, the IAT sensor is gonna wear. Here are the most common types of failure:
- General wear: Like any other part on your Dodge Ram pickup, the IAT sensor gets old. Eventually, it just stops working.
- Open circuit problems: The sensor suffers an internal open-circuit failure. When that happens, the PCM thinks the intake air temp is freezing —usually around -40°F.
- Short circuits: Other times, the sensor suffers a short-circuit issue. In this case, the PCM sees a super high intake air temp reading —like 248°F or even higher.
- Wire damage: The insulation on the wires near the connector can crack and peel away. Once the copper's exposed, those wires can touch and short-circuit.
- Connector damage: Even unplugging the sensor carefully can break the locking tab. That happens a lot and leads to loose or intermittent connection.
Any of these problems can feed bad data to the PCM, which ends up messing with engine performance and triggering an IAT-related diagnostic trouble code (DTC).
Quick Checks Before Testing The IAT Sensor
Before you reach for your multimeter and start the actual sensor resistance test, visually check for the following issues:
- Check the two wires coming out of the sensor's connector. See any cuts, frays, or other damage? Fix that first —it might solve everything right there.
- Next, check the connector. Make sure it's not damaged and the locking tab isn't broken/missing.
- Look at the sensor itself, especially the plastic top. That part can break off from the metal base.
Frayed wires around the connector are super common. When the insulation for some reason peels off and the copper's showing, it won't take much for the wires to touch and short out.
If they touch, the PCM sees false air temp readings (248°F or more) —and trigger the check engine light.
Here's a real-world example of that kind of wiring damage:
- IAT Sensor Wire Insulation Problem And Wires Shorted Together (from easyautodiagnostics.com).
You've got a couple ways to fix frayed wires:
- If the damage is bad or it's right by the connector, it's best to replace the whole connector.
- If it's just a small section and farther away from the connector, wrapping it up with electrical tape can work for now.
NOTE: Electrical tape isn't a long-term solution. Whether the damage is minor or major, replacing the connector or wiring is the right move if you want a permanent fix.
Where To Buy The IAT Sensor And Connector
Disclosure: As an Amazon Associate, I earn from qualifying purchases. If my tutorials help you, using these links is an easy way to support the site at no extra cost to you. Thank you!
Checking Temperature To Resistance Value Relationship
As I already mentioned, the IAT sensor changes its resistance based on the temp of the air hitting it —specifically the air flowing through your intake manifold.
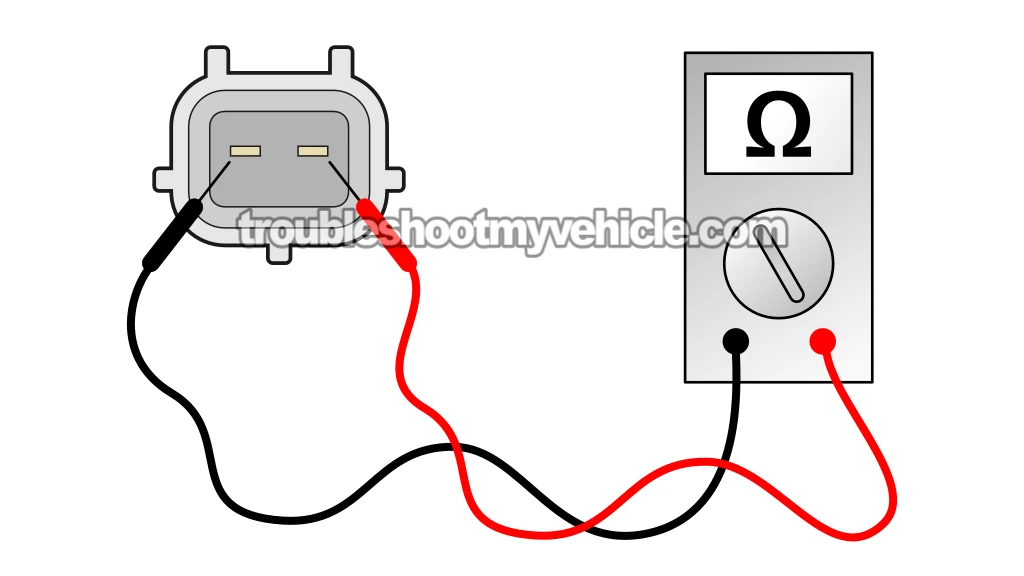
You can check that resistance easily using a multimeter set to Ohms. The reading you get should line up with the current air temperature around you (see the Temp-To-Resistance Chart above).
A working sensor will show a resistance value that's close to the ambient temp on the chart —usually within about 10 degrees of whatever it is outside.
If the sensor's toast, your multimeter will show one of these:
- Open circuit: The screen says "OL" —that means "over limit" (infinite resistance) and confirms a break in the sensor's internal circuit.
- Short circuit: If the display reads "0 Ohms", the sensor's shorted out internally and confirms it's bad.
IMPORTANT: For the most accurate result, the sensor needs to be cold (whatever ambient temp is around you). If the engine's been running, give it time to cool off all the way before you test its resistance.
Alright, let's get going:
- 1
Check the current outside temperature.
Pull up the weather on your phone or check a nearby thermometer. You'll use this to match up with the resistance reading from the multimeter. - 2
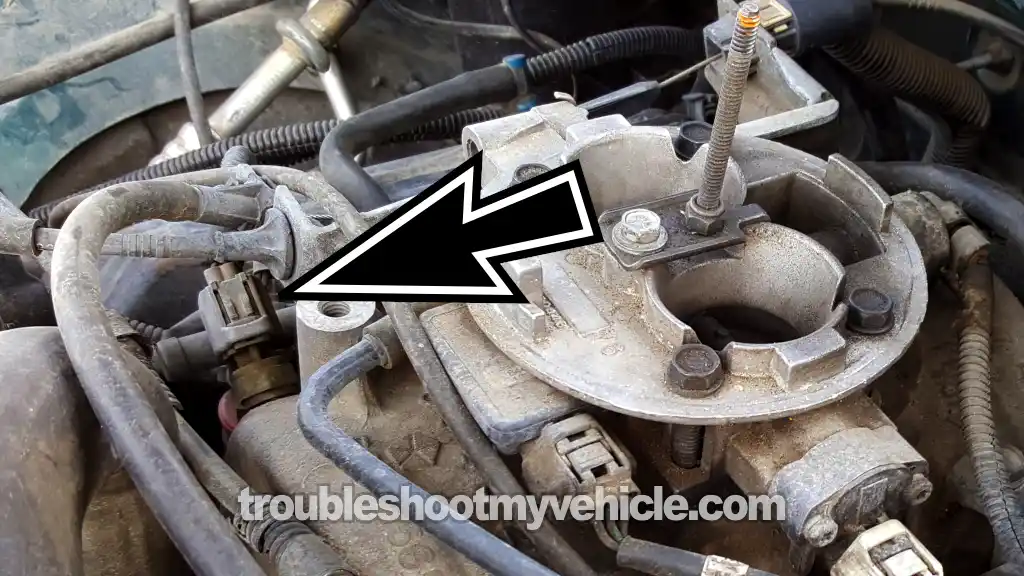
Find the IAT sensor and disconnect it from its 2-wire connector.
LOCATION: Look near the front of the intake manifold, passenger side of the engine. (Photo 4 in the image viewer shows exactly where). - 3
OPTIONAL: Remove the sensor from the manifold. Be careful, it kinda breaks easily.
NOTE: You can test it in place, but if pulling it out makes things easier, go ahead. - 4
Set your multimeter to Ohms (Ω) mode.
- 5
Measure the resistance by placing the multimeter probes on the sensor's two male terminals.
- 6
Write down the resistance value that shows up on your multimeter.
- 7
Compare your number to the Temperature-To-Resistance Chart (see the image viewer above).
The resistance should fall within about ±10°F of your outside temp.
This is what your results mean:
CASE 1: The resistance doesn't match what it should be based on the current temp. That means the sensor's not working right. Time to replace it.
CASE 2: The resistance lines up with the expected range for your local temp. Good news —your sensor's working fine. No replacement needed.
More 3.9L V6 Dodge Ram Pickup Tutorials
You can find a complete list of tutorials for the 3.9L V6 Dodge Ram Pickup in this index:
Here's a sample of the tutorials you'll find in the index:
- Testing The Front Oxygen Sensor's Performance (1996-2001 3.9L V6 Dodge Ram Pickup).
- How To Test The Fuel Pump (1992-2001 3.9L V6 Dodge Ram Pickup).
- How To Test The TPS (1997-2001 3.9L V6 Dodge Ram Pickup).
- How To Test The Engine Compression (1989-2001 3.9L V6 Dodge Ram Pickup).

If this info saved the day, buy me a beer!


