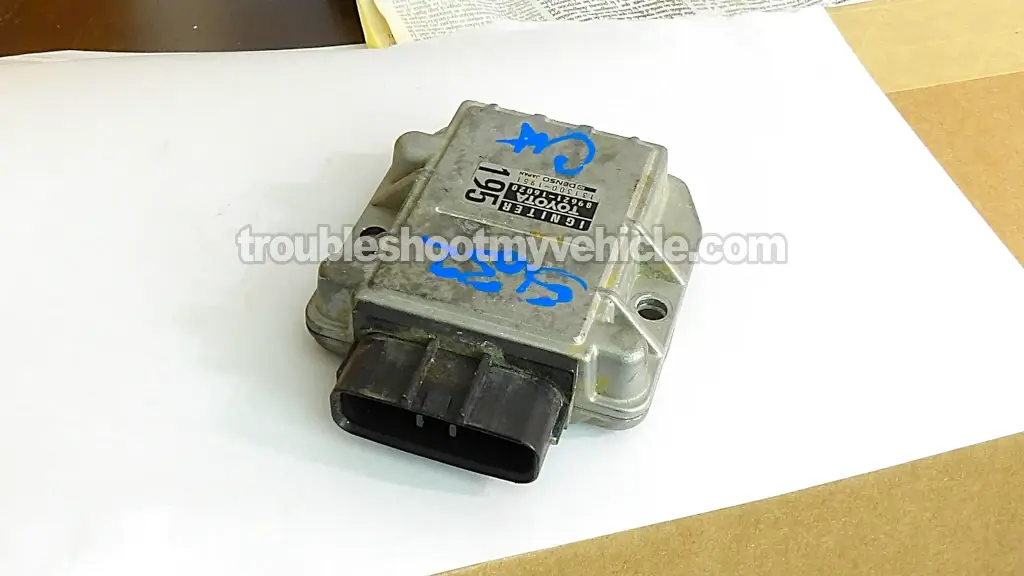
When the igniter (ignition control module) on your 1992-1995 2.2L Toyota Camry fails, the engine is not gonna' start due a lack of spark.
In this tutorial, I'm gonna' explain how to test the igniter (ignition control module) and the two crankshaft positions sensors inside the distributor.
You don't need any exotic or expensive diagnostic test equipment to follow the test steps in this tutorial.
Contents of this tutorial:
- Symptoms Of A Bad Igniter.
- Test The Ignition Coil First.
- Igniter Circuit Descriptions.
- Where To Buy The Igniter (Ignition Control Module).
- TEST 1: Making Sure The Igniter Is Getting Power.
- TEST 2: Making Sure The Igniter Is Getting Ground.
- TEST 3: Testing The Igniter Control Signal.
- TEST 4: Testing Camshaft Position Sensor 1.
- TEST 5: Testing Camshaft Position Sensor 2.
- More 2.2L Toyota Tutorials.
ES ![]() You can find this tutorial in Spanish here: Cómo Probar El Módulo De Encendido 1992-1995 2.2L Toyota Camry (at: autotecnico-online.com).
You can find this tutorial in Spanish here: Cómo Probar El Módulo De Encendido 1992-1995 2.2L Toyota Camry (at: autotecnico-online.com).
APPLIES TO: This tutorial applies to the following vehicles:
- 2.2L Toyota Camry: 1992, 1993, 1994, 1995.
Symptoms Of A Bad Igniter
The igniter (which is another name for the ignition control module) is the component that activates the ignition coil to start sparking away. When this bad boy fails, your Toyota Camry is not gonna' start due to a lack of spark (at all four cylinders).
What gives away the igniter as defective, when testing it, is the fact that it's getting battery power, Ground, and the igniter control signal from the fuel injection computer but it does not activate the ignition coil.
Test The Ignition Coil First
Before you start your igniter diagnostic, you should first test the ignition coil and see if it's sparking (or not) and see if it's being activated by the igniter (or not).
In other words, if the ignition coil is getting the ignition control signal from the igniter (even thought the car doesn't start), then the igniter is functioning correctly and not behind your Camry's no-start condition.
Testing the ignition coil is not hard at all and I've written a 'how to' test the 1992-1995 2.2L Toyota Camry ignition coil tutorial that'll help you do it. You can find it here: How To Test The Ignition Coil (1992-1995 2.2L Toyota Camry)
Igniter Circuit Descriptions

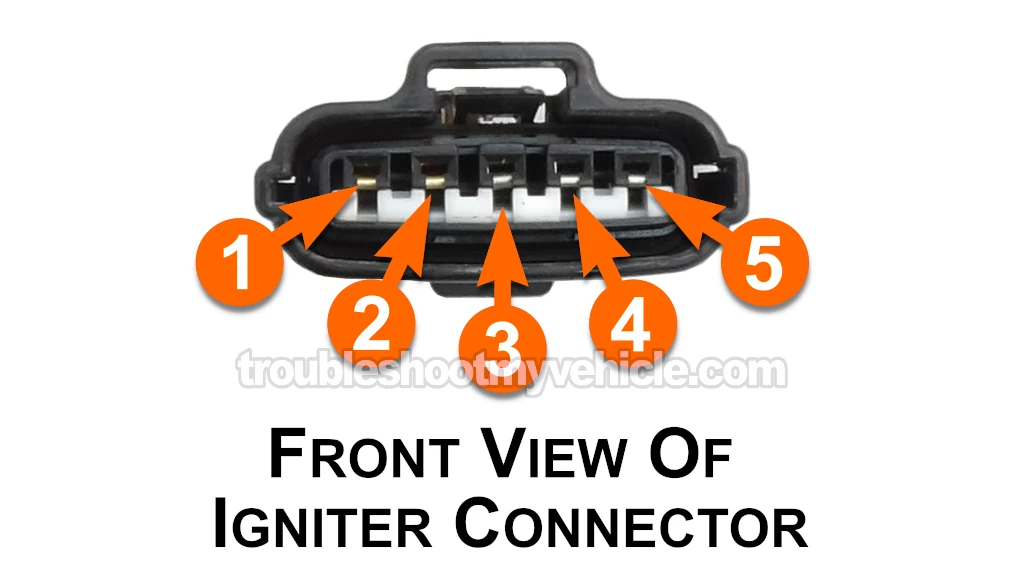
The Igniter (ignition control module) has 5 wires coming out of its connector. Each one has a specific job to do and here's a brief description of each:
NOTE: To further help you in your diagnostic tests, you can find the 1992-1995 2.2L Toyota Camry ignition system wiring diagram here: Ignition System Wiring Diagram 1994 2.2L Toyota Camry.
| 1992-1995 2.2L Camry igniter Connector | ||
|---|---|---|
| Pin | Wire Color | Description |
| 1 | White with red stripe | IGF -Ignition coil firing feedback signal |
| 2 | White | IGT -igniter control signal |
| 3 | White with red stripe | Bat + -Battery power |
| 4 | Black | IG- -Tachometer signal |
| 5 | Light green | IGC -Ignition coil control signal |
NOTE: The Igniter harness connector has female metal terminals. You'll need to use a back probe or a wiring piercing probe to test the signals in the wires.
Where To Buy The Igniter (Ignition Control Module)
Yup, this bad boy is very expensive. Check out the following links and comparison shop:
Disclosure: As an Amazon Associate, I earn from qualifying purchases. If my tutorials help you, using these links is an easy way to support the site at no extra cost to you. Thank you!
TEST 1: Making Sure The Igniter Is Getting Power

The first thing we need to do is to make sure that the igniter (ignition control module) is getting power.
The wire feeds the igniter with battery power is the white with red stripe (WHT/RED) wire of the igniter harness connector.
The WHT/RED wire connects to female terminal labeled with the number 3 in the image above.
IMPORTANT: Remember, it's important that you have verified that the ignition coil IS NOT sparking and that it IS NOT getting the IGC signal. You can do this with the help of this tutorial: How To Test The Ignition Coil (1992-1995 2.2L Toyota Camry).
Let's get started:
- 1
Connect the red multimeter test lead to the WHT/RED wire of the igniter's electrical connector. This is the wire that connects to female terminal number 3 in the image above (of the igniter's harness connector).
- 2
Connect the black multimeter test lead to the battery negative (-) terminal.
- 3
Have your helper turn the key to the ON position.
- 4
Your multimeter should read 10 to 12 Volts DC if the igniter is getting battery power.
Let's take a look at what your test results mean:
CASE 1: The igniter is getting 10 to 12 Volts DC. This is the correct and expected test result. The next step is to make sure the igniter is getting Ground. For this step, go to: TEST 2: Making Sure The Igniter Is Getting Ground.
CASE 2: The igniter IS NOT getting battery power. This tells you that the igniter is not working due to a lack of battery power.
Your next step is to find out why this battery power is missing and restore it. Once battery power is restored, the igniter should function again.


