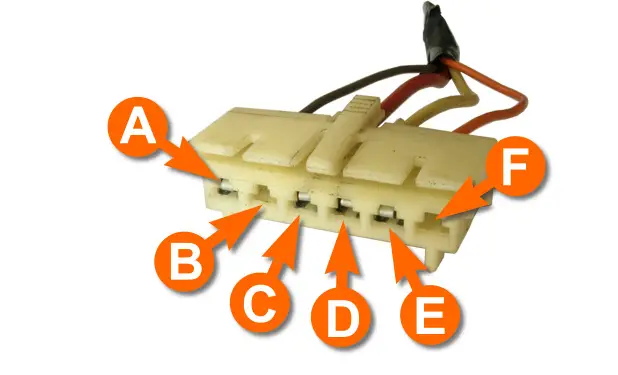
TEST 5: Jumpering The Headlight Circuit

In TEST 3, you checked the headlight circuit inside of the headlight switch itself with your multimeter in Ohms mode.
In this test section, you'll jumper the headlight circuit of the headlight switch connector to see if the headlights come On.
You'll need to use a small jumper wire to connect the circuits labeled with the letter C and the letter D of the headlight connector.
The most important thing to keep in mind when using a jumper wire is:
- Never use something that will permanently open up the metal female terminal inside the connector.
The circuits that you'll need to measure are the ones labeled with the letter C and the letter D.
If you'll recall, the circuit with the letter C is the one that provides 10 to 12 Volts from a fusible link in the engine compartment. Circuit D is the one that delivers the this battery power to the headlights (via the hi-low beam dimmer switch).
This is what you'll need to do:
- 1
Remove the headlight switch and disconnect it from its electrical connector.
- 2
Connect a jumper wire between the headlight switch connector terminals C and D.
- 3
The headlights should come on as soon as the jumper wire is in place.
Let's examine your test results:
CASE 1: The headlights came ON. This tells you that the headlight circuit (between the headlight connector and the headlights) is OK.
So, if TEST 3 confirmed that there was no continuity when you turned ON the headlights AND jumpering circuits C and D, in this test section, made the headlights come ON, then you now know beyond a shadow of a doubt that the headlight switch is bad and needs to be replaced.
If you'd like to save money on the headlight switch, take a look at the following section: Where To Buy The Headlight Switch And Save.
CASE 2: The headlights DID NOT come ON. Re-check your connections and re-test.
If your headlights still do not come ON, AND TEST 3 confirmed that the headlight switch is OK internally, then the most likely cause of the problem will be:
- A bad low-high beam headlight dimmer switch.
- An 'open-circuit' problem between the headlights' connectors and the headlight switch connector.
TEST 6: Jumpering The Park Lamps Circuit

In TEST 4, you checked and confirmed that the park lamps circuit inside of the headlight switch itself (with your multimeter in Ohms mode).
In this test section, you'll activate the parklights using a jumper wire to jumper circuits A (Brown wire) and E (Orange wire) of the headlight switch connector.
IMPORTANT: When using anything to jumper these two female terminals (of the headlight switch connector) together, you should not use something that will permanently open up the metal female terminal inside the connector.
OK, circuit E is the one that provides 10 to 12 Volts from a the park lamps fuse in the instrument panel fuse box. Circuit A is the one that delivers the this battery power to the park lamps, instrument cluster illumination, etc., once the park lights or headlights are turned ON.
This is what you'll need to do:
- 1
With the headlight switch removed and disconnected from its electrical connector
Connect a jumper wire between the headlight switch connector terminals A and E. - 2
The park lights and instrument cluster illumination should come on as soon as the jumper wire is in place.
Let's take a look at what your test result means:
CASE 1: The park lights came ON. This tells you that the parklight's circuit (between the headlight connector and the parklights) is OK.
So, if TEST 4 confirmed that there was no continuity when you turned ON the parklights and/or headlights AND jumpering circuits A and E, in this test section, made the park lights (and instrument cluster illumination) come ON, then you now know beyond a shadow of a doubt that the headlight switch is bad and needs to be replaced.
If you'd like to save money on the headlight switch, take a look at the following section: Where To Buy The Headlight Switch And Save.
CASE 2: The park lights DID NOT come on. Re-check your connections and re-test.
If your vehicle's park lights still do not come ON, and TEST 4 confirmed that the headlight switch is OK internally, then the most likely cause of the problem will be:
- An 'open-circuit' problem between the park lights' connectors and the headlight switch connector.
More GM 4.3L, 5.0L, 5.7L Tutorials
You can find a complete list of tutorial in this index: GM 4.3L, 5.0L, 5.7L Index Of Articles.
Here's a sample of the tutorials you'll find in the index:
- How To Test The Blower Resistor (1988-1993 Pickups).
- How To Test The Blower Motor (GM 4.3L, 5.0L, 5.7L).
- How Can I Tell If My 4L60-E Transmission is Bad?
- Shift Solenoid A And B Tests (GM 4.3L, 5.0L, 5.7L).
- How To Test The Engine Compression (GM 4.3L, 5.0L, 5.7L).
- How To Test The GM Distributor Mounted Ignition Module (at: easyautodiagnostics.com).

If this info saved the day, buy me a beer!

