TEST 2: Park Lamps Battery Power Circuit

If you started from TEST 1, you have confirmed that the headlight circuit is getting juice (10 to 12 Volts DC).
In this test section, you'll check and confirm that the park lights circuit is getting power. This power also comes in the form of 10 to 12 Volts DC.
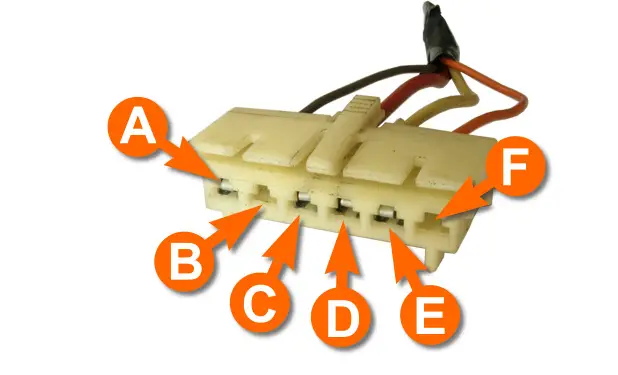
The circuit that supplies this voltage, is the one that's labeled with the letter E and is the Orange colored wire in the headlight switch's connector.
OK, this is what you'll need to do:
- 1
Disconnect the headlight switch from the its connector. Set your multimeter to Volts DC mode.
- 2
Probe the circuit labeled with the letter E shown in the photos in the image viewer with the red multimeter test lead.
Ground the black multimeter test lead. - 3
Your multimeter should register battery voltage (10 to 12 Volts).
This circuit is always hot. So it should have voltage present at all times, whether the key is in the ON position or not.
Let's take a look at what your test results mean:
CASE 1: 10 to 12 Volts did register on your multimeter. This tells you that the park lamp fuse is feeding power to the park lamp circuit of the headlight switch.
The next step is to test the park lamps circuit inside the headlight switch itself with your multimeter in Ohms mode. For this test go to: TEST 3: Checking Headlight Circuit.
CASE 2: 10 to 12 Volts DID NOT register on your multimeter. Re-check your connections and re-test.
If the multimeter still does not register 10 to 12 Volts DC, then you have found the cause of the 'no park lamps' problem on your GM pickup or SUV since without power, the headlight switch can not turn on the park lamps or the instrument cluster illumination.
Although it's beyond the scope of this test article to troubleshoot this lack of power (in this circuit), you at least now know that you need to find out why you're missing this voltage since this will solve the 'no park lights' problem on your GM vehicle.
TEST 3: Checking Headlight Circuit

OK, now it's time to find out if the headlight switch is bad or not.
In this test section we'll test the headlight circuit inside the headlight switch itself.
The test involves measuring the resistance of the circuit inside the headlight switch with your multimeter in Ohms mode.
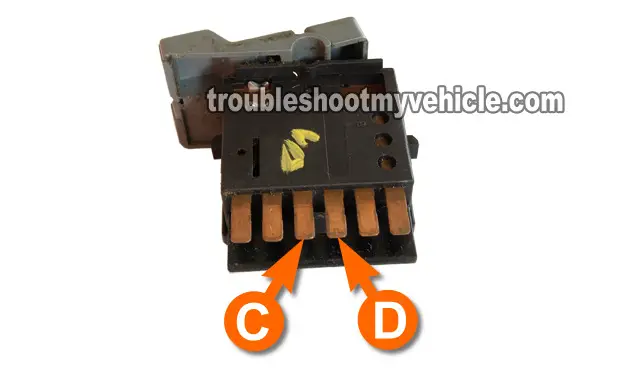
The circuits that you'll need to measure are the ones labeled with the letter C and the letter D.
This is what you'll need to do:
- 1
With the headlight switch removed and disconnected from its electrical connector.
Place your multimeter in Ohms (Ω) mode. - 2
Probe the headlight switch terminals labeled with the letter C and letter D.
It doesn't matter which multimeter test lead goes where, since the polarity doesn't matter. - 3
Turn the headlight switch to the 'headlights on' position.
- 4
If the headlight switch is OK, your multimeter will register continuity.
Your multimeter should register 0.2 to 0.9 Ohms. - 5
Now turn the headlight switch to the headlights OFF position.
Your multimeter should now show NO CONTINUITY (this is usually registered as OL on the multimeter's display). - 6
Repeat steps 4 through 6 several times.
Each time you turn on the headlights, your multimeter should register continuity.
Each time you turn off the headlights, your multimeter should register NO continuity.
Let's take a look your test results:
CASE 1: If the multimeter registered the indicated resistance (Ω). This tells you that the headlight circuit inside the headlight switch is OK.
This also means that if you have a 'no headlights' problem, then the headlight switch is not the root cause of the problem.
There's one more test, that I suggest you do. This test involves jumpering 12 Volts to the headlights from the headlight switch connector (to further confirm that you do have a bad headlight switch). For this test, go to: TEST 5: Jumpering The Headlight Circuit.
The next step is to test the park lamps circuit inside the headlight switch. For this test, go to: TEST 4: Checking The Park Lamps Circuit.
CASE 2: If the multimeter DID NOT register the indicated resistance (Ω). Re-check your connections and re-test. If your multimeter still does not register continuity in this circuit, then the headlight switch is bad and needs to be replaced.
TEST 4: Checking The Park Lamps Circuit

In this section, you'll test the park lamp circuit inside the headlight switch to see if it's bad and the cause of your vehicle's 'no parklights' condition.
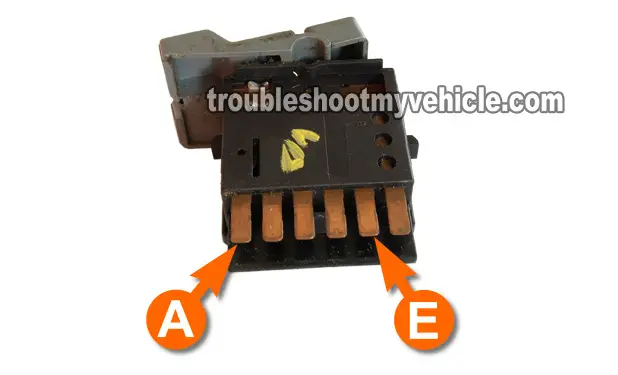
The two circuits that you'll need to test, with your multimeter in Ohms mode, are the headlight switch male spade terminals labeled with the letter A and with the letter E (see photo in the image viewer).
OK, to get this show on the road, this is what you'll need to do:
- 1
Set the multimeter in Ohms (Ω) mode.
- 2
Probe the headlight switch terminals labeled with the letter A and letter E.
It doesn't matter which multimeter test lead goes where, since the polarity doesn't matter. - 3
Turn the headlight switch to the 'park lights on' position.
- 4
If the headlight switch is OK, your multimeter will register continuity.
Your multimeter should register 0.2 to 0.9 Ohms. - 5
Now turn the headlight switch to the parklights OFF position.
Your multimeter should now show NO CONTINUITY (this is usually registered as OL on the multimeter's display). - 6
Repeat steps 4 through 6 several times.
Each time you turn on the parklights, your multimeter should register continuity.
Each time you turn off the parklights, your multimeter should register NO continuity.
Let's take a look at what your test results mean:
CASE 1: If the multimeter registered the indicated resistance (Ω). This tells you that the parklight circuit inside the headlight switch is OK.
This also means that if you have a 'no parklights' problem, then the headlight switch is not the root cause of the problem.
CASE 2: If the multimeter DID NOT register the indicated resistance (Ω). Re-check your connections and re-test. If your multimeter still does not register continuity in this circuit, then the headlight switch is bad and needs to be replaced.
There's one more test, that I suggest you do. This test involves jumpering 12 Volts to the parklights from the headlight switch connector (to further confirm that you do have a bad headlight switch). For this test, go to: TEST 6: Jumpering The Park Lamps Circuit.
