Testing the intake air temperature (IAT) sensor, which is located inside the mass air flow (MAF) sensor, can easily be done with a scan tool and/or a multimeter.
In this article, I'll show you how to test IAT sensor in a step-by-step way that will help you say that, 'Yes, it's bad' or 'No, it's not bad'.
Now, you may be wondering, why test it? Well, since it's part of the MAF sensor and the MAF sensor is not exactly cheap, it's a good idea to test it first before replacing it.
Contents of this tutorial:
- Symptoms Of A Bad IAT Sensor.
- What Tools Do I Need To Test The IAT Sensor?
- What Does The IAT Sensor Do?
- TEST 1: Checking The Intake Air Temperature Value.
- TEST 2: IAT Sensor Circuit High Voltage.
- TEST 3: IAT Sensor Circuit Low Voltage.
- TEST 4: Unplugging The IAT Sensor.
- TEST 5: Jumpering The IAT Sensor Circuits.
- TEST 6: IAT Sensor Resistance Test (P0112).
- TEST 7: IAT Sensor Resistance Test (P0113).
- TEST 8: 5 Volt Reference Circuit.
- Intake Air Temp (IAT) Temperature/Resistance Chart.
- IAT Sensor Test Summary.
- Related Test Articles.
Symptoms Of A Bad IAT Sensor
The most obvious symptom will be the check engine light (CEL) lit nice and bright on your instrument cluster. The second will be an IAT sensor malfunction diagnostic trouble code (DTC) stored in the PCM memory.
Here are some of the specific symptoms you'll see/have:
- Diagnostic Trouble Codes:
- P0112: Intake Air Temperature (IAT) Sensor Circuit Low Voltage.
- This means that the IAT sensor is reporting a temperature of 300 °F (149 °C).
- P0113: Intake Air Temperature (IAT) Sensor Circuit High Voltage.
- This means that the IAT sensor is reporting a temperature of -38 °F (-39 °C).
- P0112: Intake Air Temperature (IAT) Sensor Circuit Low Voltage.
- Bad gas mileage.
- Black smoke coming out of the tailpipe.
- Won't pass the emissions test.
What Tools Do I Need To Test The IAT Sensor?
Here's a basic list of tools you'll need:
- A multimeter.
- You'll need a multimeter to measure DC Voltage and Resistance (Ohms).
- If you need to upgrade or buy a multimeter, check out my recommendation: Buying A Digital Multimeter For Automotive Diagnostic Testing (found at: easyautodiagnostics.com).
- Scan tool.
- Although you can check the IAT sensor without a scan tool, using a scan tool with Live Data capability is the fastest and easiest way to test the IAT sensor.
- Don't have one? Check out my recommendation: Abe's Scan Tool Recommendation.
- Wire piercing probe.
- This tool makes it super easy to test the voltages inside the wires.
- If you need to see what this tool looks like, you can see it here: Wire Piercing Probe.
What Does The IAT Sensor Do?

In a nutshell, the intake air temperature (IAT) sensor helps the PCM (Powertrain Control Module = Fuel Injection Computer) make a correct measurement of the air mass that enters the engine.
The main reason why the PCM needs to know the temperature of the incoming air, is that temperature has an effect on the density of the air the engine is breathing. The denser the air, the more fuel the PCM has to inject into the engine.
Using the info provided by the MAF sensor, the PCM only gets to know the flow rate of the incoming air. With the IAT sensor, it get's to know the temperature of that incoming air and then is able to better calculate how dense that air is.
Calculating the flow rate and density of the air that the engine is breathing at any given time helps the PCM maximize everything from fuel consumption to performance.
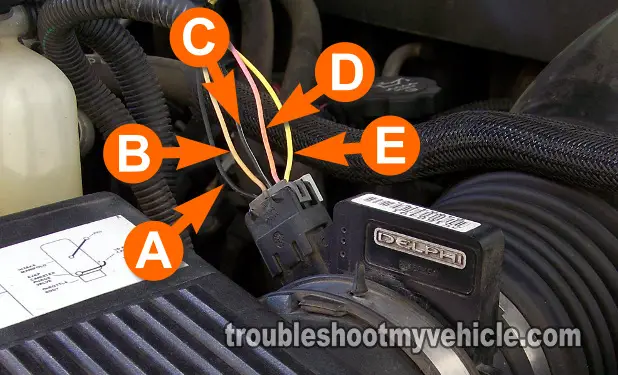
OK, these are the circuit descriptions of the mass air flow (MAF) sensor and the intake air temperature (IAT) sensor:
| MAF Sensor Connector Pin Out | ||
|---|---|---|
| Pin | Wire Color | Description |
| A | Black | IAT Sensor Low Reference (fancy name for Ground) |
| B | Tan | IAT Sensor 5 Volt Reference |
| C | Black w/ White stripe | MAF Sensor Ground |
| D | Pink | MAF Sensor Voltage |
| E | Yellow | MAF Sensor Signal |
TEST 1: Checking The Intake Air Temperature Value

The fastest and easiest way to test the intake air temperature (IAT) sensor is using a scan tool with Live Data capability.
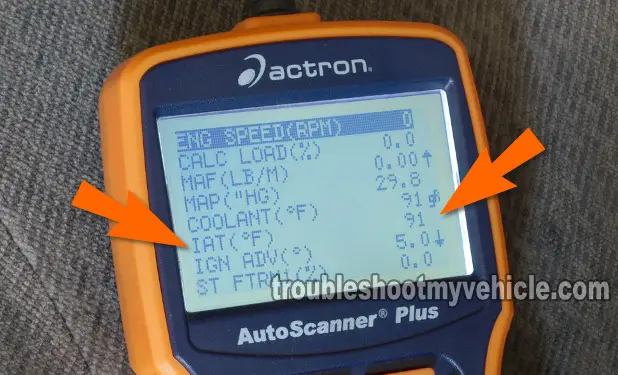
We're gonna' start out by connecting the scan tool and eye-balling what temperature the IAT sensor is outputting.
Now, it's possible to check the IAT sensor without a scan tool. How? By measuring the resistance of the IAT sensor and then comparing them to the actual ambient temperature that your pickup or SUV is in. To see the Resistance/Temperature Chart, go here: Intake Air Temp (IAT) Temperature/Resistance Chart.
If you don't have a scan tool and you need to buy one, check out my Actron CP9580 Scan Tool Review.
OK, this is what you need to do:
- Connect your scan tool to your pickup or car.
- Once the scan tool has powered up, go to its Live Data mode.
- Scroll down to the PID labeled IAT (°F)
- In case you're wondering, PID stands for: Parameter ID (ID = Identification).
- The scan tool should register a temperature that should be within ±10 °F of ambient temperature (if all is normal)
- So let's say that it's 50 °F outside, then the IAT sensor PID should register something between 40 to 60 °F.
- Now, since you're here because you have an IAT sensor diagnostic trouble code (DTC), more than likely you'll see one of the following:
- - 30 to -40 °F (that's negative 30 to 40 °F).
- OR 300 °F.
Let's interpret your test results:
CASE 1: Your scan tool shows a -30 to -40 °F reading. This confirms that there is a problem with the intake air temperature (IAT) sensor.
This test result also confirms that the diagnostic trouble code P0113 (IAT Sensor Circuit High Voltage), that was stored in the PCM's memory is telling you the truth.
The most likely cause will be that the IAT sensor circuit is 'open' somewhere inside the MAF sensor (remember the IAT sensor is part of the MAF sensor assembly).
By 'open' I mean that there's a break in one or both of the wires that feed the intake air temperature (IAT) sensor or that the IAT sensor itself is fried and causing an extremely high resistance.
The next test will help you to further narrow down the problem. Go to: TEST 2: IAT Sensor Circuit High Voltage.
CASE 2: Your scan tool shows a 300+ °F reading. This confirms that you do have a problem with the intake air temperature (IAT) sensor or its circuits.
This temperature reading also confirms that the diagnostic trouble code P0112 (IAT Sensor Circuit Low Voltage) stored in the PCM's memory is correct.
The next step is to see if the IAT sensor wires are not shorted together, go to: TEST 3: IAT Sensor Circuit Low Voltage.
CASE 3: Your scan tool shows a temperature reading that's ±10 °F of ambient temperature- This tells you that at the moment the IAT sensor and its circuits are OK.
But, since your scan tool retrieved a DTC P0112 or P0113 the problem may just be hiding at the moment, I recommend clearing the diagnostic trouble code (DTC) and road testing your vehicle to see if the code comes back.
If it does, then repeat this test once more.
