This tutorial will help you to test a bad headlight switch in step-by-step manner. Specifically, you'll be able to troubleshoot a 'no head lights' or a 'no park lights' problem to the head light switch.
Testing the headlight switch (which GM calls the headlamp switch) is a very easy affair and can be done with a multimeter and I'll show you how.
Before I continue, I want to let you know that there's one more article that may help you. This article deals with testing the low-high beam headlight dimmer switch and will help you test a 'no low beams' or a 'no high beams' problem and you can find it here: How To Test The Low-High Beam Headlight Dimmer Switch.
To help you make sure this article applies to your specific Chevrolet or GMC pickup, van, mini-van or SUV, this article will help you test the following headlight switch part #'s:
- AC Delco Part # D1530F.
- AC Delco Part # D1523H.
- AirTex, Wells Part # 1S1356.
- Standard Motor Products Part # DS876.
- Standard Motor Products Part # DS876T.
- OEM (Original Engine Management) Part # HLS31.
If this headlight switch tutorial does not apply to your GM pickup or SUV, there's one more headlight switch tutorial for 1994 and older GM pickups that you can find here: How To Test The Headlight Switch (GM 1990-1994).
Contents of this tutorial:
- Symptoms Of A Bad Headlight Switch.
- What Tools Do I Need To Test The Headlight Switch?
- Where To Buy The Headlight Switch And Save.
- Circuit Descriptions Of The Headlight Switch Connector.
- TEST 1: Checking Power (12 Volts) Headlight Circuit.
- TEST 2: Fused Jumper Wire (Headlight Circuit).
- TEST 3: Checking Power (Park Lamps Circuit).
- TEST 4: Fused Jumper Wire (Park Lamps Circuit).
- Headlight Switch Test Summary.
- More GM 4.3L, 5.0L, 5.7L Tutorials.
Symptoms Of A Bad Headlight Switch
The most common and the most obvious symptom of a bad headlight switch is that the headlights (headlamps) will not work. You'll also see:
- Park lights do not come ON.
- Instrument cluster illumination does not work.
With the help of this 'how to test' tutorial, you'll be able to say without a doubt that either the headlamp dimmer switch is bad or not.
Since the headlight switch is part of a much larger system, if the test results confirm the headlight switch is OK, then you can avoid having to waste time and money replacing it.
What Tools Do I Need To Test The Headlight Switch?
The cool thing is, is that you don't need any expensive tools to check the headlight switch yourself.
Here's a basic list of tools you'll need:
- Multimeter.
- The multimeter can either be a digital one or an analog one.
- If you need to upgrade or buy a multimeter, check out my recommendation: Tekpower TP8268 AC/DC Auto/Manual Range Digital Multimeter (Amazon affiliate link).
- A jumper wire.
- Ideally, this jumper wire should have an inline fuse attached to it.
- Now, a fused jumper is not necessary since you can use a regular wire as a jumper wire.
- Wire piercing probe.
- Although this tool is not an absolute must, if you do buy one, you'll realize just how easy it makes testing the voltages inside the wires.
- If you need to see what this tool looks like, you can see it here (this is what I use): Goupchn 4mm Banana to Banana Plug Test Leads Kit (Amazon affiliate link).
As you can see from the list above, it's nothing that's gonna' break the bank.
Where To Buy The Headlight Switch And Save
You can find the headlight switch in any auto parts store. If you're wanting the buy the original AC Delco headlight switch, you can buy it online for a whole lot cheaper than somewhere local.
The following links will help you comparison shop for the AC Delco and after market headlight switches:
Disclosure: As an Amazon Associate, I earn from qualifying purchases. If my tutorials help you, using these links is an easy way to support the site at no extra cost to you. Thank you!
Will the above headlight switch fit your particular GM pickup? Don't worry, once you get to the site they'll make sure it fits (by asking you the specifics of your particular vehicle). If it doesn't fit, they'll find you the right one.
Circuit Descriptions Of The Headlight Switch Connector

The headlamp dimmer switch has a total of 11 wires (circuits) sticking out of its connector.
Each one has a specific job to do but don't worry, we don't have to test them all to find out why the headlamps (or park lamps) are not working.
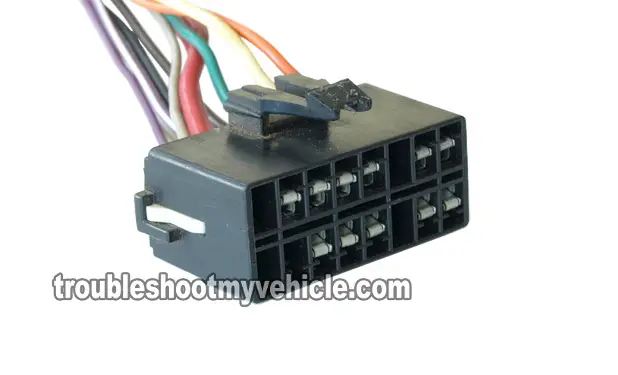
If you look closely at the headlight switch connector, you'll see that the letters A-H are molded on the top row, and that letters J-S are molded onto the bottom row. I'll be using these same letters for the circuit descriptions.
These are the circuit descriptions of the headlight and dimmer switch
| Headlight Dimmer Switch Pin outs | ||
|---|---|---|
| Pin | Wire Color | Description |
| B | Gray | Courtesy Lamp |
| C | Red | Battery Fused Feed |
| D | Pink | Ignition Fused Feed |
| E | Dark Green | Instrument Panel Lamps Dimmer Switch |
| G | Yellow | Headlamp Switch Output |
| H | Orange | Battery Fused Feed |
| L | Purple | Interior Lamp Defeat Switch |
| M | White | Courtesy Lamp |
| N | Purple w/ White Stripe | LED Dimming Signal |
| R | Black | Ground |
| S | Brown | Park Lamp Feed |
TEST 1: Checking Power (12 Volts) Headlight Circuit

This section (TEST 1 and TEST 2) will help you diagnose a 'no head lights' problem.
The very first thing we'll do is to make sure that the circuit that supplies the circuit that controls the headlights (inside the headlight switch) is getting power.
This power comes in the form of 12 Volts and they are always present (which means that even if the ignition key is removed from the ignition switch you still have power).
It's very important that you keep several things in mind when testing for these 12 Volts:
- You can probe the front to the connector, but be careful and avoid damaging the metal female terminal with the multimeter test lead.
- It's best to back probe the connector or use a wire piercing probe instead of probing the front of the headlight switch connector.
This is what you'll need to do:
- 1
Remove and unplug the headlight switch from its electrical harness connector.
- 2
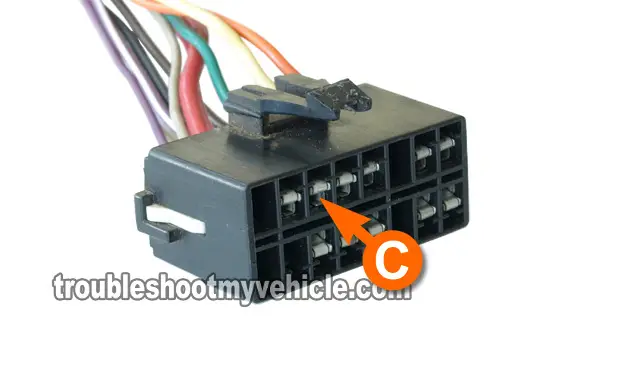
With your multimeter set it in Volts DC mode probe the wire that corresponds to the circuit C (see photo above) with the red multimeter test lead.
You can accomplish this by:- Back probing the connector.
- Using a wire piercing probe (the method I use).
- Or gently touching the multimeter probe to the front of the connector.
- 3
Ground the black multimeter test lead on a good Ground point.
NOTE: Since you're working inside the vehicle, you may not have a handy Ground point to Ground the multimeter test lead, so I suggest using a battery jump start cable to Ground the black multimeter test lead directly to the battery negative (-) terminal. - 4
Your multimeter will register one of two things: battery voltage (12 Volts) or no voltage at all.
Voltage should be present whether the key is in the ON position (in the ignition switch) or not.
Let's take a look at what your test results mean:
CASE 1: The multimeter registered 12 Volts. This is the correct and expected test result and tells you that the circuit that controls the headlights (inside the headlamp dimmer switch does have power).
The next step is bypass the headlight switch with a jumper wire and see if the headlights come on. For this test, go to: TEST 2: Fused Jumper Wire (Headlight Circuit).
CASE 2: The multimeter DID NOT register 12 Volts. Re-check your connections and re-test. If your multimeter still does not register battery voltage, then this tells you that the reason that the headlights are not coming ON when is a lack of power.
This test result also tells you that the headlight switch is not bad since without power in this circuit, it can not turn on the headlights.
TEST 2: Fused Jumper Wire (Headlight Circuit)

So far in TEST 1, you have confirmed that there's battery voltage (10 to 12 Volts DC) in circuit C (circuit C is the red wire).
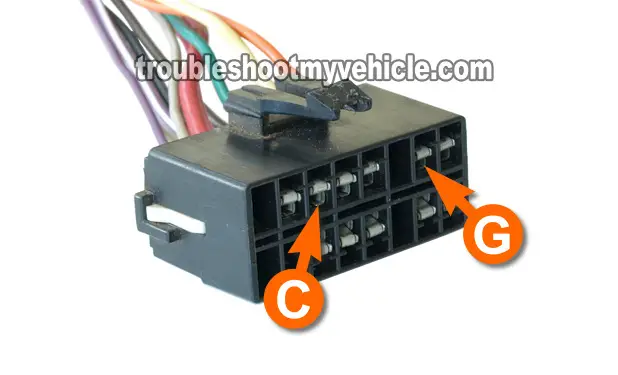
The next step now is to use a fused jumper wire to and manually jumper circuit G and circuit C together.
circuit G is the Yellow wire sticking out of the headlight switch connector.
I recommend that you make your own fused jumper wire to use in this section but you don't have to. You can use just a piece of wire.
OK, this is what you'll need to do:
- 1
Disconnect the headlight switch from its electrical harness connector.
- 2
Locate terminals C and G of the headlight switch's connector (see the image above).
- 3
Using a jumper wire, jumper terminals C and G together.
NOTE: Whatever you use to jumper these two female terminals together, be careful and do not damage them. By damage, I mean using something that will permanently open up the terminals and resulting in a false contact later with the male spade terminals of the headlight switch. - 4
The result that you should see is that the headlights should come ON.
Let's see what your test results mean:
CASE 1: The headlights came ON. This tells you that the headlight switch is bad and needs to be replaced.
Here's why:
- So far you have verified that when you turn ON the headlights (via the headlight switch), the headlights do not come ON.
- In TEST 1, you confirmed that the headlight switch is getting power in circuit C.
- In this test step, when you manually jumpered circuits C and G the headlights came ON.
Taking the 3 results above into account, they tell you beyond a shadow of a doubt that the headlight switch is bad and needs to be replaced. If you'd like to save some bucks on the headlight switch, go to: Where To Buy The Headlight Switch And Save.
CASE 2: The headlights DID NOT come ON. Re-check your connections and re-test.
If the headlights did not come ON, then you have eliminated the headlight switch as bad.
Although it's beyond the scope of this article to test for a short in the wiring between the headlight switch and the headlights, this result tells you that there is an open-circuit problem in circuit G (yellow wire).


