TEST 5: Making Sure The Ignition Coil Is Getting 12 Volts

In this test section, our focus will be making sure the ignition coil is getting the necessary 10 to 12 Volts it needs to function.
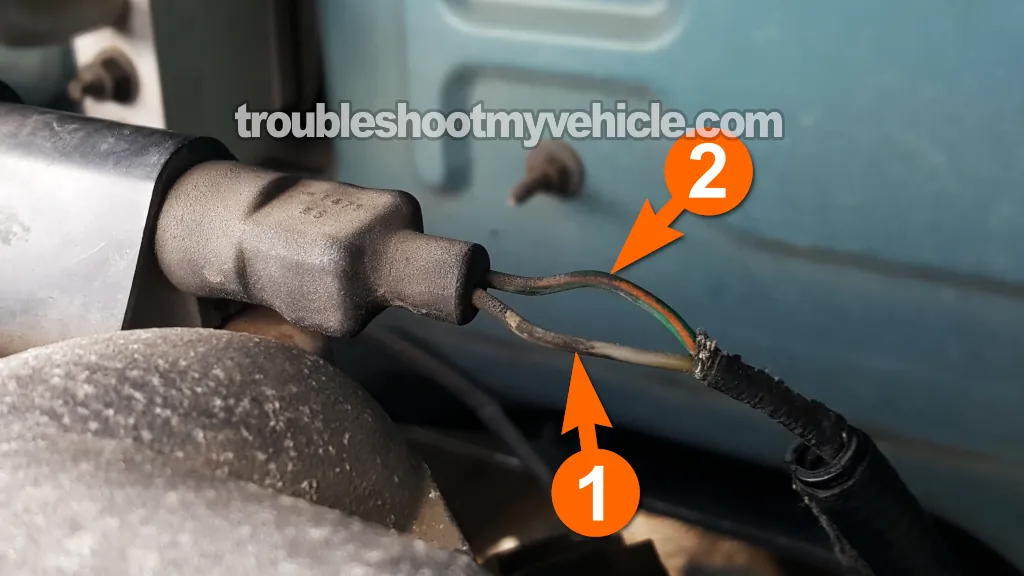
The wire responsible for supplying these 10 to 12 Volts to the coil pack is the dark green with orange stripe (DK GRN/ORG) wire of the ignition coil 2-wire connector. In the photo above, I've labeled it with the number 2.
To confirm the presence of this voltage in the DK GRN/ORG wire, we'll use a multimeter set to Volts DC mode.
NOTE: 10 to 12 Volts are available in the DK GRN/ORG wire only when the engine is cranking or is running.
Here are the steps:
- 1
Disconnect the ignition coil from its connector.
- 2
Connect the black multimeter test lead to the battery negative (-) terminal.
- 3
Place your multimeter in Volts DC mode.
- 4
Gently probe the terminal that connects to the DK GRN/ORG wire with the red multimeter test lead.
CAUTION: Be careful that the multimeter probe doesn't damage the female terminal, or you'll have to get a new connector. - 5
Have your helper crank the engine.
NOTE: This voltage must be checked with the engine cranking. - 6
You should see 10 to 12 Volts on your multimeter.
Let's take a look at what your test results mean:
CASE 1: The multimeter registered 10 to 12 Volts DC. This is the correct and expected test result.
The next step is to see if the ignition coil is getting its activation signal, go to: TEST 6: Checking The Ignition Coil's Activation Signal.
CASE 2: The multimeter DID NOT register 10 to 12 Volts DC. Re-check all of your connections and retest. If still no voltage is present, this result exonerates the ignition coil as bad. Without 10 to 12 Volts, the ignition coil will not function.
The most common cause of this missing voltage is a bad crankshaft position sensor. You can find a step-by-step test of the crankshaft position sensor here: How To Test The Crankshaft Position Sensor (1998-2000 3.0L Caravan, Grand Caravan, Voyager, Grand Voyager).
In case you're wondering what the CKP sensor has to do with these missing 12 Volts: the power supply to the ignition coil is controlled by the engine's cranking/running status. The crankshaft position sensor (CKP) plays a critical role in this process. If the CKP sensor fails, the fuel injection computer won't receive the engine RPM input it needs.
Without this RPM input, the computer figures the engine isn't cranking or running and it won't activate the Automatic Shutdown (ASD) relay. The ASD relay is responsible for supplying power to several key components, including the ignition coil. So, if the CKP sensor fails and the ASD relay does not get activated, the ignition and fuel system won't be powered up with the necessary 12 Volts and the engine is not gonna start.
TEST 6: Checking The Ignition Coil's Activation Signal

So far, your ignition system diagnostic has confirmed:
- None of the spark plugs are sparking (TEST 1).
- The ignition coil high tension wire is not sparking (TEST 3).
- The ignition coil tower is not sparking (TEST 4).
- The DK GRN/ORG wire is delivering 10 to 12 Volts (TEST 5).
In this test section, we'll check to see if the ignition coil is getting its activation signal. This activation is delivered to the ignition coil by the grey (GRY) wire of the ignition coil's 2-wire connector.
We're gonna use an LED light to check for the ignition coil's activation signal. If you don't have an LED light, you can find out more about it and where to buy one here: The LED Light Test Tool And How To Make One (at: easyautodiagnostics.com).
NOTE: In the 1999-2000 3.0L V6 mini-vans, the ignition coil activation signal wire is a grey with red stripe (GRY/RED) wire.
Let's get started:
- 1
Disconnect the ignition coil from its connector.
- 2
Insert the black lead of the LED light into the female terminal of the connector that connects to the GRY wire.
The GRY wire is the one that feeds the activation signal to the ignition coil.
NOTE: Make sure that the black lead of the LED light makes a tight connection in the female terminal. - 3
Insert the red lead of the LED light into the female terminal of the connector that connects to the DK GRN/ORG wire.
NOTE: Make sure that the red lead of the LED light makes a tight connection in the female terminal. - 4
Have your helper crank the engine while you observe the LED light.
- 5
The LED light should flash ON and OFF the whole time the engine is cranking.
Let's take a look at what your test results mean:
CASE 1: The LED light flashed ON and OFF the whole time the engine was cranking. This is the correct test result and it confirms that the fuel injection computer is providing the activation signal and the circuit is OK.
You can conclude the ignition coil is bad and needs to be replaced only if you have:
- Confirmed none of the spark plugs are sparking (TEST 1).
- Confirmed the ignition coil high tension wire is not sparking (TEST 3).
- Confirmed the ignition coil tower is not sparking (TEST 4).
- Confirmed the DK GRN/ORG wire is delivering 10 to 12 Volts (TEST 5).
- Confirmed in this test section that the ignition coil is receiving an activation signal.
CASE 2: The LED light DID NOT flash ON and OFF the whole time the engine was cranking. Without an activation signal, the ignition coil will not fire off spark to cylinders #1 and #4.
The most likely cause of this missing signal is a bad camshaft position sensor or a crankshaft position (CKP) sensor. You can find the CMP sensor test here:
CKP sensor tests here:
- How To Test The CKP Sensor (1996-1997 3.0L Caravan, Grand Caravan, Voyager, Grand Voyager)
- How To Test The Crankshaft Position Sensor (1998-2000 3.0L Caravan, Grand Caravan, Voyager, Grand Voyager)
Other Possible Misfire Causes

So, your ignition system diagnostic shows that the ignition system isn't causing the cylinder misfire you're dealing with. Well, I've got a couple of suggestions that might help.
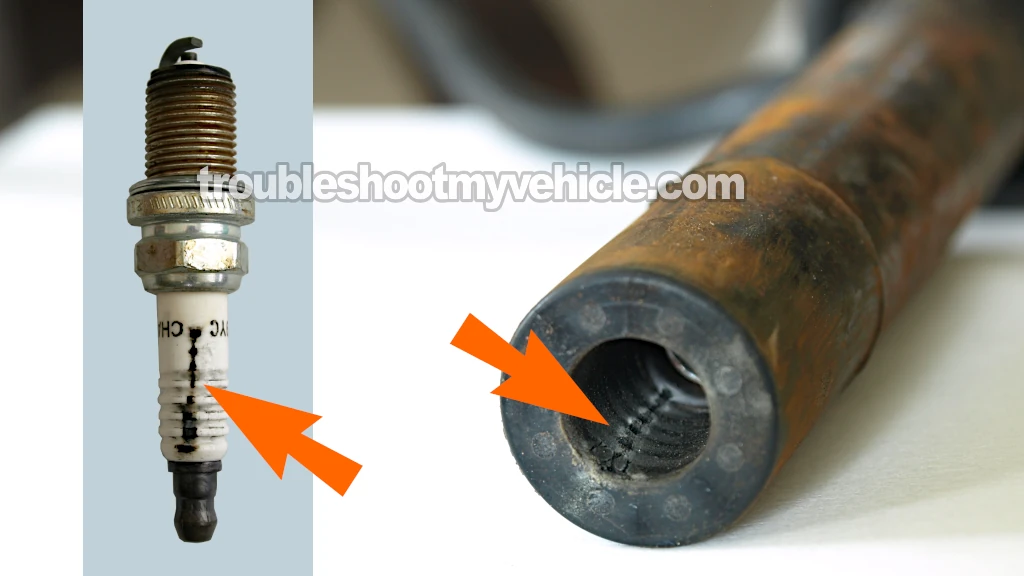
- Inspect the inside of the spark plug wire boots and remove the spark plugs to visually check their ceramic insulators for carbon tracks
- The photo above points (the orange arrows) to what carbon tracks look like.
- Replace any spark plug or spark plug wire with carbon tracks.
- The following case study on carbon tracks may come in handy: Carbon Tracks Are A Common Cause Of Ignition Misfires (at: easyautodiagnostics.com).
- Engine compression test.
- This is one of the easiest, yet most overlooked test to find the cause of a misfire condition.
- You'll need an engine compression tester of course.
- The engine compression value recorded on the compression gauge (between cylinders) should not vary more 15%.
- You can find a step-by-step compression test tutorial here: How To Test Engine Compression (1987-2000 3.0L V6 Chrysler, Dodge, Plymouth).
- Fuel injector test.
- There are several methods to test them which are beyond the scope of this article but the fastest way to test them is by checking the resistance (Ohms) value of each one with a multimeter and comparing the Ohms values to each other.
- Any resistance that's not within the average of the others indicates the fuel injector is fried. If the Ohms readings are nearly identical to each other, you can rule them out as the cause of the misfire.
- Or you can buy a specific fuel injector tester (on line) that activates the fuel injector by a predetermined pulse width in conjunction with a fuel pressure gauge that will show you the fuel pressure drop this tester will cause.

If this info saved the day, buy me a beer!

