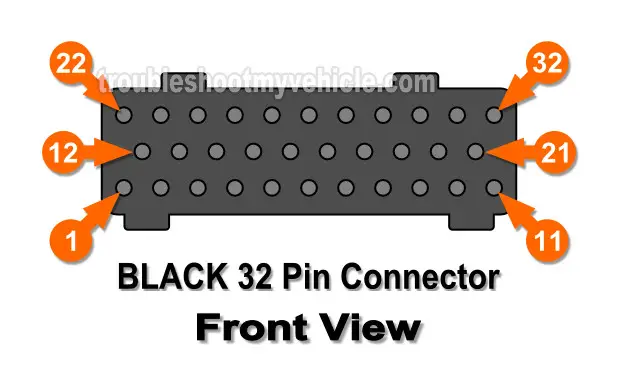
1996 PCM BLACK Connector

The PCM has 3 connectors and are color coded (black, white, and gray). Each connector has 3 rows of slots for a total of 32 slots (terminals).
IMPORTANT: The following pin out chart applies only to the 1996 Dodge Ram pickups with a 3.9L V6 engine.
ES ![]() You can find this tutorial in Spanish here: Pines De La Computadora De La Inyección Electrónica (1996 3.9L V6 Dodge Ram 1500 Pickup) (at: autotecnico-online.com).
You can find this tutorial in Spanish here: Pines De La Computadora De La Inyección Electrónica (1996 3.9L V6 Dodge Ram 1500 Pickup) (at: autotecnico-online.com).
RELATED PCM PIN OUT CHARTS:
- PCM Pin Out Chart (1994 3.9L Dodge Ram 1500 Pickup).
- PCM Pin Out Chart (1995 3.9L Dodge Ram 1500 Pickup).
| BLACK PCM 32 Pin Connector | ||
|---|---|---|
| Pin | Wire Color | Description |
| A-1 | --- | Not Used |
| A-2 | LT GRN/BLK | Ignition Power |
| A-3 | --- | Not Used |
| A-4 | BLK/LT BLU | Sensor Ground |
| A-5 | --- | Not Used |
| A-6 | BLK/WHT | Park/Neutral Position Switch (A/T Only) |
| A-7 | BLK/GRY | Ignition Coil Driver |
| A-8 | GRY/BLK | Crankshaft Position Sensor |
| A-9 | --- | Not Used |
| A-10 | YEL/BLK | Idle Air Control Motor 2 |
| A-11 | BRN/WHT | Idle Air Control Motor 3 |
| A-12 | --- | Not Used |
| A-13 | --- | Not Used |
| A-14 | --- | Not Used |
| A-15 | BLK/RED | Intake Air Temp (IAT) Sensor |
| A-16 | TAN/BLK | Engine Coolant Temp (ECT) Sensor |
| A-17 | PPL/WHT | 5 Volt Supply |
| A-18 | TAN/YEL | Camshaft Position Sensor |
| A-19 | GRY/RED | Idle Air Control Motor 1 |
| A-20 | PPL/BLK | Idle Air Control Motor 4 |
| A-21 | --- | Not Used |
| A-22 | RED/WHT | Fused B(+) |
| A-23 | ORG/DK BLU | Throttle Position Sensor (TPS) Signal |
| A-24 | BLK/DK GRN or TAN/WHT |
Pre-Cat Oxygen Sensor Input |
| A-25 | --- | Not Used |
| A-26 | BLK/DK GRN | Post-Cat Oxygen Sensor Input (L/D Trans Only) |
| A-27 | DK GRN/RED | MAP Sensor Signal |
| A-28 | --- | Not Used |
| A-29 | --- | Not Used |
| A-30 | --- | Empty |
| A-31 | BLK/TAN | Ground |
| A-32 | BLK/TAN | Ground |

Safety Precautions
Here are some very important safety precautions when testing the wires coming out of the PCM connectors.
- If one or any of the wires on your Dodge Ram DO NOT match the color stated in the pin out charts, then you should not use the pin out charts in this article. Why? Because this is the clearest indication that these ARE NOT the connector pin out charts for your particular vehicle.
- Never probe the front of the connector.
- You should use a wire piercing probe and probe the wire a few inches away from the connector.
- To see what this tool looks like: Wire Piercing Probe.
- You should use a back probe.
- You should use a wire piercing probe and probe the wire a few inches away from the connector.
- You should never disconnect any of the PCM connectors without first disconnecting the battery negative (-) terminal.
Disclaimer
I've made every effort to double and triple check the above info (and in the next couple of pages) and I've used the best sources to compile it but nothing in life is perfect. I don't have a staff of proof readers or editors, I'm just a little guy typing this stuff up in my spare time to help and give back to the Do-It-Yourself community. So without further ado, here's my disclaimer:
© copyright Abraham Torres-Arredondo: This information is distributed in the hope that it will be useful, but WITHOUT ANY WARRANTY; without even the implied warranty of MERCHANTABILITY or FITNESS FOR A PARTICULAR PURPOSE.
If you do spot errors, please let me know. You can use the contact form at the end of the article.
