A compression test can help you to nail down a hard to find misfire condition, since it's one of the most overlooked tests when diagnosing a rough idle or misfire condition.
The compression test will also let you know just how healthy (mechanically) the engine is on your Nissan 3.0L, 3.3L, 3.5L car, pick up, SUV or mini-van.
This article will walk you thru' the engine compression test and more importantly, I'll show you how to interpret the results of your compression test.
Contents of this tutorial:
Symptoms Of Low Or Zero Compression Problems
Engine compression issues will usually fall into one of two categories:
- Low compression in some but not all cylinders: This means that while some cylinders may have adequate compression, others may not, leading to an imbalance in engine performance.
- Zero PSI compression in some or all cylinders: This indicates a severe compression problem where one or more cylinders have completely lost compression, which can significantly impact engine operation.
These compression issues can manifest through various symptoms that affect the engine's performance, reliability, and drivability:
- Hard Starting or No Start: Compression is vital for the engine to start, so if there's insufficient compression, it may struggle to start or fail to start altogether.
- Poor Engine Performance: Compression provides the necessary pressure for fuel combustion. If compression is low or nonexistent, engine performance will suffer, leading to sluggish acceleration and overall poor performance.
- Misfiring: Inadequate compression can cause misfiring, where the air-fuel mixture doesn't ignite properly in the cylinders, resulting in uneven engine operation.
- Reduced Power and Performance: Without proper compression, the engine won't generate enough power, resulting in reduced performance and responsiveness.
- Excessive Oil Consumption: Compression issues can lead to oil leaking into the combustion chamber or poor sealing of the piston rings, causing increased oil consumption.
- Audible Engine Noise: Compression problems can result in abnormal engine noises such as knocking or rattling, indicating internal issues that affect engine operation.
Which Compression Tester Should I Buy?
There are lot of engine compression testers to choose from and many places to buy them. I'm gonna' make three recommendations to you:
Disclosure: As an Amazon Associate, I earn from qualifying purchases. If my tutorials help you, using these links is an easy way to support the site at no extra cost to you. Thank you!
TEST 1: 'Dry' Engine Compression Test

If your Nissan vehicle starts and runs, it's important to keep in mind that the engine compression test should be done with the engine slightly warmed up.
If your vehicle doesn't run, then don't worry about doing this test with the engine cold.
One last thing, this test is done with the engine cranking, so be careful and take all necessary safety precautions. Your safety is your responsibility.
NOTE: To get the most accurate test result, the engine should be slightly warmed up for this test, yet it can not be hot (technically: normal operating temperature). So, if the engine is completely cold, start her up and let it idle for no more than 15 minutes. If the engine has been running for a long period of time, let her cool down for about 1 hour.
OK, let's get started:
- 1
Disable the ignition system.
If your vehicle has a distributor, you can easily accomplish this by disconnecting all of the distributor's electrical connectors.
If your vehicle does not have a distributor (equipped with 6 Coil-On-Plug Ignition Coils), then you'll disable the ignition system when you remove then in the next step. - 2
Remove all of the six spark plugs.
Be careful and don't drop any of the spark plugs. Dropping them could cause their ceramic insulator to break and this will cause a misfire.
IMPORTANT: If necessary (on distributor equipped vehicles), tag each spark plug wire before you disconnect them from the spark plugs so that you'll know where they go when you re-install them. - 3
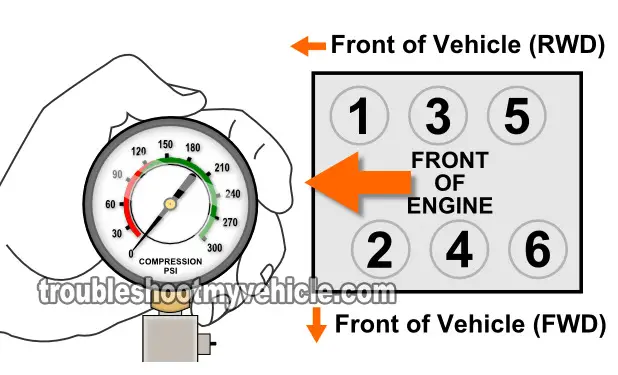
Hand-thread the engine compression gauge into the spark plug hole that you've chosen to test first. Do not use any type of tool to get it tight, hand tight is enough!
- 4
Once everything is set, have your helper crank the car or mini-van till the needle on the compression tester gauge stops climbing.
It normally takes no more than 10 seconds of engine cranking to get to this point. When the needle stops moving, you have reached the maximum compression pressure of that cylinder. - 5
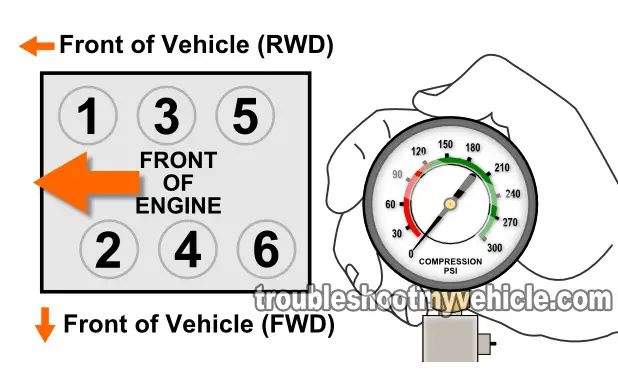
Record the reading on a piece of paper along with the cylinder the reading belongs to.
The illustration in the image above will help you to identify what cylinders you're testing. - 6
Repeat steps 3 thru 5 on the remaining engine cylinders.
Let's take a look at what your test results mean:
CASE 1: No compression in 2 or more cylinders. This test result tells you that the engine has serious internal problems.
The most common issues would be: Broken timing chain. Or a blown head gasket. Or the engine threw a rod.
CASE 2: Low compression in one or more cylinders. To a certain point, it's normal for the compression to vary a little between cylinders (as the engine accumulates thousands of miles).
But if these values vary too much, then you're gonna' have a bonafide misfire on your hands.
The next step is to do some math to find out if this low compression value is within a normal parameter or not. Go to: Interpreting Your Compression Test Results.
Interpreting Your Compression Test Results
When performing a compression test on your Nissan's engine, it's common to find that the compression readings for each cylinder are not exactly the same. This slight variation is normal due to differences in factors like cylinder wear, valve condition, and piston ring sealing.
However, if the compression value variation between cylinders is significant, typically exceeding a 15% variation between cylinders, you may some serious internal engine mechanical issues.
Usually, these variations (in the compression reading) signify problems such as worn piston rings, damaged valves, or cylinder head gasket leaks, which can affect engine performance and reliability.
To determine if the compression readings are problematic, you can do this one of two ways: You can calculate this 15% difference with pen and paper or you can use my low compression calculator. You can find the low compression calculator here: Online Low Engine Compression Calculator (at: easyautodiagnostics.com).
If you want to manually calculate the 15% difference, here's what you'll need to do:
- STEP 1: Multiply the highest compression value by 0.15 (this is the decimal value of 15%).
- STEP 2: Round the result to the nearest one (for example: 25.6 would become 26).
- STEP 3: Subtract the result (the number that was rounded) from the highest compression value.
- ANSWER: The result of this subtraction is the lowest possible compression value any cylinder can have.
Now, let me give you a more specific example: Let's say that the vehicle I'm working on produced the following compression readings:
| Cylinder | Pressure |
|---|---|
| #1 | 165 PSI |
| #2 | 95 PSI |
| #3 | 155 PSI |
| #4 | 175 PSI |
| #5 | 175 PSI |
| #6 | 170 PSI |
My next step is to do the following calculation:
- STEP 1: 175 x 0.15 = 26.25.
- STEP 2: 26.25 = 26 (rounded to nearest one).
- STEP 3: 175 - 26 = 149.
- ANSWER: 149 PSI. Any cylinder with this compression (or lower) value will misfire.
Since cylinder #2 is only producing 95 PSI, I can now conclude that it's 'dead' and causing a misfire.
To find out if the lowest compression value you got from your engine compression test is within a good range, you'll need to do the same calculation. Of course, you'll need to use the highest compression value you got and not the one in the example.
Once you've found the 'dead' cylinder, the next step is to find out what's causing the low compression value. For this step, go to: TEST 2: 'Wet' Engine Compression Test.
TEST 2: 'Wet' Engine Compression Test

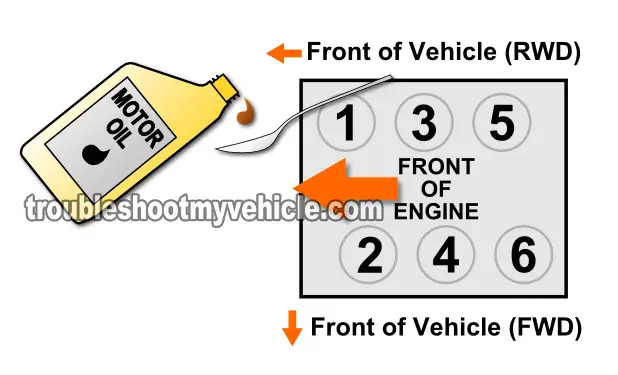
The next step, after finding out that you do have one or more cylinders with low compression, is to add about 2 tablespoons of oil to them and then retest their compression once more.
The oil that you're gonna' add to the cylinder will help determine if the low cylinder pressure or pressures you recorded in the 'Dry' compression test are caused by worn piston rings or worn cylinder head valves.
Depending on whether the compression pressure rises (on your compression tester) or not, you'll be able to say that the problem lies in the piston's rings or in the cylinder head valves.
This test, in which you add engine oil to the cylinders, is known as a 'Wet' compression test.
OK, this is what you need to do:
- 1
Add a small amount of engine oil to the cylinder that reported low compression or no compression in the 'Dry' compression test.
The amount should be about 1 to 2 tablespoons of oil. - 2
Install the compression tester onto the cylinder.
IMPORTANT: Do not use any type of tool to tightened the compression tester. Hand tight is fine. - 3
When all is set up, have your helper crank the engine.
- 4
You'll get one of two results: The compression value will go up (from the one you recorded before) or it will stay the same.
Let's interpret your test result:
CASE 1: The compression value shot up. This tells you that the piston compression rings are worn out and thus the problem is in the bottom end (block) of the engine in your 3.0L, 3.3L, or 3.5L Nissan.
CASE 2: The compression value stayed the same. This confirms that the problem is in the cylinder head valves.
Why An Engine Compression Test?
An engine compression test is one of the most important tests to perform when trying to solve a hard to diagnose misfire condition / rough idle condition. If only one cylinder has below average compression (compared to the other 5 cylinders), that cylinder will not contribute to engine power and you're gonna' feel it.
Also, no matter what you replace, the misfire condition or misfire codes (P0300, P0301, P0302, P303, P0304, P0305, P0306) will not go away! Unfortunately, the engine compression test is one of the most overlooked misfire troubleshooting tests. Now, testing the compression of each cylinder is usually done after verifying that each cylinder is getting spark (this can be easily accomplished by using a spark tester).
Related Test Articles
You can find more 'How To Test' articles for your 3.0L, 3.3L, 3.5L equipped Nissan car, pick up or mini-van at: 3.0L, 3.3L, 3.5L Nissan Index Of Articles.
Here's a small sample of the tutorials you'll find in the index:
- How To Test The Starter Motor (Nissan 3.0L, 3.3L).
- Mass Air Flow (MAF) Sensor Test 3.0L Nissan Maxima (1995-1999) (at: easyautodiagnostics.com).
- Power Transistor Test & Ignition Coil Test 3.3L Nissan (1996-2004) (at: easyautodiagnostics.com).
- How To Test The Throttle Position Sensor (1996-1999 3.0L Maxima) (at: easyautodiagnostics.com).

If this info saved the day, buy me a beer!


