TEST 2: Verifying The TPS Has Power

If your TP sensor did not show a variable voltage when you manually actuated the throttle in TEST 1, then the next step is to make sure it's being fed with power.
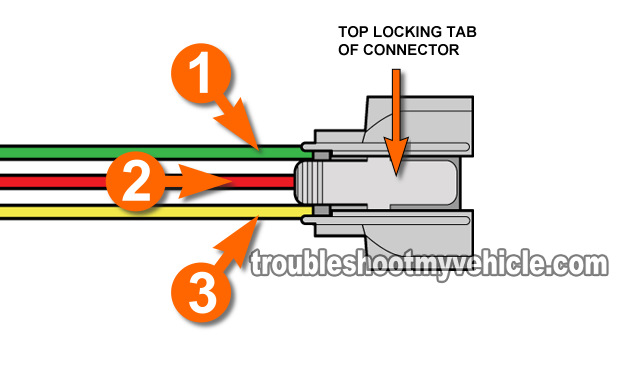
The wire labeled with the number 3, in the illustrations in the image viewer, is the one that carries these 5 Volts from the PCM to the TP sensor.
In this test section, we'll test for the presence of these 5 Volts using a multimeter.
NOTE: You can test for these 5 Volts DC with the TP sensor connected or disconnected to the TPS. I personally prefer to do this test with the TP sensor's connector unplugged.
This is what you'll need to do:
- 1
Place your multimeter in Volts DC mode.
- 2
Disconnect the TPS sensor from its electrical connector.
- 3
Probe the female terminal of the connector that connects to the number 3 wire, with the red multimeter test lead.
IMPORTANT: Be careful and don't damage the female terminal with the multimeter's probe. Damaging the terminal will require that you replace the connector. - 4
Connect the black multimeter test lead directly on the negative (-) battery terminal.
- 5
When you've set up the test, have a helper turn the key to the ON position, but not to crank or start the engine.
- 6
Your multimeter should display 4.5 to 5 Volts on its screen.
Let's take a look at what your test results mean:
CASE 1: The multimeter registered 4.5 to 5 Volts. This confirms that the TP sensor is being fed with power (4.5 to 5 Volts DC).
The next step is to test the Ground circuit of the throttle position sensor, go to: TEST 3: Verifying The TPS Has Ground.
CASE 2: The multimeter DID NOT register 4.5 to 5 Volts. Recheck your connections and repeat the test. If your multimeter still doesn't register the 4.5 to 5 Volts DC, then you've just eliminated the TP sensor itself as bad. The two most likely reasons for this are: 1) an open-circuit problem in the circuit or 2) the PCM may be fried (although a bad PCM is very rare).
Although it's beyond the scope of this article to test these two conditions, you have now eliminated the throttle position sensor (TPS) on your Honda as being the cause of the problem and/or the TPS diagnostic trouble code (DTC) lighting up the check engine light (CEL).
TEST 3: Verifying The TPS Has Ground

The TP sensor connector wire labeled with the number 1, in the illustration in the image viewer, is the one that supplies Ground to the sensor.
In this last test we'll be using the multimeter in Volts DC mode to check that this circuit is providing the throttle position sensor (TPS) a good path to Ground.
IMPORTANT: Remember, the PCM is the one that provides this Ground internally, so be careful and don't accidentally or intentionally apply power (12 Volts) to this circuit or you'll fry the PCM.
OK, here are the test steps:
- 1
Set the multimeter's dial to Volts DC mode.
- 2
Disconnect the TPS sensor from its electrical connector.
- 3
Probe the female terminal of the connector that connects to the number 1 wire, with the black multimeter test lead.
IMPORTANT Be careful and don't damage the female terminal with the multimeter's probe. Damaging the terminal will require that you replace the connector. - 4
Connect the red multimeter test lead to the battery positive (+) terminal.
- 5
Have your helper turn the key to its ON position but don't crank or start the engine.
- 6
Your multimeter will display 10 to 12 Volts.
Let's take a look at what your test results mean:
CASE 1: The multimeter showed 11 to 12 Volts. This confirms that the PCM and the wire/circuit (that supply this Ground) are OK.
You can conclude that the TPS is bad and needs to be replaced if all three test have confirmed that:
- The TPS is not providing a varying voltage signal when manually opening the throttle plate (TEST 1).
- The TPS is being fed 5 Volts DC (TEST 2).
- The TPS is being fed Ground (this test section).
CASE 2: The multimeter DID NOT show 11 to 12 Volts. Recheck your connections and repeat the test. If your multimeter still doesn't show the indicated voltage, then this indicates a problem with either the PCM (internal fault/problem) or an open in the wire between the TPS and the PCM itself.
Although testing these two conditions are beyond the scope of this article, you have now eliminated the throttle position sensor (TPS) on your Honda as being the cause of the problem and/or the TPS Diagnostic Trouble Code (DTC) lighting up the check engine light (CEL).
More Honda 2.2L, 2.3L Test Tutorials
If this tutorial was helpful/informative, you can find a complete list of tutorials here: Honda 2.2L, 2.3L Index Of Articles.
Here's a sample of the tutorials you'll find there:
- How To test: P0117 OBD II Trouble Code (Honda 2.2L, 2.3L).
- How To test: P0116 OBD II Trouble Code (Honda 2.2L, 2.3L).
- P1129 MAP sensor signal Higher Than Expected (Honda 2.2L, 2.3L).
- P1128 MAP sensor signal Lower Than Expected (Honda 2.2L, 2.3L).
- P0108 Manifold Absolute Pressure (MAP) Circuit High voltage (Honda 2.2L, 2.3L).
- How To Troubleshoot A No Start (Honda 2.2L, 2.3L).
- How to test the igniter, Ignition Coil Accord, Civic, CRV, and Odyssey (at: easyautodiagnostics.com).
- How To Bench Test A Starter Motor (Step By Step) (at: easyautodiagnostics.com).

If this info saved the day, buy me a beer!

