In this tutorial, I'll show you how to test the blower motor and blower motor relay on 2001-2005 1.7L Honda Civics in a step by step manner.
8 times out of 10, when the blower motor stops working, it's the motor itself that has fried but not always.
Other components that can fail, and cause the blower motor to stop working are:
- Blower motor fuse (located in the under-hood fuse box).
- Blower motor relay fuse (located in the under-dash fuse box).
- Blower motor relay.
- Blower motor.
- Blower motor resistor (known as the power transistor).
With the help of this tutorial, you'll be able to test them all and get to the bottom of the problem.
NOTE: If you have already tested your Honda Civic's blower motor (and it's good) and need to just test the blower motor resistor (known as the blower motor power transistor), then the following tutorial will help you test it:
Contents of this tutorial:
ES ![]() You can find this tutorial in Spanish here: Como Probar El Motor Soplador Del Aire Acondicionado (1.7L Honda Civic) (at: autotecnico-online.com).
You can find this tutorial in Spanish here: Como Probar El Motor Soplador Del Aire Acondicionado (1.7L Honda Civic) (at: autotecnico-online.com).
APPLIES TO: This tutorial applies to the following vehicles:
- 1.7L Honda Civic: 2001, 2002, 2003, 2004, 2005.
How The Blower Motor Works
To understand the how and why of the tests in this tutorial, it'll help if we know how your Honda Civic's blower motor works.
In a nutshell, when you turn your Civic's ignition switch to the ON position:
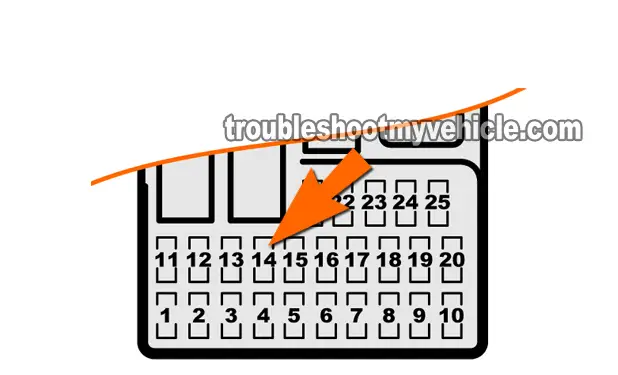
- Fuse #14 of the under-dash fuse box powers up and then feeds the number #2 terminal slot of the blower motor relay (on the under-hood fuse/relay box).
- Fuse #14 is a 10 amp fuse.
- Fuse #14 (of the under-dash fuse box) is the one that feeds battery power to the blower motor's coil.
- Fuse #14 connects to relay terminal slot #2 of the under-hood fuse box.
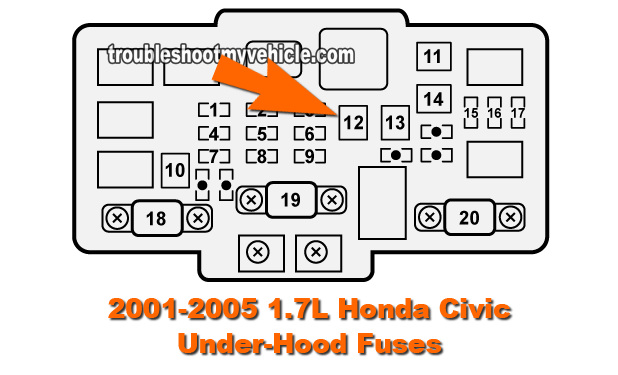
- Fuse #12 of the under-hood fuse/relay box is always hot.
- Fuse #12 is a 40 amp fuse.
- Fuse #12 (of the under-hood fuse box) is the one that feeds battery power to the blower motor (once the blower motor relay activates).
- Fuse #12 connects to relay terminal slot #3 of the under-hood fuse box.
- As soon as the blower motor relay's coil is fed power from the #14 fuse (of your Civic's under-dash fuse box):
- The blower motor relay activates (since relay terminal slot #1 is always connected to chassis Ground).
- The relay closes the power feed circuit to the blower motor and the BLU/WHT (blue w/ white stripe) wire of the blower motor harness connector now has battery power (from the #12 fuse of the under-hood fuse box).
- NOTE: In some vehicles this BLU/WHT wire is a GRN/WHT (green w/ white stripe) wire.
- Even though the relay has now given the blower motor juice to run, it doesn't because the blower motor resistor (power transistor) has not connected the blower motor to the Ground it needs to run.
- When you turn on the heater and select a fan speed:
- The blower motor resistor (power transistor) now activates and lets a varying amount of Ground thru' to the blower motor.
- This varying amount of Ground is what controls the blower motor fan speed.
Testing the blower motor and the blower motor relay isn't hard. Let's start with the first test.
TEST 1: Checking The Basics
To get your Honda Civic blower motor diagnostic on the road, in this first test, we'll check 3 specifics things.
One, that the blower motor relay fuse in the under-dash fuse box is not blown.
And two, that the blower motor fuse in the under-hood is not blown.
We'll also verify that the blower motor is really getting the juice (the blower motor relay is sending) when the key is in the ON position.
These are the test steps:
- 1
Check that fuse #12 of the under-hood fuse box is not blown.
This is a 40 amp fuse (see image 1 of 2 in the image viewer). - 2
Check that fuse #14 of the under-dash fuse box is not blown.
This is a 10 amp fuse (see image 2 of 2 for the location of this fuse). - 3
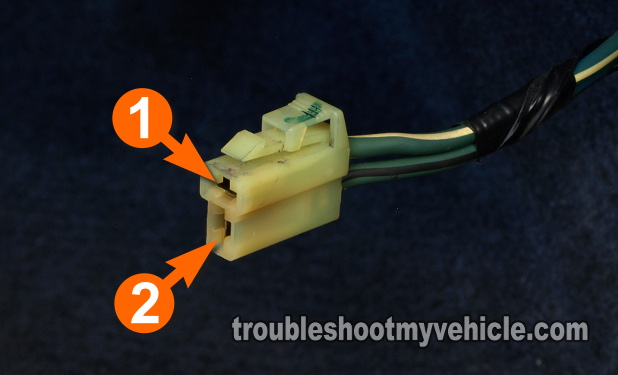
Unplug the blower motor from its harness connector and using your multimeter, check that terminal labeled with the number 1 (image 3 of 3 in the image viewer) has battery power when the key is in the ON position (position II).
NOTE: Depending on your specific Honda Civic, the wire that connects to the #1 terminal of the blower motor connector will be a BLU/WHT wire or a GRN/WHT wire.
Let's take a look at your test results:
CASE 1: Both fuses were not blown and power is present on the BLU/WHT wire. This is the correct and expected test result.
More importantly, it tells you that your Honda Civic's blower motor relay is OK and not the cause of the issue you're having with the inoperative blower motor.
Your next step is to bypass the blower motor resistor (known as the blower motor power transistor) and check the blower motor directly. For this test go to: TEST 2: Bypassing The Blower Motor Resistor.
CASE 2: One (or both) fuses were blown. Replace the fuses and retest.
Now since fuses don't get blown for no particular reason, you'll need to find out why they blew in the first place since there's a good chance you've got a short in the circuits those fuses are protecting.
CASE 3: Both fuses are OK but power was NOT present. This usually indicates that the blower motor relay is bad. The blower motor relay can be tested. For this test, go to: TEST 3: Testing The Blower Motor Relay (Part 1).
TEST 2: Bypassing The Blower Motor Resistor
If you've reached this point, you have confirmed that your Honda Civic's blower motor is getting power on the BLU/WHT (or GRN/WHT) wire of its harness connector.
In this test step, we're gonna' bypass your Civic's blower motor resistor and see if the blower motor will turn on when you open the ignition switch.
The basic idea here is to add power and Ground to the blower motor without removing it from its location under the dash.
Adding power power is the easy part since it involves just opening the ignition switch. To add Ground to the blower motor, we need to bypass the blower motor resistor (known as the blower motor power transistor).
IMPORTANT: For this test to work, you must be certain that the blower motor is getting power when you turn the key to the ON position (position II) on the BLU/WHT wire (or GRN/WHT wire depending on your specific Honda Civic) of the blower motor's 2 terminal connector.
- 1
Unplug the blower motor resistor (known as the blower motor power transistor).
- 2
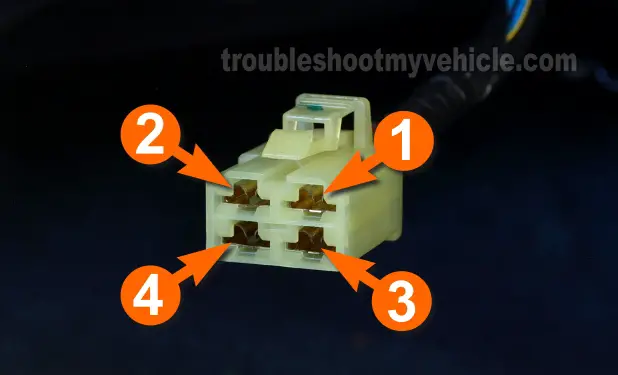
Using a jumper wire, jumper terminals 4 and 2 of the blower motor resistor's harness connector (see photo in the image viewer).
Terminal #2 is has the BLK wire attached to it and this wire connects directly to chassis Ground. Terminal #1 has the BLU/WHT (or GRN/WHT) wire connected to it. - 3
Turn the key to the ON position (position II) to power up the circuit.
- 4
You should see one of two results: the blower motor will come on or it won't.
Let's take a look at what your test results mean:
CASE 1: The blower motor came on when you turned the key to the ON position. This test result tells you that the blower motor is OK and that the reason it's not coming on is due to a possible problem with the blower motor resistor (known as the power transistor).
Thankfully, you can test your Honda Civic's blower motor resistor and thus be absolutely sure that it's fried and behind the cause of the 'no blower' condition. The following step-by-step tutorial will show you how to test the blower motor resistor (power transistor):
CASE 2: The blower motor DID NOT come on when you turned the key to the ON position. This test result tells you that the blower motor is fried and needs to be replaced.
Here's why: So, far, you have:
- You have checked the 2 fuses that feed the blower motor relay and the blower motor (TEST 1).
- You have verified that terminal number 1 of the blower motor connector is hot (has 12 Volts) when the ignition switch is in the ON position (TEST 1).
- You have bypassed the blower motor resistor in this test.
So, taking all of the above into account, the blower motor should have turned on when you opened up the ignition switch. Since it did not, you can correctly conclude that the blower motor is bad and needs to be replaced.
TEST 3: Testing The Blower Motor Relay (Part 1)
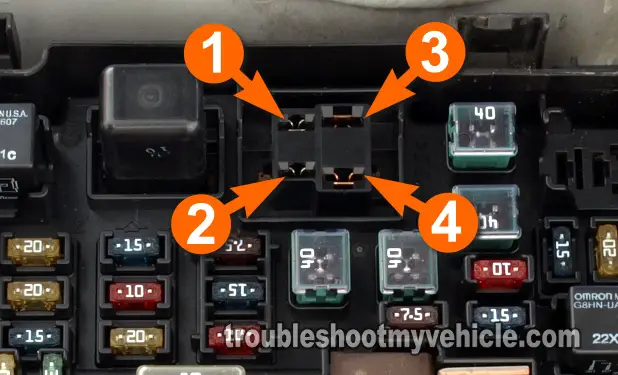
As you already may know, the blower motor relay is the one that connects the blower motor to battery power (when you turn on the heat, or A/C, in your Honda Civic).
For the blower motor relay to activate (and thus activate the blower motor), it needs battery power from two fuses. These two you have already verified are not blown in TEST 1.
To see if your Honda Civic's blower motor relay is bad, in this first part we're gonna' check that the relay' coil is getting both power and Ground. How? By testing the two terminal slots (of the under-hood relay box) that feed the relay this battery power and Ground with your multimeter.
In case you're wondering what the relay coil is, this is the winding inside the relay that, when activated by power and Ground, completes the circuit that connects the blower motor to battery power.
IMPORTANT: Be extremely careful not to damage the female metal terminals in the relay terminal slots by putting excessive pressure on them with your multimeter test leads. The only way to repair damaged female terminals (that have been permanently opened up) is replacing the entire fuse box with a new/used one.
Here are the test steps:
- 1
Remove the blower motor relay located in your Honda Civic's under-hood fuse box.
You should now see the four terminal slots that the male terminals of the relay connect to (see the image above). - 2
Locate relay terminal slot labeled with the #2 (in the image above). This is the terminal slot that feeds the blower motor relay's coil with battery power from the #14 fuse located in the under-dash fuse box.
With your multimeter (in Volts DC mode) confirm that this slot has battery voltage. Battery power should be present with the key in the ON position (position II). - 3
Locate relay terminal slot labeled with the #1. This is the terminal slot that feeds the blower motor relay's coil with chassis Ground.
Probe this terminal for Ground by connecting the red multimeter test lead to the battery positive (+) terminal and the probing the slot labeled with the #1 with the black multimeter test lead.
Your multimeter should register 12 Volts (battery voltage) whether the key is in the ON or OFF position.
Let's take a look at what your test results mean:
CASE 1: Battery power and Ground were present at the indicated relay terminal slots. This is the correct and expected test result and tells you that your Honda Civic's blower motor relay's coil is getting both power (12 Volts) and Ground.
Your next step is the check that the relay terminal slot #3 is getting power and then bypassing the blower motor relay by jumpering relay terminal slots #3 and #4 together. For this test go to: TEST 4: Testing The Blower Motor Relay (Part 2).
CASE 2: Battery power WAS NOT present but Ground was present. This result tells you that the there's an open or a short in the circuit between fuse #14 (of the under-dash fuse box) and relay terminal slot #2.
Although it's beyond the scope of this tutorial to verify this condition, solving this issue will restore power to terminal slot #2 and solve the 'no blower' condition your Honda Civic is currently experiencing.
CASE 3: Battery power was present but Ground WAS NOT present. The blower motor relay will not activate the blower motor with this Ground missing.
Your next step is to resolve the problem causing this lack of Ground.
TEST 4: Testing The Blower Motor Relay (Part 2)

So far, you have checked that terminal slots #1 and #2 are doing their job and supplying Ground and power to your Honda Civic's blower motor relay's coil (TEST 3).
In this test step, we're gonna' make sure that terminal slot #3 has power and then we're gonna' jumper terminal slots #3 and #4 together with a jumper wire.
Jumpering terminal slots #3 and #4 together (with a jumper wire) should make the blower motor fan run since this bypasses your Civic's blower motor relay. If the fan runs, then you can conclude that the blower motor relay is bad and needs to be replaced.
IMPORTANT: For this test to work, you need to jumper together (with a jumper wire) terminals #2 and #4 of the blower motor power transistor harness connector. Otherwise, this test won't work.
Here are the test steps:
- 1
Reconnect the blower motor to its electrical connector (if it's unplugged from previous testing).
- 2
Bypass the blower motor resistor (power transistor) by jumpering together terminals #2 and #4 of the blower motor power transistor's harness connector.
You can find the step-by-steps instructions on how to bypass the power transistor here: TEST 2: Bypassing The Blower Motor Resistor. - 3
Locate relay terminal slot labeled with the #3. This is the terminal slot that feeds the blower motor relay with battery power from the 40 amp fuse (fuse #12) located in the under-hood fuse box.
With your multimeter (in Volts DC mode) confirm that this slot has battery voltage. Battery power should be present all the time (in other words, with both the key off or the key on). - 4
Once you have confirmed that terminal slot #3 has power, then the next step is to jumper slot terminals #3 and #4 together using a jumper wire.
Jumpering these two relay terminal slots together should activate the blower motor inside your Honda Civic (remember, the blower motor resistor must be bypassed for this to work).
Let's take a look at what your test results mean:
CASE 1: Battery power was present at relay terminal slot #3 and the blower motor ran when you jumpered slot terminals #3 and #4 together. This is the correct and expected test result and tells you that the blower motor relay is bad and needs to be replaced.
I'll explain in more detail: So far you have:
- Verified that the all of the fuses that feed the blower motor ARE NOT blown and that the blower motor connector terminal #1 is not getting 12 Volts with the key on engine off (KOEO) (TEST 1).
- In TEST 3, you confirmed that relay terminal slots #1 and #2 are providing Ground and power.
- In this test, you completely bypassed the blower motor relay (by jumpering slots #3 and #4) and the blower motor fan ran.
Since the blower motor relay is getting power, Ground and the circuits between it and the blower motor are OK, it should be able to turn on the blower motor. Since it isn't, you can correctly conclude that the blower motor relay is bad and needs to be replaced.
If you're still in doubt and need to bench test the blower motor relay -the following tutorial will help you:
CASE 2: Battery power WAS NOT present at relay terminal slot #3 and the blower motor DID NOT run when you jumpered relay terminal slot #3 and #4 together. This result tells you that there's an open or a short in the circuit between fuse #12 (of the under-hood fuse box) and relay terminal slot #3.
Although it's beyond the scope of this tutorial to test this circuit, I can tell you that you'll need to test the continuity between relay terminal slot #3 and fuse #12. Resolving the lack of battery power at relay terminal slot #3 will solve the 'no blower' condition affecting your Honda Civic.
CASE 3: Battery power was present at relay terminal slot #3 but the blower motor DID NOT run when you jumpered relay terminal slot #3 and #4 together. This result tells you that the there's an open or a short in the BLU/WHT (or GRN/WHT) wire between the blower motor connector and terminal slot #4 of the under-hood fuse box.
Although it's beyond the scope of this tutorial to test this circuit, I can tell you that you'll need to test the continuity between relay terminal slot #4 and terminal #1 of the blower motor power transistor connector. Resolving the open or short will solve the 'no blower' condition affecting your Honda Civic.
Where To Buy The Blower Motor And Save
The links below are to help you comparison shop online. I used to buy everything at my local auto parts store, till I found out just how over-priced everything is. Below are the links to the blower motor, blower motor relay, and the blower motor resistor (also known as the blower motor power transistor).
Disclosure: As an Amazon Associate, I earn from qualifying purchases. If my tutorials help you, using these links is an easy way to support the site at no extra cost to you. Thank you!
NOTE: Not sure if the above components fit your particular Honda Civic? Don't worry, they'll make sure the part fits once you get to the web site.
More 1.7L Honda Civic Tutorials
You can find a complete list of tutorials for your 1.7L Honda Civic here:
Here's a small sample of the tutorials you'll find in the index:
- Maintenance Required Light Reset (2001-2005 1.7L Honda Civic).
- How To Do A Cylinder Balance Test (2001-2005 1.7L Honda Civic).
- How To Test Trouble Code P0141 (2001-2005 1.7L Honda Civic).
- How To Test The TP Sensor (2001-2005 1.7L Honda Civic).
- How To Test Trouble Code P0135 (2001-2003 1.7L Honda Civic).

If this info saved the day, buy me a beer!


