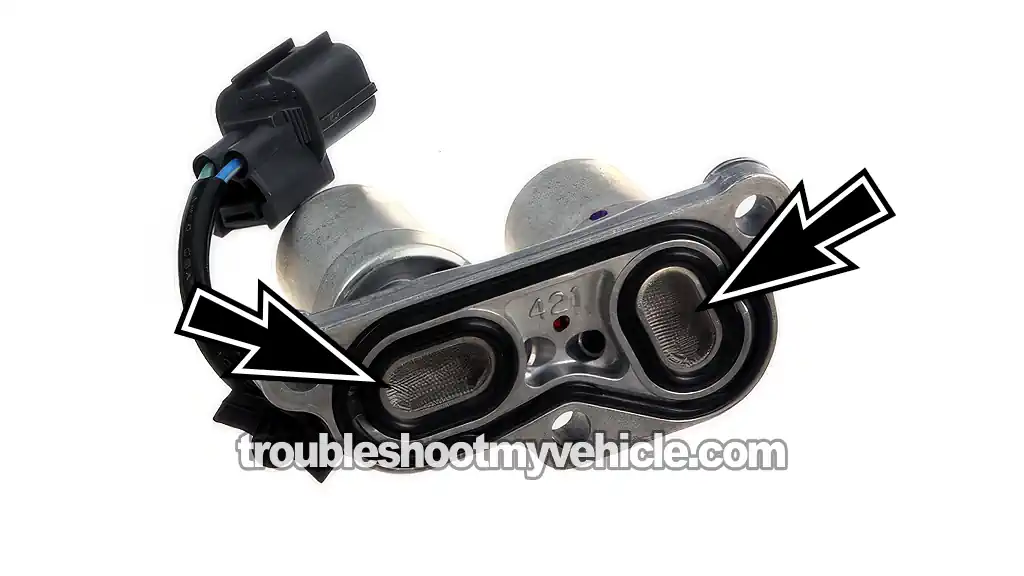
The shift solenoid assembly, which consists of shift solenoid A and B, on your 1996-2000 1.6L equipped Honda Civic (DX, EX, and LX) can be tested.
In this tutorial, I'll show the two tests that you can do yourself to see if either one of the two solenoids (that make up the assembly) are bad (or not).
Contents of this tutorial:
ES ![]() You can find this tutorial in Spanish here: Cómo Probar Los Solenoides De Cambio A y B (1996-2000 1.6L Honda Civic) (at: autotecnico-online.com).
You can find this tutorial in Spanish here: Cómo Probar Los Solenoides De Cambio A y B (1996-2000 1.6L Honda Civic) (at: autotecnico-online.com).
LOCK-UP SOLENOID TESTS: The following tutorial will help you test the lock-up solenoid assembly:
START HERE: Shift Solenoid Assembly Tests
Shift solenoid A and shift solenoid B are part of the same assembly and both are tested in the same way.
Testing each shift solenoid involves two specific tests. One is a resistance test and the other involves applying 12 Volts from your Honda Civic's battery (to see if the solenoid clicks).
Since the solenoids are grounded thru' the assembly's metal base there's no need to manually apply Ground, unless you have removed the shift solenoid assembly and you're bench testing it.
Here's a brief description of the 4 tests in this tutorial:
- resistance testing shift solenoid A and/or B..
- This test simply involves measuring the resistance of shift solenoid A and/or B and comparing the value with the factory spec of 14-25 Ohms.
- TEST 1: Solenoid A And B Resistance Test.
- Manually applying 12 Volts to shift solenoid A and/or B.
- In this test, you'll use a jumper wire to apply power (from your Honda Civic's battery) to shift solenoid A and/or B and listen for a clicking sound.
- TEST 2: Applying 12 V To Solenoid A And B.
TEST 1: Solenoid A And B Resistance Test
To diagnose shift solenoid A and/or shift solenoid B, the first thing you'll need to do is see if the solenoid's internal resistance is within specification.
To get into more specifics: You'll need to probe terminal number 1 of the solenoid's connector and the solenoid assembly's metal base with your multimeter in Ohms mode (Ω).
To test shift solenoid B, you'll need to probe terminal number 2 of the solenoid's connector and the solenoid assembly's metal base with your multimeter in Ohms mode (Ω).
If you don't have a multimeter and need to buy one, this is my recommendation: Tekpower TP8268 AC/DC Auto/Manual Range Digital Multimeter (Amazon affiliate link).
NOTE: Perform this test with a completely cold engine/transmission. There are 2 reasons for this. One is so that you can avoid getting burned by the transmission (if it's hot) and the other is because the factory resistance specification calls for the solenoid to be tested at room temperature.
NOTE 2: You can test the shift solenoid assembly off of the vehicle too, although the test instruction below assume that the shift solenoid assembly is still bolted in place on the automatic transmission.
OK, this is what you need to do:
- 1
Set your multimeter's dial to Ohms mode (Ω).
- 2
Unplug the shift solenoid A and B assembly from its harness connector.
NOTE: This test is done on the shift solenoid assembly's connector AND NOT on the engine wiring harness' connector. - 3
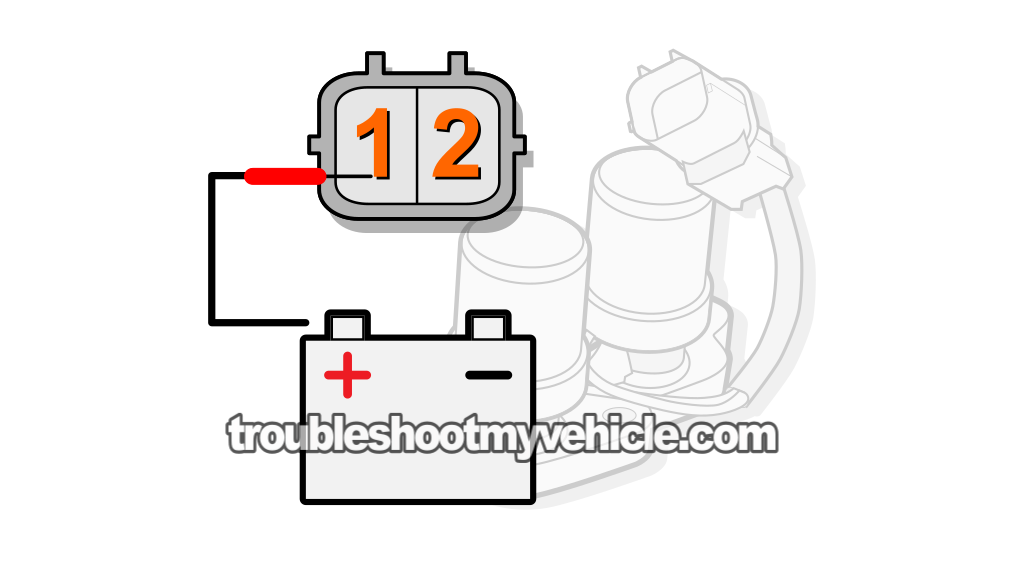
To test shift solenoid A, measure the resistance between terminal labeled with the #1, in the image viewer above, and the solenoid assembly's body.
NOTE: Shift solenoid A is Grounded by the solenoid assembly's case. If the solenoid assembly is still bolted to the transmission housing, you can Ground your multimeter's lead directly on the battery's negative (-) terminal. - 4
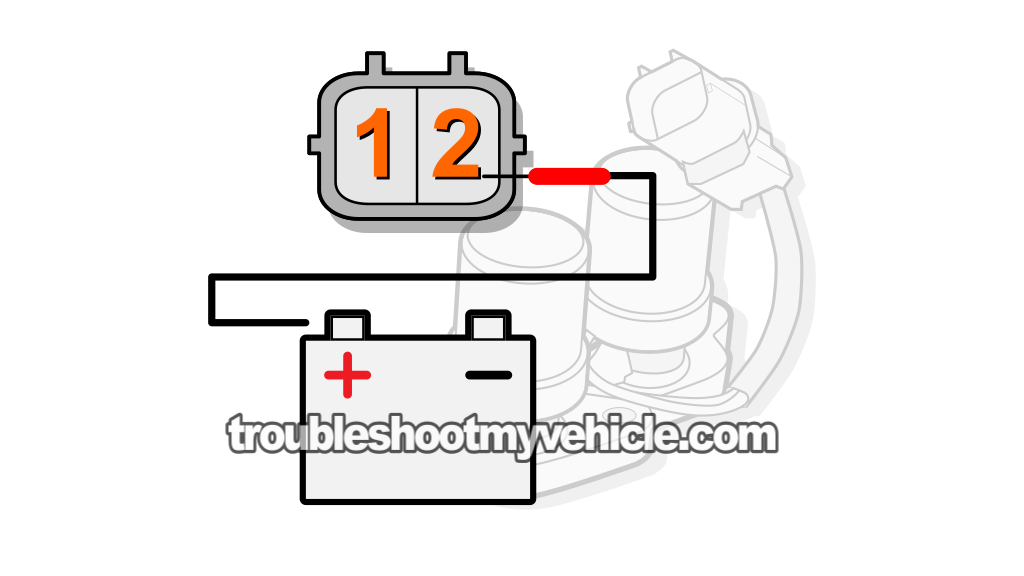
To test shift solenoid B, measure the resistance between terminal labeled with the #2, in the image viewer above, and the solenoid assembly's body.
NOTE: Shift solenoid B is Grounded by the solenoid assembly's case. If the solenoid assembly is still bolted to the transmission housing, you can Ground your multimeter's lead directly on the battery's negative (-) terminal. - 5
Your multimeter should read 14-25 Ohms for the resistance value of shift solenoid A and shift solenoid B.
Let's take a look at what your test results mean:
CASE 1: Shift solenoid A and B's resistance is between 14-25 Ohms. This is the correct and expected test result.
Although shift solenoid A and/or B passed the resistance test, there's still one more you need to do to make sure it's OK and this is to manually apply 12 Volts to the solenoid and see if it clicks. For this test, go to: TEST 2: Applying 12 V To Solenoid A And B.
CASE 2: Shift solenoid A and B's resistance WAS NOT between 14-25 Ohms. Recheck your multimeter test connections and retest. If you still don't get the correct resistance, then the shift solenoid is bad and you'll need to replace the entire shift solenoid assembly to solve the issue.
TEST 2: Applying 12 V To Solenoid A And B
If you've reached this point, you have verified that shift solenoid A and/or B's internal resistance is between 14 to 25 Ωs, the next step is to apply 12 Volts directly to it from your Civic's battery.
This is a pretty simple test, but you'll need to take a few precautions. The first is to use a 'fused' jumper wire to apply this voltage from your Civic's battery.
You can make your own 'fused' jumper wire by putting a 10 or 15 amp fuse between the wire and your Honda Civic's battery positive (+) post.
The other is to remember that the shift solenoid assembly gets Ground thru' its base. So if you've removed the shift solenoid assembly from your Civic's automatic transmission, you'll need to Ground it to the battery negative (-) terminal using something like a jump-start cable.
NOTE: The instructions below assume that the shift solenoid assembly is still mounted to the automatic transmission.
These are the test steps:
- 1
Unplug the shift solenoid assembly from its electrical connector.
NOTE: This test is done on the shift solenoid assembly's connector AND NOT on the engine wiring harness connector. - 2
Apply 12 Volts to terminal #1, of the shift solenoid assembly's connector, using a jumper wire or a power probe to test shift solenoid A.
- 3
Apply 12 Volts to terminal #2, of the shift solenoid assembly's connector, using a jumper wire or a power probe to test shift solenoid B.
- 4
You should hear an audible click when the 12 Volts are applied.
Repeat this test as many times as you need to be certain of your test results.
Let's examine your test results:
CASE 1: Solenoid valve A and/or B clicked when you applied 12 Volts. This test result tells you that the solenoid is opening and closing.
Since you've reached this point from TEST 1 (which means that shift solenoid A and/or B passed the resistance test), this test result indicates that the shift solenoid assembly is OK and not the cause of the transmission issue.
CASE 2: Solenoid valve A and/or B DID NOT click when you applied 12 Volts. This test result tells you that shift solenoid A and/or B is bad and needs to be replaced.
Since shift solenoid A and/or B is part of the shift solenoid assembly, you'll need to replace the entire assembly to solve the issue.
Solenoid Assembly Is Good But Transmission Still Not Shifting

If you've tested and found either solenoid (shift solenoid A or B) good and your Honda's transmission isn't slipping yet a shift solenoid A or B trouble code keeps popping up, I want to suggest two things:
- Remove the solenoid assembly and see if the metal mesh screen filters are clogged and if they are, you should clean them (see photo). Several people have reported that this has solved the issue.
- Check the continuity of the wires between the solenoid assembly and the PCM. You'll need a wiring diagram of your specific Honda to accomplish this test.
Also, and especially after finding no faults in the wiring, there's a good chance that you'll have to replace the shift solenoid assembly to completely eliminate it as the source of the problem. I know this isn't something you want to hear, but in some cases this is a necessary thing.
Now, if your Honda Civic's transmission is slipping, then replacing the shift solenoid assembly isn't gonna' help bring the transmission back to normal. Slippage is a direct result of internal damage to the friction discs or hard parts. The only way to solve a slippage issue is overhauling the transmission.
More 1.6L Honda Civic Test Articles
If this tutorial helped then you might be interested in the others found here: 1.6L Honda Civic Index Of Articles.
Here's a sample of the articles you'll find in the index:
- How To Test Trouble Code P0135 (1995-2000 Honda 1.6L).
- How To Test: Lock-up Control Solenoid Valves (1996-2000 1.6L Honda Civic).
- How To Troubleshoot A No Start (1995-2000 1.6L Honda Civic).
- How To Test The Igniter, Ignition Coil Accord, Civic, CRV, and Odyssey (at: easyautodiagnostics.com).

If this info saved the day, buy me a beer!


