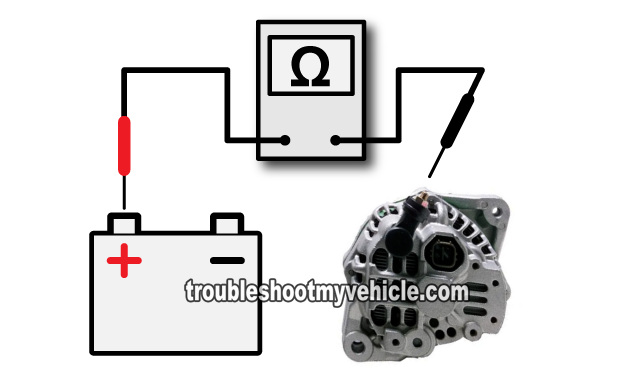
TEST 2: Checking The Continuity Of The Bat (+) Cable
All of the electrical power that the alternator produces, to charge the battery and to power any of your Honda Civic's electrical needs, passes thru' a single 80 Amp mega fuse!
This 80 Amp mega fuse is located in the under-hood fuse/relay box and if it's blown then the alternator could be working, but its output will never reach your Honda Civic's battery (this mega fuse is labeled with the #42 in the second illustration in the image viewer).
So in this test step, you're going to verify that this fuse is OK on your 1.6L Honda Civic before we proceed with the next and last test (which is checking the alternator fuse in the under-dash fuse/relay box inside your Civic).
This is what you'll need to do:
- 1
Disconnect the battery negative (-) cable terminal from the battery negative post. The positive cable remains connected.
IMPORTANT: Don't continue to the next step without first disconnecting the negative cable from the negative battery post. - 2
Set your multimeter to Ohms mode.
- 3
Connect the red multimeter test lead to the stud on the rear of the alternator. The BAT + cable, which connects to the battery positive (+) terminal, is the cable that connects here.
The arrow in the photo points to this stud. - 4
With the black multimeter test lead probe the center of the battery positive (+) post on your Honda Civic's battery.
- 5
You'll get one of two results.
1.) If the 80 Amp mega fuse, protecting this circuit, is blown then your multimeter will indicate a reading of OL (which means over limit). In other words, there will be NO continuity.
2.) If the 80 amp mega fuse is OK and not blown, your multimeter will register an Ohms reading of 0.5 Ohms or less. In other words, there will be continuity.
Let's take a look at what your results mean:
CASE 1: Your multimeter registered continuity. This is good, since it indicates that the 80 amp mega-fuse protecting this circuit is OK and not blown.
The last test to do also involves checking the condition of another fuse. Except that this is just a regular plastic blade type fuse found in the fuse box under the dash. For this test, go to: TEST 3: Checking The Alternator Fuse.
CASE 2: Your multimeter DID NOT register continuity. This result tells you that the 80 amp mega fuse is blown and this will keep the alternator from charging the battery.
This fuse is locate in the under-hood fuse box and is labeled with the number 41 in image 2 of 2 in the image viewer above.
Replace the fuse and retest. Replacing the 80 amp mega fuse (if it's blown) should solve your No Charge condition. You'll have to investigate the reason this mega fuse blew, since they don't get blown for no particular reason.
TEST 3: Checking The Alternator Fuse

There's one more fuse that you need to check, before condemning the alternator as fried on your 1.6L Honda Civic.
This is the alternator fuse of the under-dash fuse/relay box. This fuse is the number 15 fuse and this bad boy is a 7.5 amp fuse.
The illustration in the image viewer (of the under-dash fuse/relay box) will help you locate this alternator fuse on your 1996-2000 1.6L Honda Civic.
NOTE: You can enlarge the image in the image viewer to get a good view of the location of the number 15 fuse.
This is what you need to do:
- 1
Reconnect the battery to its battery negative (-) cable, that you disconnected in the previous test.
- 2
Locate the alternator fuse, which will be located in the under-dash fuse/relay box inside your Honda Civic.
The alternator fuse of the under-dash fuse/relay box is the number 15 fuse. - 3
Once you have located the alternator fuse, remove it and check that it's not blown.
- 4
If it is blown, replace it with a new one and repeat TEST 1.
Let's examine your test result:
CASE 1: The alternator fuse is NOT blown. This is good and let's you know that the alternator has all of the power sources it needs to charge, since it isn't then this result also let's you know that the alternator is bad and needs to be replaced.
CASE 2: The alternator fuse IS blown. Replace the fuse with another of the same amperage rating (7.5 amps) and start the car and check to see if the alternator is now charging the battery by repeating TEST 1.
More 1.6L Honda Civic Test Articles
If this tutorial helped then you might be interested in the others found here:
Here's a sample of the articles you'll find in the index:
- How To Test Trouble Code P0135 (1995-2000 Honda 1.6L).
- How To Test: Lock-up Control Solenoid Valves (1996-2000 1.6L Honda Civic).
- How To Troubleshoot A No Start (1995-2000 1.6L Honda Civic).
- How To Test The Igniter, Ignition Coil Accord, Civic, CRV, and Odyssey (at: easyautodiagnostics.com).

If this info saved the day, buy me a beer!


