")
If you're seeing trouble codes P0135 and P0155 lighting up the check engine light in your van, you've got an issue with the front oxygen sensors' heaters.
In this tutorial, which I've written specifically for the 2003-2007 Chevy Express/GMC Savana with a 4.8L, 5.3L, or 6.0L engine, I'll walk you through the meaning of these codes and the most common fixes for this problem.
Let's get started!
Contents of this tutorial:
ES ![]() You can find this tutorial in Spanish here: Cómo Diagnosticar Los Códigos P0135 y P0155 (2003-2007 V8 Chevrolet Express, GMC Savana) (at: autotecnico-online.com).
You can find this tutorial in Spanish here: Cómo Diagnosticar Los Códigos P0135 y P0155 (2003-2007 V8 Chevrolet Express, GMC Savana) (at: autotecnico-online.com).
APPLIES TO: This tutorial applies to the following vehicles:
- Chevrolet Express (1500) 4.8L, 5.3L: 2003, 2004, 2005, 2006, 2007
- Chevrolet Express (2500) 4.8L, 5.3L, 6.0L: 2003, 2004, 2005, 2006, 2007
- Chevrolet Express (3500) 4.8L, 6.0L: 2003, 2004, 2005, 2006, 2007
- GMC Savana (1500) 4.8L, 5.3L: 2003, 2004, 2005, 2006, 2007
- GMC Savana (2500) 4.8L, 5.3L, 6.0L: 2003, 2004, 2005, 2006, 2007
- GMC Savana (3500) 4.8L, 6.0L: 2003, 2004, 2005, 2006, 2007
WIRING DIAGRAM: The following wiring diagram may come in handy:
NOTE: The following tutorial will help you troubleshoot diagnostic trouble codes P0141 and P0161:
What Do Trouble Codes P0135 And P0155 Mean?
")
")
Trouble codes P0135 and P0155 are similar in definition as they both indicate a problem with the front oxygen (O2) sensor heater for bank 1 and bank 2, respectively. Let's break it down a bit further:
P0135: Heater Circuit Malfunction (Bank 1, Sensor 1)
- Meaning: This code indicates a problem with the heating circuit for the oxygen sensor located in Bank 1 (the driver's side of the engine), specifically Sensor 1 (the upstream sensor closest to the exhaust manifold).
- Bank 1 Sensor 1 (B1S1) Location: This O2 sensor is located before the catalytic converter on the driver's side, monitoring the exhaust gases from cylinders 1, 3, 5, and 7.
It's responsible for providing feedback to the powertrain control module (PCM) about the air-fuel mixture, of this bank of cylinders, before it enters the catalytic converter. - Upstream: The B1S1 oxygen sensor, or Bank 1 Sensor 1, is also referred to as the 'driver side upstream oxygen sensor'. The word 'upstream' refers to the fact that it's located before (upstream) the catalytic converter.
- Possible Causes:
- Faulty oxygen sensor (Bank 1, Sensor 1).
- Damaged wiring or connector to the sensor.
- Blown O2 sensor heater element circuit fuse.
- PCM malfunction (less common).
P0155: Heater Circuit Malfunction (Bank 2, Sensor 1)
- Meaning: This code indicates a problem with the heating circuit for the oxygen sensor located in Bank 2 (the passenger's side of the engine), specifically Sensor 1 (the upstream sensor closest to the exhaust manifold).
- Bank 2 Sensor 1 (B2S1) Location: This O2 sensor is located before the catalytic converter on the passenger side, monitoring the exhaust gases from cylinders 2, 4, 6, and 8. It performs the same function as B1S1 but for bank 2.
- Upstream: The B2S1 oxygen sensor, or Bank 2 Sensor 1, is also referred to as the 'passenger side upstream oxygen sensor'. The word 'upstream' refers to the fact that it's located before (upstream) the catalytic converter.
- Possible Causes:
- Faulty oxygen sensor (Bank 1, Sensor 1).
- Damaged wiring or connector to the sensor.
- Blown O2 sensor heater element circuit fuse.
- PCM malfunction (less common).
What Causes Trouble Codes P0135 And P0155?
The most common causes of trouble codes P0135 and P0155 are the failure of the O2 sensor's heater element and wiring problems, such as shorts or open circuits in the sensor's wiring harness.
- Heater Element Failure: The most common cause of trouble codes P0135 and P0155, is the failure of the heater element inside the O2 sensor. Over time, the heating element will fail due to the extreme temperatures it's exposed to within the exhaust system, leading to a loss of functionality.
- Wiring Problems: Wiring problems are also a common culprit for these trouble codes. The sensor's wiring can be prone to damage from exposure to heat, vibration, and other environmental factors. Wiring may become frayed, corroded, or damaged, leading to open or short circuits in the heater circuit. One common scenario is when the sensor's wiring touches the hot exhaust pipe or other components, causing a short circuit.
- Blown O2 sensor heater element circuit fuse: The heater element of the oxygen sensor requires 12 volts to function, which it receives from Fuse 40 (15A) located in the underhood fuse box. If this fuse blows, the heater element doesn't get power.
One common reason for this fuse to blow is when the sensor's wires come into contact with the hot exhaust pipe, causing them to melt and short circuit, thus blowing the fuse. - PCM malfunction: The PCM is responsible for activating the heater element of the oxygen sensor. While very rare, it's possible for the PCM to malfunction and not be able to activate the oxygen sensor heater.
What Does The O2 Sensor Heater Do?
The oxygen sensors play a crucial role in monitoring and controlling exhaust emissions by providing feedback to the powertrain control module (PCM) about the air-fuel mixture. But this only happens once they've reached a certain operating temperature (typically between 600 to 800 °F).
When an engine is started from a cold condition, the O2 sensors are also cold, and their response time is slower. During this time, the PCM relies on pre-programmed fuel maps and sensor readings from other sensors, such as the mass airflow sensor, to control the air-fuel mixture.
As the engine warms up and the O2 sensors reach their optimal operating temperature, they become active and start producing accurate feedback based on the oxygen content in the exhaust gases. This feedback allows the PCM to adjust the air-fuel mixture in real-time, end result is better gas mileage and emissions control.
Although the oxygen sensors are exposed to the hot exhaust gas exiting the engine, relying solely on exhaust gas temperature to heat them to their optimal operating temperature just isn't enough, especially during idling or low-load conditions when exhaust temperatures may not be high enough.
To ensure that the O2 sensors reach their operating temperature quickly and consistently, regardless of engine operating conditions, they're equipped with built-in heaters. These heaters are electrical elements integrated into the sensor housing. During engine start-up, the PCM activates these heaters to rapidly warm up the sensors to their optimal temperature range.
Eventually, the heating elements inside oxygen (O2) sensors will degrade, as they're subject to wear and tear from the extreme temperatures they create and are exposed to within the exhaust system. When the heating elements inside the O2 sensors fail, it'll trigger trouble codes related to the sensor heater circuit, such as P0135 and P0155 you're currently trying to troubleshoot.
How To Resolve Trouble Code P0135 Or P0155
The most common approach to resolving either a P0135 or a P0155 trouble code is to simply replace the affected oxygen sensor. These are the three main reasons this approach is popular:
- Simplicity: Replacing the O2 sensor is a relatively straightforward procedure that doesn't require advanced diagnostic equipment or specialized skills. It's a common "quick fix" solution that can be performed quickly and with minimal effort.
- Cost-Effectiveness: O2 sensors are not that expensive ($30 to $50) compared to other engine management system components.
- Diagnostic Challenge: Troubleshooting the heater circuit is more time-consuming, requires a professional technician level scan tool (the ones that cost $3,000 or more), and access to professional diagnostic test info. For a lot of folks and even some repair shops, it's more convenient and cost-effective to simply replace the sensor first. If no other issue exists (like electrical wiring problems in the O2 sensor heater circuit), then it's a win.
If you're considering replacing the affected oxygen sensor right off the bat, I recommend the following preliminary checks to ensure a successful repair:
- Check Fuse 40: Start by inspecting Fuse 40 (15A) in the underhood fuse box to verify that it's not blown. As mentioned earlier, a blown fuse can cut off power to the oxygen sensor heater element, leading to malfunctioning sensors. Checking and replacing the fuse (if it's blown) isn't difficult at all and should be done before replacing the sensor.
- Inspect Wiring Harness: Conduct a visual inspection of the oxygen sensor wiring harness wires. Look for any signs of damage, such as melted insulation or wires that are shorted together. Damage to the wiring will cause Fuse 40 to blow. If you identify any issues with the wiring, repair the issue before installing the new oxygen sensor.
To see my oxygen sensor recommendations and where to buy them, go here: Where To Buy The O2 Sensor And Save.
Now, if replacing the sensor doesn't solve the problem, or you're gonna diagnose it first, the basic test procedure for testing the heater element typically involves the following steps:
- Visual Inspection: The sensor's wiring and connectors are visually inspected for any signs of damage such as frayed wiring, melted insulation (caused by contact with the exhaust pipe), or wiring that has shorted together. Any visual damage to the wiring should be noted as a potential cause of the heater circuit malfunction and trouble code.
- Confirming The Heater Element Is Getting Power: This involves checking that the heater element is receiving 10 to 12 Volts DC with the key on but engine off (KOEO). This typically involves using a multimeter to measure the voltage between the wire of the connector that connects to the oxygen sensor fuse and Ground.
- Activating The Heater With A Scan Tool: If the visual inspection and voltage measurement do not reveal any issues, the next step is to command the heater circuit 'ON' using a professional technician level scan tool. This tool allows you to perform a functional test of the heater element by commanding it to turn on manually. This test verifies whether the heater circuit is capable of functioning properly when activated by the PCM.
Where To Buy The O2 Sensor And Save
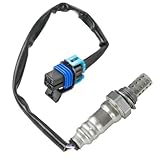
When replacing the oxygen sensor, it's crucial to identify the correct sensor based on its location in the exhaust system. The terms "Bank 1", "Bank 2", 'upstream', and 'downstream' are commonly used to distinguish between sensors on different sides of the engine:
Bank 1 refers to the driver-side of the engine (cylinders: 1, 3, 5, and 7), and Bank 2 refers to the passenger side (cylinders: 2, 4, 6, and 8). This important because generally there's a difference in the length of the O2 sensor's wiring and its connector.
Bank 1 Sensor 1 (Driver Side Upstream):
 43%
43%
Bank 2 Sensor 1 (Passenger Side Upstream):

 6%
6%Disclosure: As an Amazon Associate, I earn from qualifying purchases. If my tutorials help you, using these links is an easy way to support the site at no extra cost to you. Thank you!
NOTE: Not sure if the oxygen sensors listed above fit your particular vehicle? Don't worry, once you get to the site they'll make sure it fits by asking you the specifics of your particular vehicle. If it doesn't fit, they'll find you the right one.
More Chevy Express/GMC Savana Articles And Tutorials
You can find a complete list of articles and diagnostic tutorials for the V8 Chevy Express and GMC Savana here:
Here's a sample of the tutorials you'll find in the index:
- How To Test For The Fuel Pump (2008-2013 V8 Chevy Express, GMC Savana).
- How To Test For A Blown Head Gasket (2003-2013 V8 Chevy Express, GMC Savana).
- How To Diagnose An Engine Cranks But Does Not Start Problem (2003-2007 V8 Chevy Express, GMC Savana).
- How Can I Tell If The Automatic Transmission Is Bad? (2003-2013 Chevrolet Express, GMC Savana).

If this info saved the day, buy me a beer!

