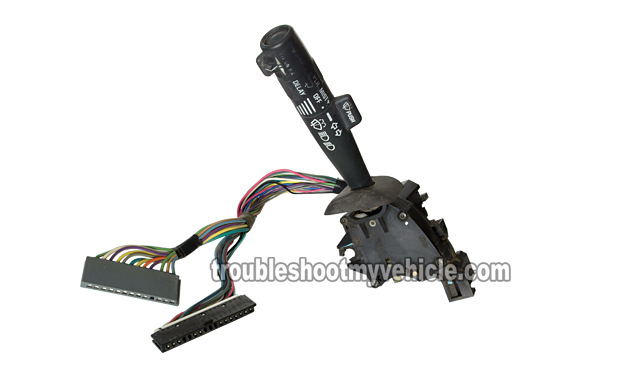
Testing to see if the wiper switch is bad or not is not that hard to do. In this article, I'll show you how to do it with a multimeter.
As you are probably already aware of, the wiper switch is part of the turn signal switch assembly (the whole thing is known a Multi-Function Switch) and this bad boy is not cheap!
You can expect to pay around $150+ US for it, so being able to test it and make sure that the wiper switch is truly fried will save you the frustration of replacing something that not only won't solve the problem but just made you throw your hard earned money away.
Contents of this tutorial:
- Symptoms Of A Bad Wiper Switch.
- What Tools Do I Need To Test The Wiper Switch?
- Wiper Switch Circuit Descriptions.
- TEST 1: Checking The Wiper Fuse Input.
- TEST 2: High Speed Wiper Circuit Test.
- TEST 3: Low Speed Wiper Switch Circuit.
- TEST 4: Wiper Delay (PULSE) Circuits.
- TEST 5: High Speed Circuit Resistance Test.
- Wiper Switch Test Summary.
Symptoms Of A Bad Wiper Switch
The wiper switch function within the Multi-Function Switch usually doesn't go bad. Doesn't mean it doesn't happen, because it does and when it does you'll see one of the following symptoms:
- No High Speed Wipers.
- No Low Speed Wipers.
- No Medium Speed Wipers.
- No Wiper Motor operation.
The most common culprit of NO wipers is usually a bad wiper motor but not always. So, the focus of this article is to help you test and either eliminate the wiper switch or condemn it as bad.
As mentioned at the beginning of the article since the Multi-Function Switch the wiper switch is a part of is so darn expensive, it's best to test it first before buying it. This article will help you to accomplish this.
What Tools Do I Need To Test The Wiper Switch?
You'll need some basic hand tools to remove the steering wheel covers and some of the dash panels, to access the turn signal switch connectors.
You'll also need:
- Multimeter.
- The multimeter can either be a digital one or an analog one.
- If you need to upgrade or buy a multimeter, check out my recommendation: Buying A Digital Multimeter For Automotive Diagnostic Testing (found at: easyautodiagnostics.com).
- Wire piercing probe.
- Although this tool is not an absolute must, if you do buy one, you'll realize just how easy it makes testing the voltages inside the wires.
- If you need to see what this tool looks like, you can see it here: Wire Piercing Probe.
As you can see from the list above, it's nothing that's gonna' break the bank.
Wiper Switch Circuit Descriptions

The Multi-Function Switch, that the wiper switch is a part of, has two connectors.
One connector is a gray one and the other is black.
Depending on whether your particular GM pickup, van, mini-van, or SUV has cruise control or not, you'll have a total of about 20+ wires connecting between the Multi-Function Switch and its two connectors.
Don't worry, we don't need to test all of the wires to check the wiper switch function within the Multi-Function Switch. As a matter of fact, we only need to worry about testing a total of 3 wires. These 3 circuits (wires) belong to the gray connector.
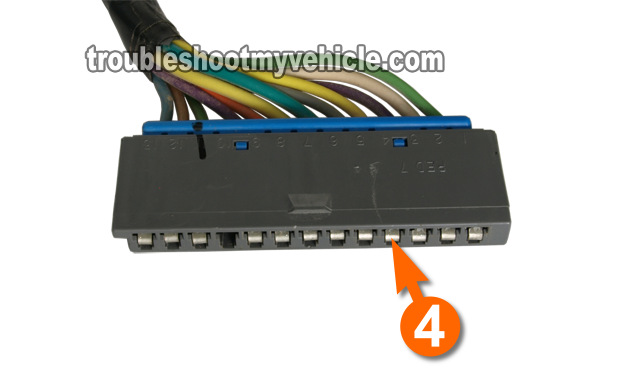
Now, we're gonna' need to identify the circuits (wires) that we need to test. So, let me tell you that each of the Multi-Function switch's connectors has numbers embossed on them to aid you in identifying the circuits:
- The gray connector has the numbers 1 through 13 embossed on one side.
- The black connector has the numbers 1 through 17 embossed on one side.
If you take a look at photo above, you'll see these embossed numbers on the connector.
We are only gonna' concern ourselves with 3 circuits (wires) of the gray connector and these circuits are:
- 13 Pin Gray Connector:
- Circuit 3: Windshield Wiper Motor High Speed Output.
- Circuit 4: Ignition Battery Power (Wiper Fuse Input).
- Circuit 5: Windshield Wiper Motor Low Speed Output.
You'll notice that there's no mention of the colors of the wires and this is intentional, since the colors on your specific vehicle may be different.
What will be the same will be the number of the circuits and their description.
Disabling The Air Bag System (SIR)
IMPORTANT: You will to disconnect the Multi-Function switch's connectors from the instrument panel harness connector to identify the circuits to test and this will require that you disable the air bag system on your GM vehicle (know as SIR: Supplemental Inflatable Restraint System).
Here are the factory instructions for disabling the air bag system:
- Turn the steering wheel so that the front wheels are pointing straight ahead.
- Turn the ignition switch to the 'Lock' position and remove the key.
- Remove the 'AIR BAG' fuse from the instrument panel fuse box.
- Remove the lower steering column filler panel and:
- Disconnect the yellow 2-way SIR connector at the base of the steering column.
- Wait 2 full minutes so that the air bag system is completely disabled.
Alright, let's turn the page and get testing.
TEST 1: Checking The Wiper Fuse Input

The very first thing you need to do is to make sure that the wiper fuse is OK.
So, please pull out the wiper fuse from the instrument panel fuse box and make sure it's not blown.
If the wiper fuse is blown, then you have found the solution to the 'no wiper' problem.
If the fuse is NOT blown, then the next step is to make sure that the wiper switch (inside the Multi-Function Switch) is getting voltage from the wiper fuse.
This will require that you disconnect the Multi-Function Switch's gray connector to identify the 3 wires you need to test. IMPORTANT: If you haven't already disabled the air bag system, do so now. You can find the instructions here: Disabling the Air Bag System (SIR).
Once you have identified the circuits that need to be tested (we'll be testing a total of 3), make sure you reconnect the gray Multi-Function Switch connector to the instrument panel harness connector.
This is what you'll need to do:
- Locate the circuit (wire) labeled with the number 4 of the Multi-Function Switch's gray connector.
- With an appropriate tool (like a Wire Piercing Probe), probe the wire between the gray connector and the Switch.
- Connect the red multimeter test lead to the tool piercing the wire.
- Set your multimeter to Volts DC mode.
- Turn the ignition switch to the RUN position.
- Ground the black multimeter test lead on a good Ground point.
- The best way to do this is to use a battery jump start cable to Ground the black multimeter test lead directly to the battery negative (-) terminal.
- Your multimeter will register one of two things: battery voltage (10 to 12 Volts) or no voltage at all.
Let's interpret your multimeter test result:
CASE 1: Your multimeter registered the indicated voltage. So far so good. The next step is t make sure that the wiper switch is re-directing the voltage to the wiper motor in High speed. Go to: TEST 2: High Speed Wiper Circuit Test.
CASE 2: Your multimeter DID NOT register the indicated voltage. Re-check your connections, make sure you're testing the correct wire and repeat the test.
If your multimeter still does not register battery voltage, then this tells one of three things:
- The wiper fuse is blown.
- There's an 'open-circuit' problem in the wiring between the gray connector and the instrument panel fuse box (although this would be extremely rare).
This test result also tells you that the wiper switch is OK and not bad, since without this battery voltage, from the fuse, the wiper switch won't work. You'll need to troubleshoot and diagnose this missing voltage before continuing any further.
