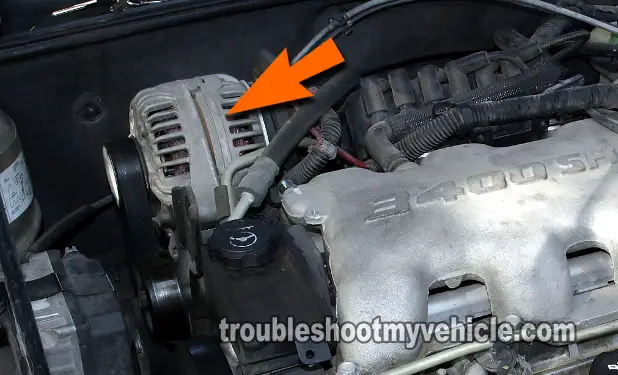
This article will walk you, step by step, through the testing of the alternator on your 3.1L or 3.4L GM car. No expensive testing equipment is needed, all you need is a multimeter to accomplish this test.
This is an on-car test of the alternator that's accomplished in three easy test steps.
To see if this alternator test article covers your specific 3.1L or 3.4L GM vehicle and alternator, you can take a look at the list of applications on the box labeled 'Applies To:' on the column on the right and scroll with the prev and next links.
Contents of this tutorial:
Symptoms Of A Bad Alternator
The most common symptom of a bad alternator are:
- The most obvious will be that the battery light will be On in your vehicle's instrument cluster.
- When you turn on the headlights, the glow very dim.
- Your vehicle starts easily with a jump-start, but only runs a few minutes until it stalls.
- Every time you re-charge the battery, the vehicle starts fine, but after the initial trip, it needs to be jump-started.
ALTERNATOR TEST 1: Checking Battery Voltage With Engine Running
You'll need to crank and start the car, so the battery has to be charged enough so that the vehicle will stay running for at least 15 minutes. If possible, charge the battery for at least 45 minutes before attempting the alternator test.
Also, whether you use a digital or an analog multimeter, it doesn't matter. Both will do the job. Alright, the very first thing you need to do is find out how much voltage the alternator is producing.
This is what you'll need to do:
- 1
Start the engine and let it idle.
- 2
Place your multimeter in Volts DC mode.
- 3
With the red multimeter test lead, touch the battery positive (+) terminal.
- 4
Connect the black multimeter test lead to the negative (-) battery terminal.
- 5
Observe the DC voltage your multimeter is registering. You'll need to know what this voltage is for the next step.
Now, if the alternator is charging, you'll notice that the reading, on your multimeter, will be above 13.5 Volts. If it's not charging, this reading will be around 12 Volts DC. - 6
Now, have your helper turn ON the headlights, the A/C (or heater) on high, windshield wipers, radio, etc. Have him or her turn everything inside that can be possibly be turned on
The idea here is to place an electrical load on the charging system to see if it can respond and meet the electrical demand. - 7
The multimeter's voltage reading will drop slightly and then stabilize around 13.5 to 14.5 Volts after something is turned ON.
Or the multimeter will drop in voltage and continue to drop further the more things get turned ON and the longer the vehicle runs. Usually dropping down to 9 Volts or less.
Let's interpret your test result:
CASE 1: Your multimeter registered 13.5 to 14.5 Volts from the beginning of the test to the end of the test: This test result lets you know that the alternator is working and charging.
Here's why: One indicator, that the alternator is producing enough electrical power to meet the demand of the vehicle is by producing at least 2 Volts over battery voltage (12.5 Volts). Since your multimeter test has confirmed this, the alternator is good.
CASE 2: If your multimeter DID NOT register 13.5 to 14.5 Volts from beginning to end and the voltage dropped to 9 Volts DC: This test result lets you know that the alternator is probably bad.
Here's why: An alternator that is not working (producing a charge) will not be able to produce any voltage. So, then the dropping voltage reading you saw on the multimeter is just the battery's voltage potential slowly being drained.
You could stop here and replace the alternator. Around 90% of the time, you would hit the nail right on the head and solve the no-charging condition. But to be absolutely sure, I suggest doing two more very simple tests. For this first one, Go to: ALTERNATOR TEST 2 Checking Continuity Of The Battery (+) Circuit.
ALTERNATOR TEST 2 Checking Continuity Of The Battery (+) Circuit

The charge that the alternator produces, on your 3.1L or 3.4L V6, is delivered to the battery across a single wire (circuit). This circuit is protected by an inline fusible link, that in the older vehicles is located on the starter motor solenoid and in the newer vehicles, it's located on the underhood fuse box.
Every now and then, this fuse or inline fusible link blows and the alternator's Power output never reaches the battery. This test step will help you to verify is this fusible link is blown or not.
This test is accomplished by doing a simple Ohms (resistance) test of the wire.
This is what you'll do:
- 1
Disconnect the negative (-) cable from the battery.
This is important! The battery positive cable must remain connected to the battery. - 2
Set your multimeter to Ohms mode.
- 3
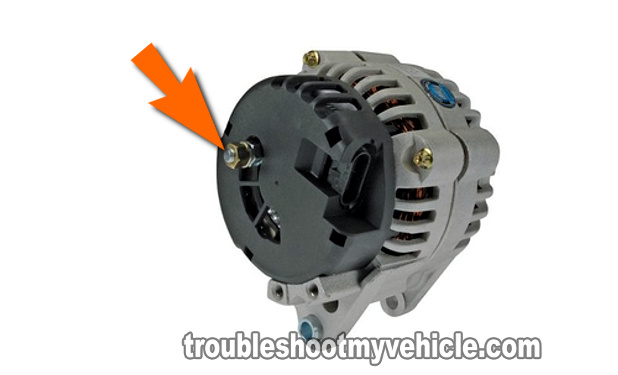
Touch the red multimeter test lead to the stud behind the alternator.
This stud is where the big wire, that supplies the alternator's output to the battery, is attached to with a nut.
Touch this stud with the red multimeter test lead. - 4
Connect the black multimeter test lead to the battery positive (+) terminal at the battery.
- 5
Your multimeter should show an Ohms value of about 0.5 Ohms if all is OK in this circuit and the inline fusible link is not blown,
If the inline fusible link is blown, your multimeter will register an infinite Ohms reading, which if you're using a digital multimeter, it'll display the letters OL.
OK, now that the testing part is done, let's take a look at what your results mean:
CASE 1: Your multimeter registered 0.5 Ohms. This result indicates that the inline fusible link is OK and not blown.
Now, there's just one more thing to check and you're done! The next test is to make sure that the alternator fuse in the underhood fuse box is not blown. For this test, go to: ALTERNATOR TEST 3: Checking The Alternator Fuse.
CASE 2: Your multimeter DID NOT register 0.5 Ohms, it registered OL. This result tells you that the inline fusible link is blown.
Replace the fusible link and retest. More than likely your problem will be solved and the alternator will begin charging again. The exact location of this inline fusible link varies from one GM vehicle to another. You'll need to check a repair manual to be sure.
ALTERNATOR TEST 3: Checking The Alternator Fuse
OK, this last test verifies that the alternator fuse in the underhood fuse box is OK. This fuse provides the voltage regulator inside of the alternator with 12 Volts. Without these 12 Volts, the alternator will not produce a charge. This fuse is normally labeled GEN BATT and is a 10 Amp fuse.
In this test, you're gonna' verify that there is indeed power (12 Volts) available in this circuit. This is what you'll need to do:
- 1
Reconnect the battery to it's negative (-) battery cable, that you disconnected in the previous test.
- 2
Locate the alternator fuse, which will be located in the fuse box in the engine compartment.
The exact location of this alternator fuse (GEN BATT) will vary from one vehicle to another and may be labeled differently. You'll need to consult your owner's manual or repair manual to find its exact location. - 3
Once you have located the ALT fuse, pull it out and verify that it is not blown.
Let's analyze your test results:
CASE 1: The fuse is NOT blown. This means that the alternator's voltage regulator is getting power.
You can conclude that the alternator on your GM 3.1L or 3.4L equipped vehicle is bad and needs to be replaced if you have:
- Confirmed that the alternator's output goes down to 12 Volts or less when placing a load on it (TEST 1).
- Confirmed that the alternator output's cable has continuity (TEST 2).
- Confirmed in this section that the alternator fuse is OK.
CASE 2: The fuse IS blown. This tells you that the voltage regulator is not getting power.
Replace the fuse and start the vehicle up and check to see if the alternator is charging the battery.
Related Test Articles
I have written quite a few articles on the GM 3.1L and 3.4L equipped cars to help you solve the most common types of problems with specific troubleshooting tests. You can find them in this index: GM 3.1L, 3.4L Index Of Articles.
Here's a sample of the tutorials you'll find in the index:
- How To Test The Fuel Pump -No Start Tests (GM 3.1L, 3.4L).
- How To Test A Blown Head Gasket (GM 3.1L, 3.4L).
- How To Test The Fuel Injectors (GM 3.1L, 3.4L).
- How To Test Engine Compression (GM 3.1L, 3.4L).

If this info saved the day, buy me a beer!

