P0132: O2 Sensor Circuit High Voltage (Bank 1 Sensor 1)
OK, in layman's terms, a P0132 O2 Sensor Circuit High Voltage (Bank 1 Sensor 1) diagnostic trouble code (DTC) is telling you:
- That the upstream oxygen sensor is creating and thus reporting a continuous high voltage to the PCM (Powertrain Control Module). This continuous voltage will be over 0.5 Volts (500 millivolts).
- This ‘stuck’ voltage will be a value between 0.5 and 1.0 Volt DC (500 millivolts to 1 Volt).
- Usually, any continuous high voltage from the upstream O2 sensor above 0.5 Volts indicates a Rich condition (too much fuel present in the air/fuel mixture) but not always, since the O2 sensor can fail and produce the same results.
- A Rich condition simply refers to the fact that the engine's air/fuel mixture is too fuel heavy for proper/ideal combustion.
In a normally operating system, the front (upstream) O2 sensor will produce a voltage that will constantly change between 0.1 Volt to 0.9 Volts DC (with the engine is running of course). When a P0132 diagnostic trouble code is registered in the PCM memory, the PCM is seeing a voltage that stays continually fixed somewhere above 0.5 Volts.
A P0132 could be caused by a:
- Bad oxygen sensor.
- The oxygen sensor fails internally in such a way that it stays stuck producing a continuous high voltage above 0.5 Volts (500 millivolts).
- A Rich condition due to a:
- A fuel pressure regulator that's leaking fuel into its vacuum line/hose.
- Clogged fuel injectors that are not correctly atomizing the fuel that they are spraying into the cylinder.
- Tune up parts (like: spark plugs, spark plug wires, ignition coil packs) that have failed or are too worn out and are causing a misfire condition. The end result is unburned fuel flowing into the exhaust and causing the upstream O2 sensor to produce a high voltage.
With this basic information under our belts, let's take a look at how to test/diagnose DTC P0132 in the next section.
How To Diagnose Trouble Code P0132
Testing a P0132 diagnostic trouble code is pretty easy. The first thing you'll need to do is to confirm that the O2 sensor voltage is indeed stuck above 0.5 Volts and for this you'll need a scan tool that can display Live Data.
Once you've confirmed that the upstream O2 sensor is stuck producing a high voltage (by seeing this ‘stuck’ voltage on the scan tool), you can test the O2 sensor itself (without having to replace it first) to see if it's bad or not. How? -By inducing a Lean condition.
When a Lean condition is created, the upstream (pre-catalytic converter) oxygen sensor's voltage will come down below 0.5 Volts, usually to about 0.1 Volts (100 millivolts).
If the oxygen sensor voltage does come down, then this test result will tell you that the O2 sensor is good and operating properly and that the problem is elsewhere.
To get this party started, this is what you'll need to do:
- 1
Connect your scan tool to the your car or mini-van and start the engine (Don't have a scan tool? Need a scan tool? check out my recommendation: Actron CP9580 Scan Tool Review).
Let the engine idle for at least 15 minutes before you start the test, to get the O2 sensor to activate. - 2
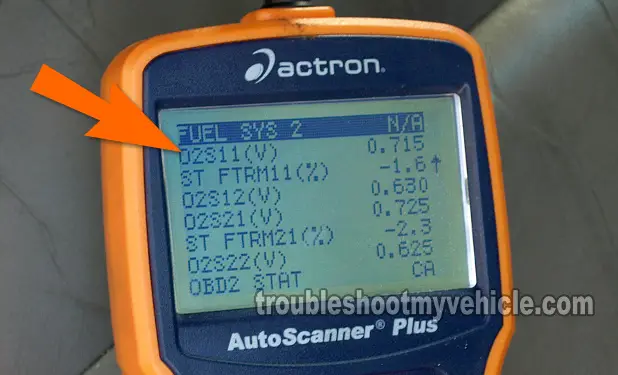
Now, on your scan tool (and once you're in Live Data mode), scroll down to the PID that's labeled O2S11. This PID is the one that will show you what the oxygen sensor is reporting in Volts DC.
- 3
Now, take a look at the voltage readings for O2S11.
These should be constantly moving between any number between 0.100 Volts and 0.900 Volts.
If the voltages are not moving between 0.100 and 0.900 Volts, don't worry about it just yet, let's go on to the next step. - 4
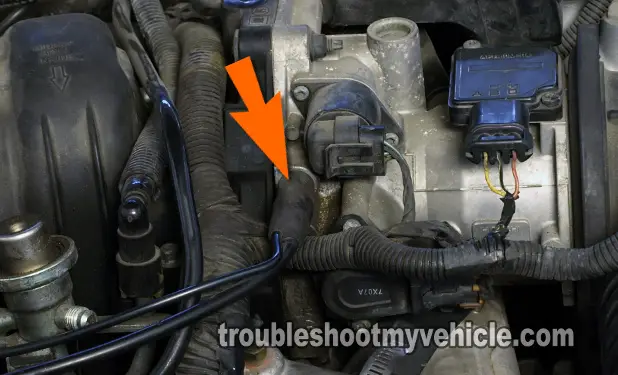
With the engine running, start to disconnect a big vacuum hose while you observe your scan tool's display screen, but don't disconnect the hose completely.
Note: This has to be a big vacuum hose, like the one in photo 2 of 2 in the image viewer or the hose that connects to the vacuum booster. The idea is not to unplug the line completely, but to disconnect only enough to let air in and raise the idle. - 5
As ambient air starts to get sucked into the vacuum hose's port, you should see the voltage numbers of O2S11 immediately go down to about 0.100 Volts.
- 6
Reconnecting the vacuum hose and see if the O2 sensor's reading goes back to it previous activity.
Let's take a look at what your test results mean:
CASE 1: The upstream O2 sensor's voltage decreased to about 0.1 Volts. This test result eliminates the oxygen sensor as bad since it responded to the Lean condition you have just created.
Now, if the oxygen sensor's voltage is still stuck above 0.5 Volts, then you've got a bonafide Rich condition being caused by one of the following:
- A bad fuel pressure regulator that's leaking fuel into its vacuum hose.
- Clogged fuel injectors.
- An ignition system misfire.
CASE 2: The upstream O2 sensor's voltage DID NOT decrease to 0.1 Volts. This test result confirms that the upstream oxygen sensor is bad and needs to be replaced.
If the oxygen sensor was operating normally, it would have reacted to the vacuum leak, you just created, by immediately producing a voltage around 0.1 Volts (100 millivolts) since it did not, you can deduce correctly that it's fried and needs to be replaced.


