This article will help you to get to the bottom of diagnostic trouble codes: P0620 and P0622 by helping you check one of the alternator's voltage regulator's circuits.
As you may already be aware, this alternator is a computer controlled alternator. And when the check engine light (CEL) lights up with one of these two trouble codes, the PCM is having a hard time operating/controlling the charging system (alternator) of your 4.8L or 5.4L Ford pickup, van, or SUV.
What usually happens (and IT HAPPENS A LOT) when you see one of these two diagnostic trouble codes, is that the alternator was replaced, yet the Battery Charge Light inside the vehicle does not turn off. In a lot of these cases, the alternator is outputting 14+ Volts, yet the PCM senses a failure in the charging system.
If this is happening to you and find yourself scratching your head and wondering what the heck is wrong (if the alternator or the PCM is the problem), then you've found the right tutorial to show you how to eliminate the alternator or condemn the alternator as bad (even if new out of the box).
Here are the diagnostic trouble code descriptions:
- P0620: Generator Control Circuit Malfunction.
- P0622: Generator Field "F" Control Circuit Malfunction.
What Tools Do I Need
Here's a basic list of tools you'll need:
- Multimeter.
- If you need to upgrade or buy a multimeter, check out my recommendation: Buying A Digital Multimeter For Automotive Diagnostic Testing (found at: easyautodiagnostics.com).
- Scan tool.
- NOTE: A scan tool is not needed to use the testing info in this tutorial but the scan tool does come in handy to retrieve the diagnostic trouble codes.
- If you don't have one, and have decided it's time to buy one, check out my recommendation: Actron CP9580 Scan Tool Review.
TEST 1: Resistance Test

The test involves testing the resistance between the case of the alternator and one of the voltage regulator's pins with your multimeter in Ohms mode (to find out if the alternator is the one causing the P0620 or P0622 diagnostic trouble code).
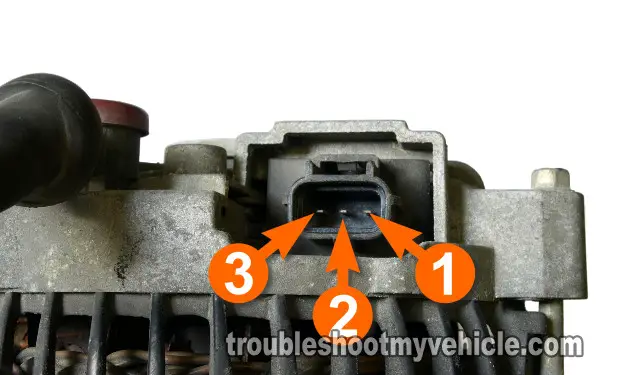
As you can see from the photo the voltage regulator has 3 pins/3 wires connected to it.
Since there are three pins (in the voltage regulator), you need a way to identify them and in this section, we'll identify them using the photo in the image viewer and the chart below:
OK, this what you'll need to do:
- Disconnect the alternator's voltage regulator's electrical connector.
- Place the multimeter in Ohms (Ω) mode.
- Locate the voltage regulator's pin identified with the number 1 in photo 1 of 2.
- Connect the red multimeter test lead to this metal pin.
- Ground the black multimeter test lead directly on the alternator's case.
- NOTE: If you have a brand new alternator on your hands, the case will be painted. Find a bare metal spot on the case to Ground the multimeter lead.
- If all is good, your multimeter should register 1.2 to 1.6 K Ohms (Ω).
- If your multimeter registers anything else, repeat the test several times to make sure of the test result.
- If the voltage regulator is bad (and causing the trouble codes: P0620 or P0622), your multimeter will register a resistance much higher than the 1.2 to 1.6 K Ohms. It will usually be around 60+ K Ohms or more.
Let's interpret your test result:
CASE 1: The multimeter recorded the indicated resistance. This tells you that the cause of the fault in the charging system is not the alternator.
CASE 2: The Multimeter DID NOT record the indicated resistance. Make sure that you're testing the correct pin, that your connections are OK, and repeat the test.
If you still don't see the indicated resistance (1.2 to 1.6 K Ohms), then you have a bad alternator on your hands and you have found the cause of the diagnostic trouble codes P0620 or P0622.
