

In this tutorial I'll show you an easy way to test the MAF sensor on your Ford Fiesta. The test is done with a multimeter, you don't need a scan tool for this test.
With your test results, you'll find out if the MAF sensor is working or if its bad.
Contents of this tutorial:
ES  You can find this tutorial in Spanish here: Cómo Probar El Sensor MAF Con Multímetro (2011-2013 1.6L Ford Fiesta) (at: autotecnico-online.com).
APPLIES TO: This tutorial applies to the following vehicles:
- 1.6L Ford Fiesta: 2011, 2012, 2013.
Symptoms Of A Bad MAF Sensor
As you're probably already aware, the mass air flow (MAF) sensor measures the amount of air entering the engine. The fuel injection computer then uses this info to determine the correct amount of fuel to inject into the engine.
If the MAF sensor malfunctions or fails, the fuel injection computer will no longer correctly adjust the air/fuel mixture and engine performance is gonna suffer. You'll see one or more of the following problems:
- Check Engine Light: The check engine light will be shining nice and bright on your dashboard and one of the following diagnostic trouble codes will stored in the computer's memory:
- P0102: MAF Signal Low Input to PCM.
- P0103: MAF Signal High Input to PCM.
- Poor Engine Performance: You may experience a lack of power or hesitation during acceleration, especially under heavy loads or at higher speeds.
- Rough Idling or Stalling: The engine may idle rough or even stall unexpectedly.
- Decreased Fuel Efficiency: A faulty MAF sensor can disrupt the air-fuel mixture, causing the engine to run either too rich (excessive fuel) or too lean (insufficient fuel). The end result is bad gas mileage.
- Black Smoke from Exhaust: An overly rich air-fuel mixture due to a faulty MAF sensor can result in black smoke coming out of the exhaust pipe.
- Difficulty Starting: In some cases, a failing MAF sensor may cause difficulty starting the engine.
- Stalling at Idle: The engine may stall when idling.
- Hesitation or Surging: You might notice hesitation or surging during acceleration or while driving at a consistent speed.
MAF Sensor Circuit Descriptions
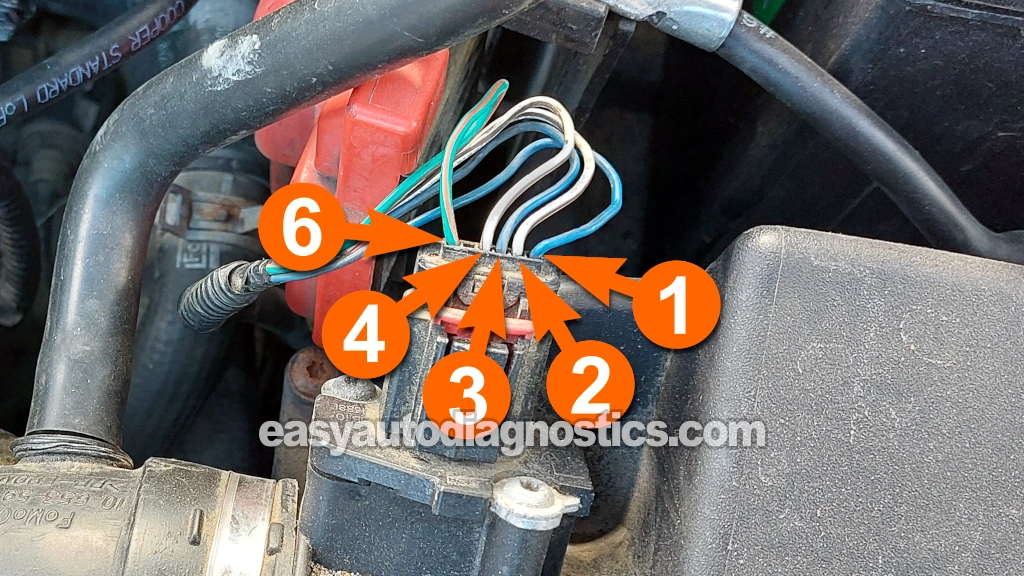
In order to correctly diagnose the MAF sensor as good or bad, we need to know what each of the four wires coming out of the connector is doing.
The following table provides a brief description of each wire:
| Terminal | Wire | Description |
|---|---|---|
| 1 | Blue (BLU) | IAT Sensor Signal |
| 2 | White with brown stripe (WHT/BRN) | IAT Sensor Ground (provided by PCM) |
| 3 | Blue with grey stripe (BLU/GRY) | MAF Sensor Signal |
| 4 | White with brown stripe (WHT/BRN) | MAF Sensor Ground (provided by PCM) |
| 5 | -- | Empty |
| 6 | Green with orange stripe (GRN/ORG) | 12 Volts (in RUN or START) |
Where To Buy The MAF Sensor And Save
The following MAF sensors are of known automotive brands (brands that I use myself):


Disclosure: As an Amazon Associate, I earn from qualifying purchases. If my tutorials help you, using these links is an easy way to support the site at no extra cost to you. Thank you!
NOTE: Not sure if the indicated MAF sensors fit your particular Ford Fiesta? Don't worry. Once you get to the site, they'll ask you for the specifics of your particular vehicle. If it doesn't fit, they'll find you the right one.
TEST 1: Testing The MAF Signal
To get started, we're gonna check the MAF sensor's output signal and make sure that it reacts to changes in engine speed.
Specifically, the MAF sensor's output voltage signal should increase as engine speed increases and decrease as engine speed decreases.
Generally, when the MAF sensor fails, its output voltage will stay stuck in one value regardless of engine speed.
IMPORTANT: The MAF sensor must be connected to its connector to perform this test. You'll need to use a back probe on the connector or a wire piercing probe on the wire. You can see an example of this tool here: Goupchn 4mm Banana to Banana Plug Test Leads Kit (Amazon affiliate link).
Let's get started:
- 1
Reconnect the MAF sensor to its electrical connector.
- 2
Place your multimeter in Volts DC mode.
- 3
Connect the black multimeter test lead to the battery (-) negative terminal.
- 4
Connect the red multimeter test lead to the wire labeled with the number 3 using a suitable tool.
- 5
Crank and start the engine and let her idle.
Once the idle stabilizes, take a look at the voltage number or numbers your multimeter is throwing at you. This voltage may fluctuate a little or a lot, and this is OK. Whatever they're doing, this is your base MAF signal voltage. - 6
Accelerate the engine by having a helper step on the gas pedal.
- 7
The voltage value should increase as the engine speed increases.
- 8
Decelerate the engine by having your helper step off the gas pedal.
- 9
The voltage value should decrease as the engine speed decreases.
- 10
Repeat steps 6 through 9 several times to make sure of your test result.
Let's see what your test results mean:
CASE 1: The voltage reading increased/decreased as you increased/decreased the engine speed. This tells you that the MAF sensor is good and is not the cause of the engine performance problem.
CASE 2: The voltage value stayed stuck in one value regardless of engine speed. This usually tells you that the MAF sensor is bad.
To make sure it's bad, we need to check a few more things. For the next test, go to: TEST 2: Making Sure The MAF Sensor Is Getting Power.
TEST 2: Making Sure The MAF Sensor Is Getting Power
The MAF sensor needs power, in the form of 12 Volts, to function and produce a viable MAF signal the fuel injection computer can use.
In this test section, we're gonna check that the wire I've labeled with the number 6 is delivering 10 to 12 Volts to the MAF sensor.
We'll do a simple multimeter voltage test to confirm the presence of this voltage with the key in the RUN position (but with the engine off).
IMPORTANT: Be careful not to damage the front of the connector or female terminal with the multimeter test lead, or you'll need to replace the connector.
These are the test steps:
- 1
Disconnect the MAF sensor from its electrical connector.
- 2
Place your multimeter in Volts DC mode.
- 3
Connect the black multimeter test lead to the battery negative (-) terminal.
- 4
Gently probe the female terminal that connects to the wire I've labeled with the number 6 with the red multimeter test lead.
This wire should be the green with orange stripe (GRN/ORG) wire of the MAF sensor connector. - 5
Turn the key to the RUN position but don't crank or start the engine.
- 6
You should see 10 to 12 Volts on the multimeter.
Let's interpret your test result:
CASE 1: The multimeter registered 10 to 12 Volts. This is the correct result.
The next step is to make sure the MAF sensor has Ground, for this, go to: TEST 3: Making Sure The MAF Sensor Is Getting Ground.
CASE 2: The multimeter DID NOT register 10 to 12 Volts. Double check all your multimeter connections and test again.
If you still don't see 10 to 12 Volts, you can conclude that the MAF sensor itself is not at fault as it will not function without 12 Volts.
TEST 3: Making Sure The MAF Sensor Is Getting Ground
OK, so far you have:
- Confirmed that the MAF sensor's voltage output is stuck in one value regardless of engine speed (TEST 1).
- Confirmed that the MAF sensor is getting 10 to 12 Volts (TEST 2).
In this last test section, we're now gonna make sure that it's getting Ground from the fuel injection computer.
The wire that delivers this Ground to the MAF sensor is the one I've labeled with the number 4 (see photo above).
Let's get going:
IMPORTANT: Be careful not to damage the front of the connector or female terminal with the multimeter test lead, or you'll need to replace the connector.
IMPORTANT: This Ground is provided by the fuel injection computer internally. Be careful not to connect this wire to battery 12 Volts, or you'll fry the computer. The multimeter voltage test I'm suggesting in the instructions below is a safe way to check for the presence of Ground in this circuit.
These are the test steps:
- 1
Disconnect the MAF sensor from its electrical connector.
- 2
Place your multimeter in Volts DC mode.
- 3
Connect the red multimeter test lead to the battery positive (+) terminal.
- 4
Gently probe the female terminal that connects to the wire I've labeled with the number 4 with the black multimeter test lead.
This wire should be the white with brown stripe (WHT/BRN) wire of the MAF sensor connector. - 5
Turn the key to the RUN position but don't crank or start the engine.
- 6
You should see 10 to 12 Volts on the multimeter.
Let's see what your test results mean:
CASE 1: Your multimeter registered 10 to 12 Volts. This is the correct result and confirms Ground is available to the MAF sensor.
You can conclude that the mass air flow (MAF) sensor is faulty if you have:
- Confirmed the MAF sensor's signal is stuck in value regardless of engine speed (TEST 1).
- Confirmed the MAF sensor is receiving 10 to 12 Volts (TEST 2).
- Confirmed the MAF sensor is receiving Ground from the PCM (this test section).
CASE 2: Your multimeter DID NOT register 10 to 12 Volts. This test result indicates the MAF sensor is not receiving Ground.
Recheck all your multimeter connections and test again. If your multimeter still doesn't read 10 to 12 Volts, you can conclude that the MAF sensor itself isn't faulty as it won't work without Ground from the fuel injection computer.
Your next step is to figure out why this Ground is missing and restore it.
More 1.6L Ford Fiesta Test Tutorials
If this tutorial was helpful, be sure and take a look at all of the 1.6L Ford Fiesta diagnostic tutorials in this index:
Here's a sample of the tutorials you'll find there:
- How To Test The Ignition Coil Pack (2011-2019 1.6L Ford Fiesta).
- How To Test Engine Compression (2011-2019 1.6L Ford Fiesta).
- How To Test For A Blown Head Gasket (2011-2019 1.6L Ford Fiesta).
- Fuel Injector Circuit Wiring Diagram (2011-2013 1.6L Ford Fiesta).

If this info saved the day, buy me a beer!
