")
The fastest and the most accurate way to test the manifold absolute pressure (MAP) sensor on your 1991-1995 3.0L equipped Chrysler, Dodge, or Plymouth vehicle is to bench-test it with a multimeter.
In this tutorial, I'll show you how in a step-by-step way so that you can find out if the MAP sensor is bad (or good).
This tutorial will also help you diagnose OBD I trouble code: Code 14: MAP Sensor Voltage High/Low.
Contents of this tutorial:
- Symptoms Of A Bad MAP Sensor.
- What Tools Do I Need To Test The MAP Sensor?
- MAP Sensor Diagnostic Essentials.
- MAP Sensor Connector Pinout.
- Where To Buy The MAP Sensor And Save.
- TEST 1: Testing The MAP Signal With A Multimeter.
- TEST 2: Making Sure The MAP Sensor Is Getting Power.
- TEST 3: Making Sure The MAP Sensor Is Getting Ground.
- More 3.0L Chrysler Tutorials.
ES ![]() You can find this tutorial in Spanish here: Cómo Probar El Sensor MAP (1991-1995 3.0L Chrysler, Dodge, Plymouth) (at: autotecnico-online.com).
You can find this tutorial in Spanish here: Cómo Probar El Sensor MAP (1991-1995 3.0L Chrysler, Dodge, Plymouth) (at: autotecnico-online.com).
APPLIES TO: This tutorial applies to the following vehicles:
- 3.0L Chrysler LeBaron: 1991, 1992, 1993, 1994, 1995.
- 3.0L Dodge Daytona: 1991, 1992, 1993.
- 3.0L Dodge Dynasty: 1991, 1992, 1993.
- 3.0L Dodge Monaco: 1991, 1992.
- 3.0L Dodge Shadow: 1992, 1993, 1994.
- 3.0L Dodge Spirit: 1993, 1994, 1995.
- 3.0L Plymouth Acclaim: 1993, 1994, 1995.
- 3.0L Plymouth Sundance: 1993, 1994.
Symptoms Of A Bad MAP Sensor
The MAP sensor is a critical component of the engine management system in your car or mini-van when it fails, the most obvious symptom is the check engine light (CEL) shining nice and bright on your instrument cluster and the following trouble code registered in the PCM's memory:
- Code 14: Manifold Absolute Pressure (MAP) Circuit Low Voltage.
- Code 14: Manifold Absolute Pressure (MAP) Circuit High Voltage.
You'll also see one or more of the following:
- Bad gas mileage.
- Won't pass the emissions test.
- Black smoke coming out the tail pipe when the engine in your 3.0L Chrysler car or mini-van is running.
- Your car or mini-van will crank but not start.
- Longer than normal cranking time before the engine starts.
- Engine idles very rough and may stall.
What Tools Do I Need To Test The MAP Sensor?
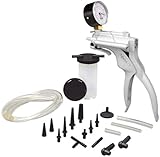
The most important tool that you'll need is a multimeter. Here a few other tools you'll need:
- A vacuum pump.
- The vacuum pump is not an absolute must, since you can use the good ole lungs to apply vacuum to the sensor in TEST 1 of this tutorial.
- If you don't have one and/or need to buy one, this is the one that I recommend and you can buy it here: MV8000 Automotive Tune-up and Brake Bleeding Kit.
- Wire piercing probe.
- Although this tool is not an absolute must, if you do buy one, you'll realize just how easy it makes testing the voltages inside the wires.
- If you need to see what this tool looks like, you can see it here: Wire Piercing Probe.
MAP Sensor Diagnostic Essentials
")
The MAP sensor's job is to continuously measure the pressure (vacuum) inside the intake manifold while the engine is running and send this information to the fuel injection computer.
The fuel injection computer uses the MAP sensor input, along with inputs from the crankshaft sensor, throttle position sensor (TPS), and intake air temperature sensor to calculate the amount of air entering the engine.
Having calculated how much air enters the engine, the computer can now calculate the correct amount of fuel to inject into the engine (among other things).
MAP Sensor Connector Pinout
")
| Pin | Wire Color | Description |
|---|---|---|
| 1 | Violet with white stripe (VIO/WHT) or violet (VIO) | 5 Volts |
| 2 | Dark green with red stripe (DK GRN/RED) | MAP Voltage Signal |
| 3 | Black with light blue stripe (BLK/LT BLU) | Sensor Ground |
Where To Buy The MAP Sensor And Save
If you need to buy the MAP sensor, check out the following links. They'll help you comparison shop for known automotive brand name MAP sensors (helping you avoid cheap knock-off sensors that won't last):


Disclosure: As an Amazon Associate, I earn from qualifying purchases. If my tutorials help you, using these links is an easy way to support the site at no extra cost to you. Thank you!
NOTE: Not sure if the above MAP sensor fits your particular vehicle? Don't worry, once you get to the site they'll make sure it fits. If it doesn't, they'll find you the right one.
TEST 1: Testing The MAP Signal With A Multimeter
In this first test, we're gonna bench-test the MAP sensor by manually applying vacuum to it and while it's still connected to its electrical connector (but with the engine off).
You'll tap into the dark green with red stripe (DK GRN/RED) wire of the MAP sensor's connector (since this is the wire that carries the MAP signal to the PCM) with your multimeter and see if the voltage signal increases/decreases as you apply and release vacuum to the MAP sensor's vacuum port.
NOTE: Although the instructions assume you're using a vacuum pump, if you don't have one, you can use your mouth and a vacuum hose to apply vacuum to the MAP sensor's vacuum port.
IMPORTANT: The MAP sensor must remain connected to its electrical connector to test its MAP signal voltage. You'll need to use a back-probe on the connector or a wire piercing probe on the wire. You can see an example of this tool and where to buy it here: Wire-Piercing Probe.
OK, this is what we'll do:
- 1
Remove the MAP sensor from its place.
NOTE: If you had to disconnect the MAP sensor to remove it, reconnect it now to its electrical connector. - 2
Connect your vacuum pump to the MAP sensor's vacuum inlet port.
- 3
Set your multimeter's selector to Volts DC mode.
- 4
Connect the red multimeter test lead to the DK GRN/RED wire of the MAP sensor's connector.
IMPORTANT: Remember, the MAP sensor must remain connected to its 3 wire connector. - 5
Ground the black multimeter test lead directly on the battery negative (-) terminal.
- 6
When everything is ready, turn the key to the ON position but don't start the engine.
This will power up the MAP sensor and you should see a reading of 4.7 Volts DC on your multimeter. - 7
Now, apply vacuum to the MAP sensor with the vacuum pump (or your mouth). The voltage signal value should decrease.
- 8
Release the vacuum. Once released, your multimeter should show the original voltage value.
- 9
Apply and release vacuum to the MAP several times.
Each time the voltage should decrease/increase as you apply/release vacuum.
Let's take a look at what your test results mean:
CASE 1: The MAP sensor's voltage decreased/increased as you applied/released vacuum. This tells you that the MAP sensor is OK and not defective.
This test result also confirms that the MAP sensor is getting power (5 Volts) on the VIO/WHT wire and Ground on the BLK/LT BLU wire.
CASE 2: The MAP sensor's voltage DID NOT decrease/increase as you applied/released vacuum- 9 times out of 10 this test result usually means that the MAP sensor is bad but just to make sure, we need to confirm that the MAP sensor is getting both power and Ground.
For the next step, go to: TEST 2: Making Sure The MAP Sensor Is Getting Power.