")
Sooner or later, the fuel pump in your 1995-1999 2.0L Neon will fail. If you suspect it's having issues, I can tell you that testing it is quite easy. In this tutorial, you'll find the information you need to test it!
I'm also including instructions on how to test a 'cranks but does not start' issue, to see if it's caused by a lack of fuel, with starting fluid.
NOTE: This tutorial applies only to the 2.0L SOHC engine (Single Overhead Camshaft).
Contents of this tutorial:
 You can find this tutorial in Spanish here: Cómo Probar La Bomba De Combustible (1994-1999 2.0L SOHC Dodge/Plymouth Neon) (at: autotecnico-online.com).
APPLIES TO: This tutorial applies to the following vehicles:
- 2.0L Dodge Neon: 1995, 1996, 1997, 1998, 1999.
- 2.0L Plymouth Neon: 1995, 1996, 1997, 1998, 1999.
NOTE: You can find the fuel pump pressure test procedure for the 2000-2005 2.0L Dodge/Plymouth Neon here:
IMPORTANT: Gasoline is extremely flammable. Be careful and take all necessary safety precautions. Be careful when using a starting fluid, as it ignites as easily as gasoline. You can successfully perform both tests without any issues if you proceed with care. Also, make sure to perform all tests with a cooled down engine, work in a well-ventilated area, and stay away from open flames or sparks.
Symptoms Of A Bad Fuel Pump
Fuel pumps often fail in one of two ways:
- Complete failure: The engine cranks but doesn't start.
- Slow failure: the engine starts and runs but experiences performance issues, especially under load.
To be a bit more specific, here are some of the symptoms you'll see from a complete fuel pump failure:
- The engine cranks but doesn't start.
- No fuel pressure is detected.
- No noise from the fuel pump.
These are some of the symptoms of a slow fuel pump failure:
- Lack of power when accelerating the engine under load.
- Unexplained loss of power.
- Bad gas mileage.
- The engine suddenly stalls.
Whether the fuel pump is failing or has failed, a fuel pressure test with a fuel pressure gauge will help you identify the cause of the problem. Not only that, but this simple test will simplify your fuel pump diagnostic, meaning you'll spend less time (and less frustration) solving the issue and be able to replace the right part.
Where to Buy a Fuel Pressure Gauge
One of the most important tools that anyone working on their own vehicle should have in their toolbox is a fuel pressure gauge. The good news is that you can buy them at almost any auto parts store and online.
The following fuel pressure test kits are very good deals and will connect to the vehicles included in this tutorial:
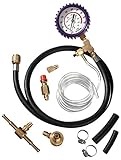


All of the fuel pressure test kits above have the adapter that'll connect to the fuel pressure test port of your Neon.
Fuel Pressure Specifications
| 2.0L SOHC Neon | ||
|---|---|---|
| Year | KOEO | KOER |
| 1995-1996 | 46-50 PSI | No dado |
| 1997-1999 | 49 PSI | No dado |
- KOEO = Key On Engine Off.
- KOER = Key On Engine Running.
Fuel Pressure Test With A Gauge
")
The 1994-1999 Dodge and Plymouth Neon SOHC engine comes equipped with a fuel pressure test port (Schrader valve) on the fuel injector rail. In the photo above, the orange arrow points to the Schrader valve where you'll connect your fuel pressure gauge.
According to the factory repair manual, you need a scanner to activate the fuel pump and check its pressure output with the key on and the engine off, which is great if you have one.
For the rest of us without one, here's the alternative: if the engine starts, simply disconnect the electrical connectors from the fuel injectors and crank the engine. It's the same procedure if the engine does not start. The following steps assume you're not using a scan tool to activate the fuel pump and check the pressure.
OK, these are the test steps:
- 1
Disconnect the four fuel injectors from their electrical connectors.
NOTE: This step only applies if the engine starts and runs. - 2
Remove the dust cap from the Schrader valve on the fuel injector rail.
- 3
Place a towel under the area of the Schrader valve.
- 4
Connect the fuel pressure gauge to the Schrader valve.
Use a towel to dry any fuel that may have been released during the gauge connection process. - 5
When you're ready, have your assistant crank the engine while you observe the pressure gauge.
- 6
The gauge should display the specified fuel pressure.
Let's take a look at what your results mean:
CASE 1: The fuel pump pressure is within specification. This indicates that the fuel pump is in good working condition and supplying fuel to the injectors.
If your Neon's engine doesn't start, then this test result rules out the fuel pump as the source of the engine's 'cranks but does not start' issue.
CASE 2: The fuel pump pressure is NOT within specification. This result tells you that the fuel pump is not functioning. Since the fuel pump isn't working, you can now conclude that it's behind the 'cranks but does not start' issue of your Neon.