TEST 2: Verifying MAP Sensor Has Power

So far, you have confirmed that the MAP sensor's voltage signal (on the ORG/GRN wire) is not decreasing as you apply vacuum to the sensor.
In this test step, we're gonna' check and see if the MAP sensor is being fed with power. Because if it's not being fed with power, it's not gonna' create a MAP voltage signal that responds to increases/decreases in vacuum.
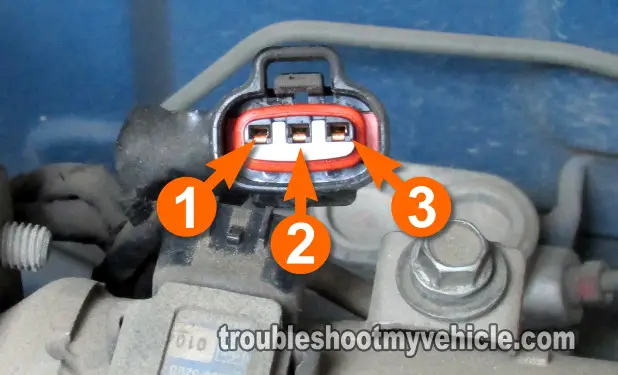
This power is in the form of 5 Volts DC and are provided by the vehicle's powertrain control module (PCM). The LT GRN wire is the one that supplies power to the MAP sensor.
NOTE: You can test for these 5 Volts DC with the MAP sensor connected or disconnected to the MAP sensor. I personally prefer to do this test with the MAP sensor's connector unplugged.
This is what you'll need to do:
- 1
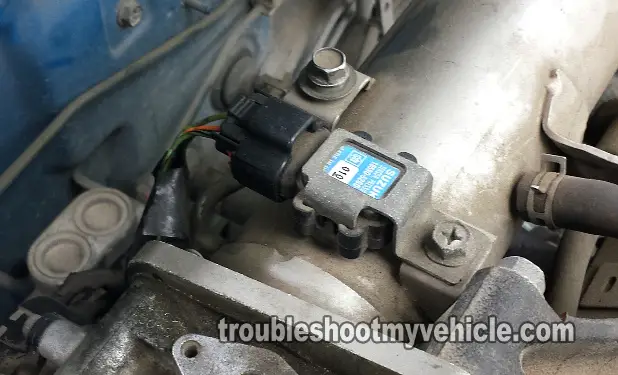
Disconnect the MAP sensor from its connector.
- 2
Place your multimeter's dial in Volts DC mode.
- 3
Turn the key on but don't start the engine.
This will power up the MAP sensor's connector. - 4
Connect the red multimeter test lead to the LT GRN wire.
IMPORTANT If you probe the front of the MAP sensor harness connector, be careful and don't damage the terminal. Damaging the terminal will require that you replace the connector. - 5
Connect the black multimeter test lead to the negative (-) battery terminal.
- 6
When you've set up the test, have a helper turn the key to the ON position but don't crank or start the engine.
- 7
Your multimeter should display 4.5 to 5 Volts on its screen.
OK, now let's interpret your test results below:
CASE 1: The multimeter registered 4.5 to 5 Volts. So far so good since this tells you that the manifold absolute pressure (MAP) sensor is getting power from the powertrain control module (PCM).
The next step (and the last test) is to check that the LT GRN/BLK wire (which connects to terminal number 1 of the MAP sensor's harness connector) is providing Ground. For this test, go to: TEST 3: Verifying MAP Sensor Has Ground.
CASE 2: Multimeter DID NOT register 4.5 to 5 Volts. Double check all of your connections and repeat the test.
If your multimeter still doesn't register the 4.5 to 5 Volts DC, then you've just eliminated the MAP sensor itself, on your Suzuki, as bad. The two most likely reasons for this are: 1) an open in the wire between the MAP sensor's harness connector and the PCM's harness connector or 2) the PCM may be fried (although a bad PCM is very rare).
Although it's beyond the scope of this article to test these two conditions, you have now eliminated the manifold absolute pressure (MAP) sensor on your Suzuki as being the cause of the problem and/or the MAP sensor diagnostic trouble code (DTC) lighting up the check engine light (CEL).
TEST 3: Verifying MAP Sensor Has Ground

Up to this point, you have checked and confirmed that the MAP sensor:
One: Is not creating an appropriate vacuum voltage signal (TEST 1).
Two: That the sensor is getting power in the form of 5 Volts from the LT GRN wire (TEST 2).
To finish our MAP sensor diagnostic tests, the last thing we need to do is to check that the LT GRN/BLK wire is providing Ground to the MAP sensor.
OK, here are the test steps:
- 1
Disconnect the MAP sensor from its connector.
- 2
Place your multimeter's dial in Volts DC mode.
- 3
Turn the key on but don't start the engine.
This will power up the MAP sensor's connector. - 4
Connect the black multimeter test lead to the LT GRN/BLK wire.
Be careful not to damage the terminal if you probe it on the front of the connector. - 5
Connect the red multimeter test lead to the battery positive (+) terminal.
- 6
Have your helper turn the key to its ON position but don't start the engine.
- 7
Your multimeter should display 10 to 12 Volts DC.
CASE 1: The multimeter showed 10 to 12 Volts. This confirms that the PCM and the wire/circuit (that supply this Ground) are OK.
You can conclude that the MAP sensor is bad if you have:
- The MAP sensor is not providing a varying voltage signal when manually apply vacuum to it.
- The MAP sensor is being fed 5 Volts DC.
- The MAP sensor is being fed Ground.
CASE 2: Multimeter DID NOT show 10 to 12 Volts. Double check that you're testing the correct MAP sensor harness terminal wire and repeat the test.
If your multimeter still doesn't show the indicated voltage, then this indicates a problem with either your Suzuki's PCM (internal fault/problem) or an open in the wire between the MAP sensor harness connector and the PCM's harness connector
Although testing these two conditions are beyond the scope of this article, you have now eliminated the manifold absolute pressure (MAP) sensor on your Suzuki as being the cause of the problem and/or the MAP sensor diagnostic trouble code (DTC) lighting up the check engine light (CEL). You can use the wiring diagram found in the following article to check continuity of the MAP sensor circuits:
MAP Sensor Trouble Code Won't Go Away

There are several things that can fool the PCM into thinking that the manifold absolute pressure (MAP) sensor is bad when it isn't
This usually means that you have already replaced the MAP sensor with a new one, yet the problem affecting your Suzuki's engine performance continues, not to mention the fact that the check engine light is re-lit by a MAP sensor trouble code (after you've erased the trouble codes from the PCM's memory).
When this happens it's usually because the MAP sensor is simply reporting an engine condition being caused by one of the following failed components:
- Engine with low engine compression.
- A failing fuel pump (one that hasn't completely died yet but is not supplying the correct fuel pressure and volume to the fuel injectors).
- A problem in the wiring (circuits) between the MAP sensor connector and the PCM.
- A bad powertrain control module (PCM), although this is extremely rare.
So if you're experiencing this particular issue, my suggestion to you is to check your Suzuki's engine compression and fuel pump pressure since these are the most common issues behind a MAP sensor code that won't go away (if you have already replaced the MAP sensor with a new one).
More 1.3L Swift (Chevy Metro) Tutorials
You can find a complete list of tutorials in this index: Suzuki 1.3L Index Of Articles.
Here's a small sample of the 1.3L Swift tutorials you'll find in the index:
- How To Test The Ignition Coils Suzuki: Swift, Vitara - Chevy: Metro, Tracker (at: easyautodiagnostics.com).
- How To Troubleshoot A Misfire (Suzuki 1.3L, 1.6L, 1.8L, 2.0L, 2.3L) (at: easyautodiagnostics.com).
- How To Do A Compression Test (Suzuki 1.3L, 1.6L, 1.8L, 2.0L, 2.3L) (at: easyautodiagnostics.com).
- Blown Head Gasket Test (Suzuki 1.3L, 1.6L, 1.8L, 2.0L, 2.3L, 2.5L) (at:easyautodiagnostics.com).

If this info saved the day, buy me a beer!

