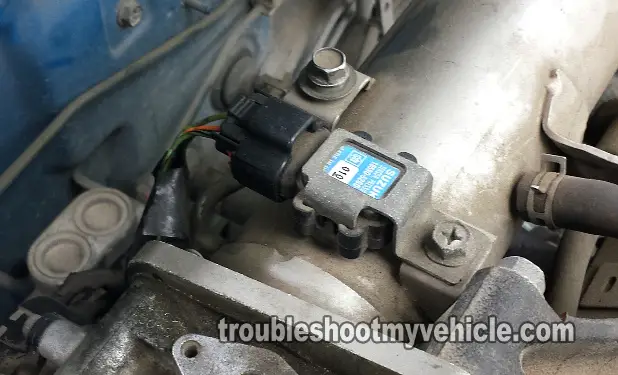
The manifold absolute pressure (MAP) sensor on your 1998-2001 1.3L Suzuki Swift (Chevy Metro) can be easily and accurately tested with a simple multimeter.
No scan tool is required to test the MAP sensor (to see if it's bad or not). In this tutorial I'll show you just how in a step-by-step way.
Contents of this tutorial:
To see the MAP sensor's wiring diagram go to: 1998-2001 MAP Sensor Circuit Diagram (1.3L Swift / Metro).
Symptoms Of A Bad MAP Sensor
Your 1.3L Suzuki Swift's fuel injection system is a ‘speed density’ type. Which means it relies on the crank sensor (for engine RPM info) and the MAP sensor (for engine load info) to calculate the amount of air the engine is breathing.
With the amount of air entering the engine calculated, the PCM then knows how much fuel to inject into each cylinder.
When the manifold absolute pressure (MAP) sensor fails your Suzuki Swift (Chevy Metro) is gonna' resent it and will let you know something is wrong. You'll see one or more of the following symptoms:
- Check engine light (CEL) shining nice and bright.
- Diagnostic trouble codes (DTC) stored in the PCM's memory:
- P0106: MAP Sensor Performance.
- P0107: MAP Sensor Voltage Low.
- P0108: MAP Sensor Voltage High.
- Your Suzuki Swift (Chevy Metro) fails the state mandated emissions test.
- Bad gas mileage.
- Hard start and/or extended cranking time (after shut off).
- Black smoke coming out of the tailpipe.
- Hesitation when accelerating your vehicle down the road.
Where To Buy Your MAP Sensor And Save
Where can you buy the MAP sensor for your Suzuki Swift (Chevy Metro)? You can buy it at your local auto parts store but it's gonna' cost a whole lot more. I suggest taking a look at the price of the MAP sensor in the following links and compare:
Not sure if the above MAP sensor fits your particular Suzuki Swift (Chevy Metro)? Don't worry, once you get to the site, they'll make sure it fits by asking you the particulars of your vehicle. If it doesn't fit, they'll find you the right one.
TEST 1: Testing The MAP Sensor Voltage Signal

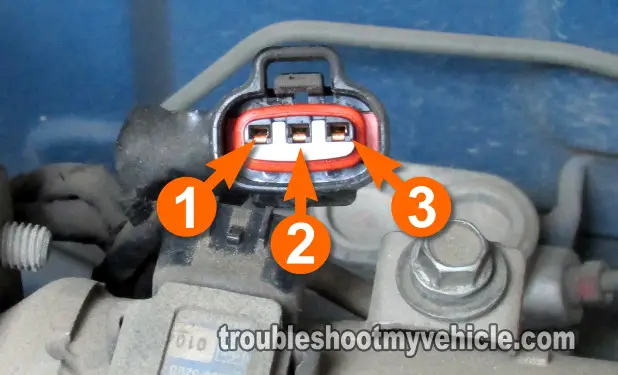
As you're already aware, the manifold absolute pressure (MAP) sensor has 3 wires coming out of its harness connector.
We're gonna' tap into the ORG/GRN wire, in this test step, since this is the one that carries the MAP voltage signal to the PCM.
To further explain what you'll do (in this test step), you're gonna' apply vacuum to the MAP sensor while it remains connected to its connector. Why? To see if the voltage signal decreases.
Once you release the vacuum you've applied, the voltage signal on the ORG/GRN should increase back to the original voltage value recorded (before the application of vacuum). This voltage value usually lies somewhere between 4.5 to 4.8 Volts DC.
NOTE: If you don't have a multimeter or need to upgrade yours, check out my recommendation: Buying A Digital Multimeter For Automotive Diagnostic Testing (found at: easyautodiagnostics.com).
IMPORTANT: This test is done with the key on but engine off (KOEO) and while the MAP sensor remains connected to its electrical connector.
OK, let's start:
- 1
Remove the MAP sensor from its place on the intake manifold.
If you disconnected the MAP sensor from its electrical connector to remove it, you need to reconnect it back before proceeding to the next steps. - 2
Place your multimeter in Volts DC mode.
- 3
Connect the red multimeter test lead to the ORG/GRN wire of the MAP sensor's connector.
This is the wire that connects to terminal #2 of the connector.
NOTE: The MAP sensor has to remain connected to its connector for this test to work (this is where a wire piercing probe comes in handy to get to the signal inside the wire. To see what one looks like, click here: Wire Piercing Probe Tool). - 4
Connect the black multimeter test lead to the battery negative (-) terminal.
- 5
Have your helper turn the key to the ON position, but don't start the engine (this will power up the MAP sensor).
- 6
Your multimeter should report 4.5 to 4.8 Volts DC. If your multimeter doesn't, don't worry about it just yet, continue with the other steps.
- 7
Apply vacuum to the MAP sensor's vacuum port.
- 8
As you apply vacuum, your multimeter should register a decreasing voltage on the ORG/GRN wire.
NOTE: You can apply vacuum with a vacuum pump or your mouth. Using vacuum pump is the better way since you can pull the voltage down quite a bit. - 9
Release the vacuum you applied while you eye-ball the multimeter.
The voltage value (that just decreased) should increase back to the 4.5 to 4.8 Volts you observed in test step 3.
Let's take a look at your test results:
CASE 1: The multimeter showed the voltage value decrease then increase as you applied and released vacuum. This test result confirms that the MAP sensor is OK and not defective.
CASE 2: The voltage value DID NOT decrease or increase as you applied and released vacuum, in other words, it stayed stuck in one voltage value as you applied and released vacuum then this tells you that the sensor is bad and needs to be replaced.
If I where in your shoes, I would still make sure that the MAP sensor is getting both power and Ground. To check for power on the LT GRN wire, go to: TEST 2: Verifying MAP Sensor Has Power.
CASE 3: The multimeter DID NOT register any voltage. This test result doesn't condemn the MAP sensor as bad just yet.
Why? Because the MAP sensor may be missing either power or Ground. So the next step is to check that the MAP sensor is getting power, go to: TEST 2: Verifying MAP Sensor Has Power.


