You can accurately test the alternator on your 1.7L equipped Civic DX, EX, or LX with a multimeter.
Not only that, it's easy and fast and in this tutorial, I'll show you how in a step-by-step way.
Contents of this tutorial:
ES ![]() You can find this tutorial in Spanish here: Cómo Probar El Alternador (2001-2005 1.7L Honda Civic) (at: autotecnico-online.com).
You can find this tutorial in Spanish here: Cómo Probar El Alternador (2001-2005 1.7L Honda Civic) (at: autotecnico-online.com).
APPLIES TO: This tutorial applies to the following vehicles:
- 1.7L Honda Civic (DX, EX, LX): 2001, 2002, 2003, 2004, 2005.
Symptoms Of A Bad Alternator
Your 1.7L Honda Civic's alternator fulfills two basic requirements: One is to charge the battery so that you crank and start the car each and every time you need to.
The other is to provide the electrical current for everything that requires it (think radio, blower motor, headlights, etc.), as you're driving down the road.
So, when the alternator fails, you'll notice one or several of the following symptoms:
- The charge light (also known as the battery light) will be shining nice and bright on your Civic's instrument cluster.
- Whenever you turn on the headlights (night driving), they glow very dim.
- The car won't crank. It will only crank and start if you jump start your Civic.
- The only way the car cranks and starts is if you charge the battery.
- The idle may get high when you come to a stop.
- The A/C will initially work and then the PCM commands it to de-activate (making you think you've got A/C compressor problems).
TEST 1: Battery Voltage Test With Engine Running

The very first thing you'll do is to see what the battery's voltage is with your Civic's engine running (with a multimeter in Volts DC mode of course).
If the alternator is defective and NOT charging the battery, your multimeter will register a battery voltage of 12.5 Volts or less.
If your Civic's alternator is working (and thus charging), your multimeter will show a voltage of 13.5 to 14.5 Volts DC.
Now, if the battery is completely dead on your Civic, you'll need to charge it up enough so that the car can idle for about 5 to 10 minutes (while you perform the test).
These are the test steps:
- 1
Crank and start your Honda Civic and select Volts DC mode on your multimeter.
- 2
Probe the positive battery terminal with the red multimeter test lead.
With the black multimeter test lead, probe the negative battery terminal on your Honda Civic's battery. - 3
Your multimeter is gonna' register one of two possible readings and they are:
1.) A steady 13.5 to 14.5 Volts DC.
2.) Or 12.5 Volts that will decrease the longer the engine stays running. - 4
Put an electrical load on the alternator to further confirm that it's either charging or not charging.
You can do this by turning on every accessory possible (inside the vehicle). For example: Turn on the A/C or heater on high, turn on the windshield wipers, turn on the headlights, turn on everything and anything that uses electricity inside and outside of the vehicle. - 5
Your multimeter will show you one of two things (as you turn on all of this stuff):
1.) The multimeter will register a nice and steady 13.5 to 14.5 Volts DC no matter what gets turned on.
2.) It will register 12.5 Volts DC and this voltage will decrease more and more as you turn on stuff inside your Honda vehicle.
OK, let's interpret your multimeter test results:
CASE 1: Your multimeter registered 13.5 to 14.5 Volts. This voltage test result tells you that the alternator is working (charging the battery).
No further testing is required, since this multimeter test result eliminates the alternator on your Honda Civic as bad.
Now, if you're having to jump-start the car to get it going, this test result points to a bad battery or a parasitic drain. A parasitic drain is tech-speak for something staying on (usually inside the car, for example: a dome-light) and draining the battery while the engine is off.
CASE 2: Your multimeter registered a voltage that steadily dropped down to 9 Volts. This is a clear indication that your Honda Civic's alternator IS NOT charging the battery.
Replacing the alternator at this point usually solves around 90% of the No Charge conditions on any 1.7L Honda Civic around the world. That's right, you could stop testing here and say: 'The alternator is fried' and be done but..
I suggest two more easy tests to be absolutely sure it is bad. For the first test of the two, go to: TEST 2: Checking The Continuity Of The Bat (+) Cable.
TEST 2: Checking The Continuity Of The Bat (+) Cable
You're probably already aware that your Honda Civic's alternator has two electrical connections.
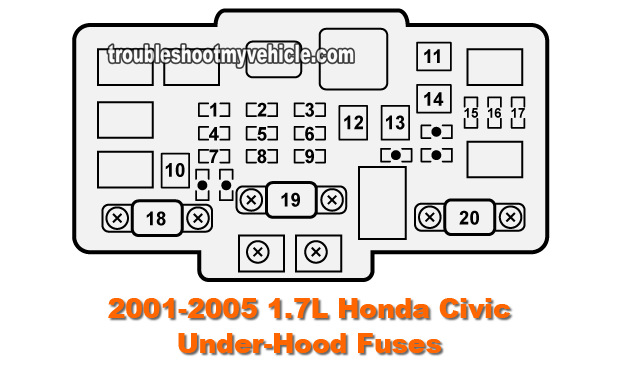
One of them is a heavy gauge wire that connects to the battery's positive (+) post across an 80 amp mega fuse (located on the under-hood fuse box).
All of the electrical power that the alternator produces, to charge the battery and to power any of your Honda Civic's electrical needs, passes across this 80 A mega fuse and sometimes this mega fuse gets blown.
So in this test step, you're going to verify that this fuse is OK on your 1.7L Honda Civic before we proceed with the next (and last test)... Which is checking the alternator fuse in the under-dash fuse/relay box (inside your Civic).
NOTE: This 80 amp mega-fuse is labeled with the number 19 in image 2 of 2 in the image viewer.
This is what you'll need to do:
- 1
Disconnect the battery negative (-) cable terminal from the battery negative (-) post. The positive cable remains connected.
IMPORTANT: Don't continue to the next step without first disconnecting the negative cable from the negative battery post. - 2
After disconnecting the battery negative (-) cable, turn on your multimeter and select Ohms mode.
- 3
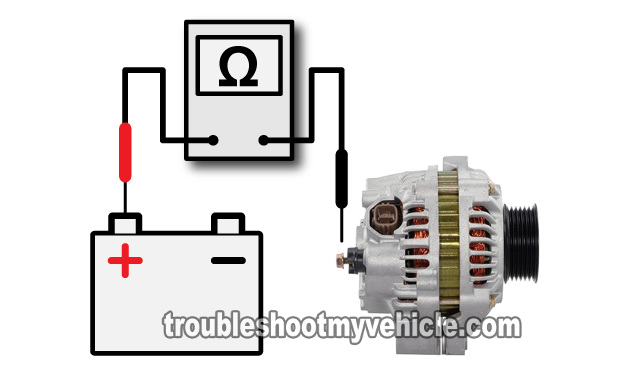
Your Honda Civic's alternator has only one big wire attached to it. This wire is attached with a nut. So, place your multimeter's RED test lead on the stud to which this wire is connected to.
The arrow in the photo points to this stud. - 4
With the black multimeter test lead, probe the center of the battery positive (+) post on your Honda Civic's battery.
- 5
You'll get one of two results.
1.) If the 80 Amp mega fuse, protecting this circuit, is blown, your multimeter will indicate a reading of OL (which means over limit). In other words, there will be NO continuity.
2.) If the 80 amp mega fuse is OK and not blown, your multimeter will register an Ohms reading of 0.5 Ohms or less. In other words, there will be continuity.
Let's take a look at what your results mean:
CASE 1: Your multimeter registered continuity. This is good, since it indicates that the 80 amp mega-fuse protecting this circuit is OK and not blown.
The last test to do also involves checking the condition of another fuse. Except that this is just a regular plastic blade type fuse found in the fuse box under the dash. For this test, go to: TEST 3: Checking The Alternator Fuse.
CASE 2: Your multimeter DID NOT register continuity. This result tells you that the 80 amp mega fuse is blown and this will keep the alternator from charging the battery.
This fuse is locate in the under-hood fuse box and is labeled with the number 19 in image 2 of 2 in the image viewer above.
Replace the fuse and retest. Replacing the 80 amp mega fuse (if it's blown) should solve your No Charge condition. You'll have to investigate the reason this mega fuse blew, since they don't get blown for no particular reason.
TEST 3: Checking The Alternator Fuse

So far, you have checked and verified that: One, the battery's voltage (with the engine running) is at or below 12.5 Volts.
Two, the 80 amp mega-fuse, in the under-hood fuse box, is not blown.
The next step (and the last one), before concluding the alternator is fried, is to check the alternator fuse that's located in the under-dash fuse box.
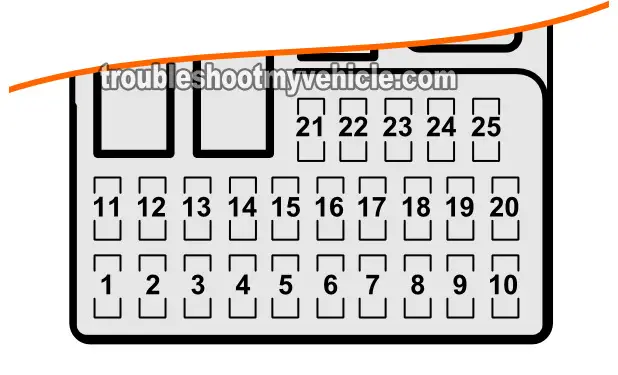
This fuse is the one labeled with the number 4 in the illustration in the image viewer and is a 10 amp fuse.
NOTE: You can enlarge the image in the image viewer to get a good view of the location of the number 4 fuse.
This is what you need to do:
- 1
Reconnect the battery to its battery negative (-) cable, that you disconnected in the previous test.
- 2
Locate the alternator fuse, which will be located in the under-dash fuse/relay box inside your Honda Civic.
The alternator fuse of the under-dash fuse/relay box is the number 4 fuse. - 3
Once you have located the alternator fuse, remove it and check that it's not blown.
- 4
If it is blown, replace it with a new one and repeat TEST 1.
Let's analyze your test results:
CASE 1: The alternator fuse is NOT blown. This is good and let's you know that the alternator has all of the power sources it needs to charge, since it isn't, this result also let's you know that the alternator is bad and needs to be replaced.
CASE 2: The alternator fuse IS blown. Replace the fuse with another of the same amperage rating (10 amps) and start the car and check to see if the alternator is now charging the battery by repeating TEST 1.
Where To Buy A Brand New Alternator
You can buy a brand new alternator for what it will cost you to buy a rebuilt one at your local auto parts store.
Check out the links below and shop/compare and see for yourself:
Disclosure: As an Amazon Associate, I earn from qualifying purchases. If my tutorials help you, using these links is an easy way to support the site at no extra cost to you. Thank you!
Not sure if the above alternator and alternator belt fit you particular 1.7L Honda Civic? Don't worry, once you get to the site, they'll make sure the parts fit and if they don't they'll ask you about your Civic's specifics to find you the right parts.
More 1.7L Honda Civic Test Articles
If this tutorial helped, you might be interested in the others found here:
Here's a sample of the articles you'll find in the index:
- Under-Dash Fuse/Relay Box (2001-2005 1.7L Honda Civic).
- How To Test The Ignition Coils (2001-2005 1.7L Honda).
- How To Do A Cylinder Balance Test (2001-2005 1.7L Honda Civic).
- How To Test Trouble Code P0141 (2001-2005 1.7L Honda Civic).
- How To Test The TP Sensor (2001-2005 1.7L Honda Civic).

If this info saved the day, buy me a beer!


