")
Although the 3.3L V6 Buick and Oldsmobile vehicles don't come equipped with a Schrader valve on the fuel injector rail, testing the fuel pump still isn't that difficult.
In this tutorial, I'll explain how to test the fuel pump pressure with a fuel pressure test gauge. I'm also including how to do a starting fluid test which will help you find out if the engine is not starting due to a lack of fuel.
Contents of this tutorial:
ES ![]() You can find this tutorial in Spanish here: Cómo Probar La Bomba De Combustible (1989-1993 3.3L V6 Buick, Oldsmobile) (at: autotecnico-online.com).
You can find this tutorial in Spanish here: Cómo Probar La Bomba De Combustible (1989-1993 3.3L V6 Buick, Oldsmobile) (at: autotecnico-online.com).
APPLIES TO: This tutorial applies to the following vehicles:
- 3.3L V6 Buick Century: 1989, 1990, 1991, 1992, 1993.
- 3.3L V6 Buick Skylark: 1989, 1990, 1991, 1992, 1993.
- 3.3L V6 Oldsmobile Achieva: 1992, 1993.
- 3.3L V6 Oldsmobile Calais (Cutlass Calais): 1989, 1990, 1991.
- 3.3L V6 Oldsmobile Cutlass Ciera: 1989, 1990, 1991, 1992, 1993.
FUEL PUMP CIRCUIT WIRING DIAGRAMS:
Buick Century And Oldsmobile Cutlass Ciera:
- Fuel Pump Wiring Diagram (1989-1990 3.3L V6 Buick Century, Olds Cutlass Ciera).
- Fuel Pump Wiring Diagram (1991-1993 3.3L V6 Buick Century, Olds Cutlass Ciera).
Buick Skylark And Olds Calais (Cutlass Calais):
- Fuel Pump Circuit Wiring Diagram (1989-1991 3.3L V6 Buick Skylark, Olds Calais).
- Fuel Pump Circuit Wiring Diagram (1992-1993 3.3L V6 Buick Skylark).
Symptoms Of A Bad Fuel Pump
Fuel pump failures usually cause one of two types of problems:
- Either the engine will not start.
- - or -
- The engine starts and runs, but runs very badly.
If the fuel pump still functions, but doesn't send the correct amount of fuel, you'll see one or more of the following symptoms:
- Engine takes longer than usual to start (extended cranking).
- Engine idle is very rough.
- Engine backfires thru' the intake manifold under load.
- Engine starts, then dies.
Both can be diagnosed with a simple fuel pump pressure test.
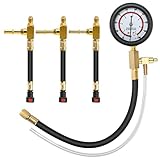
Where To Buy A Fuel Pressure Test Gauge
You'll need a fuel pressure test gauge and a quick disconnect adapter to test the fuel pressure on your 3.3L V6 Buick or Oldsmobile (since the fuel rail doesn't have a Schrader valve).
You'll also need a quick disconnect tool to disconnect the fuel line (to insert the adapter).
The following kits include the tools you need:

Using A Fuel Pump Pressure Tester To Test The Fuel Pump
")
")
")
To connect a fuel pressure test gauge to the fuel system, you'll need to use a 3/8" quick disconnect fuel pressure test adapter (see photo 2 of 3 above).
This adapter has to be installed between the fuel rail and the 3/8" fuel feed line (that comes from the fuel filter). The orange arrow in photo 1 of 3 above points to this fuel line.
To disconnect the fuel line, you'll need a quick disconnect fuel line tool (see photo 3 of 3 above).
NOTE: If you don't have a fuel pressure tester with the correct adapter or don't have the quick disconnect tool, take a look at this section: Where To Buy A Fuel Pressure Test Gauge.
The fuel pump pressure for the 1989-1993 3.3L V6 Buick and Oldsmobile vehicles is:
- 40-47 PSI Key On With Engine Off.
- With Key On Engine Running, fuel pressure should drop 3 to 10 PSI.
FUEL PUMP CIRCUIT WIRING DIAGRAMS:
- Fuel Pump Wiring Diagram (1989-1990 3.3L V6 Buick Century, Olds Cutlass Ciera).
- Fuel Pump Wiring Diagram (1991-1993 3.3L V6 Buick Century, Olds Cutlass Ciera).
- Fuel Pump Circuit Wiring Diagram (1989-1991 3.3L V6 Buick Skylark, Olds Calais).
- Fuel Pump Circuit Wiring Diagram (1992-1993 3.3L V6 Buick Skylark).
OK, these are the test steps:
- 1
Place a shop towel around the fuel pressure line (where it connects to the fuel injector rail).
The shop towel's job is to absorb any fuel that may leak when doing step 2. - 2
Disconnect the fuel pressure line from the fuel injector rail.
NOTE: You'll need to use a quick-disconnect tool to disconnect the fuel pressure line from the fuel injector rail. - 3
Connect the test adapter between the fuel pressure line and the fuel injector rail.
- 4
Connect the fuel pressure gauge to the adapter.
- 5
When ready, ask your helper to cycle the key ON and OFF several times but don't crank the engine while you observe the fuel pressure tester's gauge.
Check your connections for fuel leaks. - 6
Crank the engine and check the fuel pressure gauge.
- 7
Your fuel pressure gauge should register the specified fuel pressure.
Let's take a look at your fuel pressure test results:
CASE 1: The fuel pressure test gauge registered 0 PSI. This confirms that the no-start problem is caused by a lack of fuel.
This usually means that the fuel pump is bad and needs to be replaced.
CASE 2: The fuel pressure gauge registered the indicated fuel pressure specification. This fuel pressure gauge result lets you know that the fuel pump is working and delivering enough fuel to the fuel injectors. You can conclude the fuel pump is OK and not behind the no-start problem.
CASE 3: The fuel pressure gauge registered a fuel pressure way below the specification. This test result lets you know that the fuel pump is failing.
Using Starting Fluid
")
Using starting fluid, to confirm a lack of fuel causing a no-start problem, hails back to the days when cars had carburetors.
Although it's not the most accurate way to troubleshoot a failed fuel pump in a fuel-injected vehicle, it will let you know if the no-start problem is due to a lack of fuel.
IMPORTANT: To get the most accurate test result from the starting fluid test, you need to make sure that all spark plug wires are sparking before starting the test. Test all 6 spark plug wires for spark with a dedicated spark tester if you haven't already.
OK, this is what you'll need to do:
- 1
Remove the intake air duct from the throttle body.
You don't have to completely remove it, since you'll have to reconnect it in one of the next steps. - 2
Open the throttle manually, and spray starting fluid down the bore.
When you have sprayed a good squirt of starting fluid, quickly reconnect the air duct to the throttle body (you don't have to tighten the hose clamp).
Reconnecting the intake air duct is a very important safety precaution in case you get a back-fire thru' the intake manifold. - 3
Crank the engine once the intake air duct is back on the throttle body.
- 4
You'll get one of two results with this test:
1.) The engine will start momentarily and after a few seconds will die.
2.) The engine will only crank but not start at all.
OK, let's find out what your results mean:
CASE 1: The engine started and ran for a few seconds. This means that the reason your car is not starting is due to a lack of fuel.
I suggest that your next step be to test the fuel pump's fuel pressure with a test gauge. For this test go to: Using A Fuel Pump Pressure Tester To Test The Fuel Pump.
CASE 2: The engine did not start, not even momentarily. This usually means that a lack of fuel IS NOT the reason your car is not starting.
Now, remember what I said about this test not being very accurate? Well, I suggest you do one more test and this is to test the fuel pump's fuel pressure with a test gauge. For this test go to: Using A Fuel Pump Pressure Tester To Test The Fuel Pump.
More 3.3L V6 Buick, Oldsmobile Tutorials
You can find a complete list of 3.3L V6 Buick (Oldsmobile) tutorials in this index:
Here's a small sample of the tutorials you'll find in the index:
- How To Test Engine Compression Test (3.3L V6 Buick, Oldsmobile).
- How To Test A Blown Head Gasket (3.3L V6 Buick, Oldsmobile).
- How To Test The MAF Sensor (3.3L V6 Buick, Oldsmobile).
- What Does A MAF Sensor Do? (3.3L V6 Buick, Oldsmobile).

If this info saved the day, buy me a beer!

