Interpreting Your Compression Test Results
As the engine ages and wears, the cylinder compression values differ from one another -especially if the engine has a lot of miles.
In most cases, and depending on how small or big the difference, nothing happens to engine performance.
When the difference is too big, you'll have a rough idle or a misfire condition on your hands.
To find out if the lower compression value is causing a problem, you need to find out if it's lower than 15% of the highest compression value you got.
You can do this (figuring out the 15%) in one of two ways: You can calculate this 15% difference with pen and paper or you can use my low compression calculator. You can find the low compression calculator here: Online Low Engine Compression Calculator (at: easyautodiagnostics.com).
If you want to manually calculate the 15% difference, here's what you'll need to do:
- STEP 1: Multiply the highest compression value by 0.15 (this is the decimal value of 15%).
- STEP 2: Round the result to the nearest one (for example: 25.6 would become 26).
- STEP 3: Subtract the result (the number that was rounded) from the highest compression value.
- ANSWER: The result of this subtraction is the lowest possible compression value any cylinder can have.
Now, let me give you a more specific example: Let's say that the vehicle I'm working on produced the following compression readings:
| Cylinder | Pressure |
|---|---|
| #1 | 165 PSI |
| #2 | 95 PSI |
| #3 | 155 PSI |
| #4 | 175 PSI |
My next step is to do the following calculation:
- STEP 1: 175 x 0.15 = 26.25.
- STEP 2: 26.25 = 26 (rounded to nearest one).
- STEP 3: 175 - 26 = 149.
- ANSWER: 149 PSI. Any cylinder with this compression (or lower) value will misfire.
Since cylinder #2 is only producing 95 PSI, I can now conclude that it's 'dead' and causing a misfire.
To find out if the lowest compression value you got from your engine compression test is within a good range, you'll need to do the same calculation. Of course, you'll need to use the highest compression value you got and not the one in the example.
Once you've found the 'dead' cylinder, the next step is to find out what's causing the low compression value. For this step, go to: TEST 2: ‘Wet’ Engine Compression Test.
TEST 2: ‘Wet’ Engine Compression Test

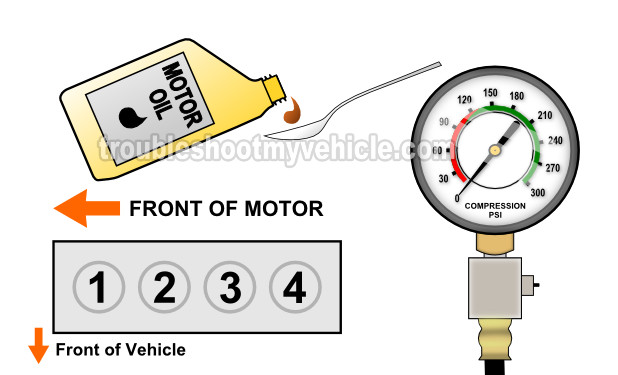
If you have found a cylinder with no or little compression, then the next step is to do a ‘wet’ compression test. In a ‘wet’ compression test you're gonna' add about two tablespoons of oil to the engine cylinder that showed a low compression reading.
The engine oil that you're gonna' add to the cylinder will help determine if the low cylinder pressure or pressures you recorded in the ‘dry’ compression test are caused by worn piston rings or worn cylinder head valves.
Depending on whether the compression pressure rises (on your compression tester) or not, you'll be able to say that the problem lies in the piston's rings or in the cylinder head valves.
OK, this is what you need to do:
- 1
Add a small amount of engine oil to the cylinder that reported low compression or no compression in the ‘dry’ compression test.
The amount should be about 1 to 2 tablespoons of oil. - 2
Install the compression tester onto the cylinder.
Do not use any type of tool to tightened the compression tester. Hand tight is fine. - 3
When all is set up, have your helper crank the engine.
- 4
You'll get one of two results: either the compression value will go up (from the one you recorded before) or it will stay the same.
Let's take a look at what your test results mean:
CASE 1: The compression value shot up. This tells you that the piston compression rings are worn out and thus the problem is in the bottom end (block) of the engine in your 2.3L/2.4L Quad 4 equipped GM vehicle.
To go into a little more detail: The reason the compression shot up is that the oil you added helped the piston rings (of the dead cylinder) to start sealing again. This effect doesn't last too long though, because as soon as you put everything back together and start the engine and the engine burns the oil, the compression will go back down again.
CASE 2: The compression value stayed the same. This confirms that the problem is in the cylinder head valves.
To add a little more info, the reason why the oil made no effect on the compression value is that no amount of oil will help the valve seal better (agains its seat on the cylinder head). So, with this test result, you have indirectly confirmed that the low or no compression value is due to a bad or bent valve.
Related Test Articles
You can find more 2.4L GM test articles by going here: GM 2.4L Index Of Articles and at:
- How To Test For A Blown Head Gasket (GM 2.4L Quad 4).
- How To Test The Fuel Injectors (GM 2.4L Quad 4).
- How To Test The MAP Sensor (GM 2.4L Quad 4).
- GM 2.4L (Quad 4) Index Of Articles (at: easyautodiagnostics.com).

If this info saved the day, buy me a beer!

