OXYGEN SENSOR TEST 1

To test the oxygen sensors, the very first thing you'll do is to induce a Rich condition.
By manually inducing a Rich Condition, you'll be able to see if the oxygen sensor can respond fast enough or not.
The O2 sensor test is a very easy test to do (as you'll shortly see once you perform it on your Ford vehicle), all the same, I suggest you read this section thoroughly so that you can familiarize yourself with the tests steps that are involved.
Alright, this is what you'll need to do:
- 1
Start the engine and let it run for about 15-20 minutes. This is important, since you need to give the O2 sensor some time to warm up and activate.
- 2
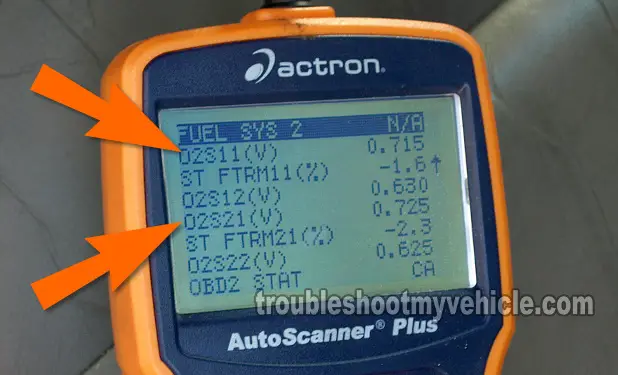
If you haven't already, connect your scan tool and get to its Live Data mode. Scroll down to the PID's that are labeled O2S11 and O2S21 (Don't have a scan tool? Need a scan tool? Check out my recommendation: Actron CP9580 Scan Tool).
- 3
Now, take a look at the voltage readings for O2S11 and O2S21.
If the engine has been running for about 20 minutes, and the 02 sensors are OK, you should see the voltages moving between 0.200 Volts and 0.900 Volts.
If the voltages are not moving between 0.100 and 0.900 Volts, don't worry about it just yet, continue on to the next step. - 4
With the engine running, spray a little carburetor cleaner into a vacuum hose (that has engine vacuum) while you observe your scan tool's display screen.
You're not going to be able to spray carb cleaner into the throttle as the engine is running, because if you were to do this, the engine will die as soon as you disconnect the air duct from it (to spray into it).
If you spray too much, the engine will stall. If this happens to you, just restart the engine and repeat the step and spray less carb cleaner spray. - 5
As you spray some short burst of carb cleaner into the vacuum hose, you should see the voltage numbers of O2S11 and O2S21 immediately spike to 0.800 to 0.900 Volts. And as long as you're spraying, these voltage number should stay there.
- 6
When you stop spraying, the O2 sensors values should come down and within a few seconds, they should start oscillating between 0.100 Volts to 0.900 Volts. If they don't, don't worry about yet.
OK, the test is done, let's take a look at what your test results mean:
TEST RESULT 1: O2S11 and O2S21 voltage numbers spiked to 0.900 Volts when you sprayed carb spray into the vacuum hose. This tells you that both oxygen sensors are OK at this point in time. They do not need to be replaced, since what is causing the PCM to think they are fried is something else.
For more info on this, go to the section: Oxygen Sensor Codes Keep Coming Back.
TEST RESULT 2: O2S11 voltage numbers DID NOT spike to 0.900 Volts when you sprayed carb spray into the vacuum hose. This confirms that Bank 1 Oxygen Sensor 1 is no longer working. You can replace the oxygen sensor.
TEST RESULT 3: O2S21 voltage numbers DID NOT spike to 0.900 Volts when you sprayed carb spray into the vacuum hose. This confirms that Bank 2 Oxygen Sensor 1 is no longer working. You can replace the oxygen sensor.
Oxygen Sensor Codes Keep Coming Back
So you tested the oxygen sensors and they tested good or you have already replace one or both and yet the PCM keeps accusing them as being bad (which also means that the check engine light is back on).
When this happens, it's usually due to either a Rich condition or Lean condition that's being caused by some other component on the engine.
What sucks about this, is that whatever is causing the Rich or Lean condition is not present all of the time (specially when you're conducting the tests). This happens quite a bit. The strategy here is to wait a few days for the condition (that's causing the O2 sensor issues) to get worse. When this occurs, you'll be able to test it and solve it.
More Test Articles
There is one article that I recommend you take a look at that deals with testing a Lean condition. You can find this article here: Troubleshooting P0171 And P0174 (Ford 4.6L, 5.4L).
I've written quite a few 4.6L, 5.4L ‘how to’ tutorials that may help you troubleshoot the issues on your Ford car, pick up or SUV. You can find all at: Ford 4.6L, 5.4L Index Of Articles.
Here is a small sample of articles you'll find in the Ford 4.6L, 5.4L Index of Articles:
- Fuel Injector Test.
- Coil-On-Plug (COP) Ignition Coil Misfire Tests (Ford 4.6L, 5.4L).
- How To Do An Engine Compression Test.
- How To Test The EGR Valve, DPFE Solenoid And Vacuum Solenoid (at easyautodiagnostics.com).
- How To Test The Mass Air Flow Sensor (at easyautodiagnostics.com).

If this info saved the day, buy me a beer!

