TEST 2: Swapping Fuel Injectors

Every now and then, you run into a situation where you have a clogged fuel injector that's causing the cylinder to misfire but you're not sure it's being caused by a clogged fuel injector.
In a case such as this (where you suspect a clogged fuel injector), I do the following leg work:
One: Make sure that all six (or eight) fuel injectors have passed the resistance test.
Two: Make sure that all six (or eight) spark plug wires are sparking and checked/verified the spark plugs are OK too.
Three: Checked and confirmed that the cylinders' compression values are normal.
Once I have eliminated all of the above, then I swap the fuel injector that belongs to the ‘dead’ cylinder with the one right next to it and see if the miss follows the injector. If the miss follows the injector to its new cylinder, then I can confidently conclude the fuel injector is clogged (and I replace it).
IMPORTANT: Don't reuse the old fuel injector O-rings when swapping out the fuel injectors. See this section for more info: Tech Tip: Always Replace Injector O-Rings
Here are the specific test steps:
- 1
Verify the cylinder is ‘dead’.
You can accomplish this by simply disconnecting the fuel injector's connector (while the engine is running) and making sure that unplugging it DOES NOT make the RPMs drop. - 2
Find a cylinder that IS NOT ‘dead’.
You can accomplish this by simply disconnecting the fuel injector's connector (while the engine is running) and making sure that unplugging it DOES make the RPMs drop. - 3
Let the engine cool down and then swap the fuel injectors.
Be careful, since swapping the fuel injectors will cause fuel to spill from the fuel rail. - 4
Start the engine and check to see if the misfire has moved to the other fuel injector's location.
You can accomplish this by simply disconnecting the fuel injector's connector (while the engine is running) and seeing if the good cylinder is now ‘dead’.
Let's take a look at your test results:
CASE 1: The miss moved to the good cylinder. If the miss follows the injector, then you can replace it knowing you've ‘hit the nail on the head’.
This is only true if you have verified that the ‘dead’ cylinder has spark and good compression.
CASE 2: The miss DID NOT move to the good cylinder. This test result tells you that the fuel injector itself is not the cause of the misfire for that specific cylinder.
Which Fuel Injector Do I Test First? Or Do I Test All Of Them?
I would recommend to test them all since they are easy to get to. But the main reason is that by testing them all, you can catch the one that's fried.
Here's why:
- All fuel injectors have a specific internal resistance that can be measured in Ohms mode on a multimeter.
- When a fuel injector goes bad, it'll normally have a completely different resistance value than the other ones.
Therefore, the purpose of the test is to find the bad fuel injector by reading it's resistance and comparing this reading to two other fuel injectors.
Let me give you some examples of what you're looking for when I say “a completely different resistance value” :
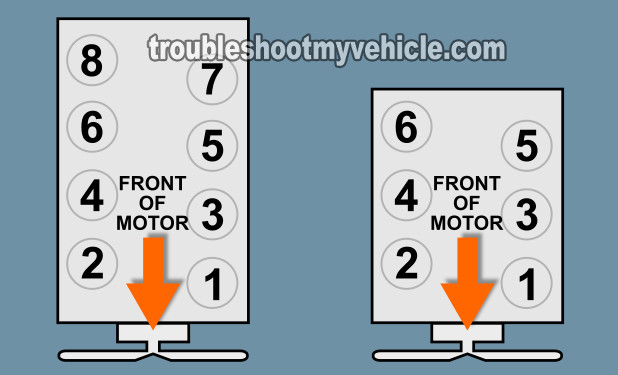
Let's say that I tested all six fuel injectors on 1997 Dodge Dakota with a 3.9L V6, and I got the following resistance values (these are just to illustrate my point, they are not what you'll see on your specific Dodge vehicle):
- Cylinder #1: 11.4 Ohms.
- Cylinder #2: 11.8 Ohms.
- Cylinder #3: 4.4 Ohms.
- Cylinder #4: 11.6 Ohms.
- Cylinder #5: 11.2 Ohms.
- Cylinder #6: 11.4 Ohms.
As you can see, the fuel injector for Cylinder #3 is the one that's fried because the resistance value is drastically different than others. Although the other 5 do show some difference, they are all still similar and let me know they are OK.
Of course, a resistance test only diagnoses a completely fried fuel injector. It doesn't test for clogged fuel injectors that may be behind the engine misfire on your Dodge/Jeep vehicle. To test for a clogged fuel injector, you'll need to follow the suggested test steps here: TEST 2: Swapping Fuel Injectors.
Fuel Injector Diagnostic Strategy
In this section I want to share with you the fastest way I've found to pinpoint the fuel injector that's bad.
Thankfully, there is a logical step-by-step way of finding out if the fuel injector (or anything else) is the one causing your engine to miss (misfire, idle rough, etc.). The best part of all, is that you don't need to spend ‘an arm and a leg’ on expensive diagnostic equipment!
These are the steps I take:
- 1
Find the ‘dead’ cylinder first.
This usually involves hooking up a scan tool and checking for misfire codes.
Unfortunately, the PCM doesn't always set a specific bad fuel injector code, but when a fuel injector does go bad, you WILL see a misfire code.
If you don't have a misfire code, then the next step is to do a manual cylinder balance test. This involves unplugging one fuel injector at a time (while the engine is running) and seeing if unplugging the injector DOES NOT cause a drop in engine RPM's.- If the cylinder is working (not ‘dead’), then unplugging its fuel injector will cause a noticeable drop in the engine's RPMs.
- If the cylinder is ‘dead’, then unplugging its fuel injector will NOT cause any engine RPM drop.
- 2
Make sure the ‘dead’ cylinder is getting spark.
The next step is to check for spark and thus eliminate the ignition system as the source of the problem.
What I'm looking for here is to confirm that the spark plug is getting spark and I do this by connecting a spark tester on the spark plug wire feeding the ‘dead’ and having a helper crank the engine while I observe the spark tester (see image 1 of 2 in the image viewer above).
If I don't get spark, then I've found the source of the misfire (rough idle, ‘dead’ cylinder, etc.) and now I know I need to check the ignition system further and diagnose/replace spark plug wires, distributor cap/rotor, etc.
If I get spark, then I continue on to the next step. - 3
Remove the spark plug(s) and visually inspect them.
What I'm checking for are for cracks and/or carbon tracks and/or oil filling up the spark plug Well.
If the spark plugs check out fine, I move on to the next test step. - 4
Perform an engine compression test.
Testing the cylinder's compression is so often overlooked as a cause of a misfire.
What I'm looking for is to see if any one cylinder is too worn out. If it's too worn out, it will always have 15% lower compression that the highest compression reading of the six (3.9L) or eight (5.2L, 5.9L).
If the ‘dead’ cylinder's compression values are within spec (in relation to the others and the 15% rule of thumb), I then move on to testing the fuel injectors and/or swapping them. - 5
Check fuel injector resistance with a multimeter.
I usually leave this test step till the very end (but you don't have to). - 6
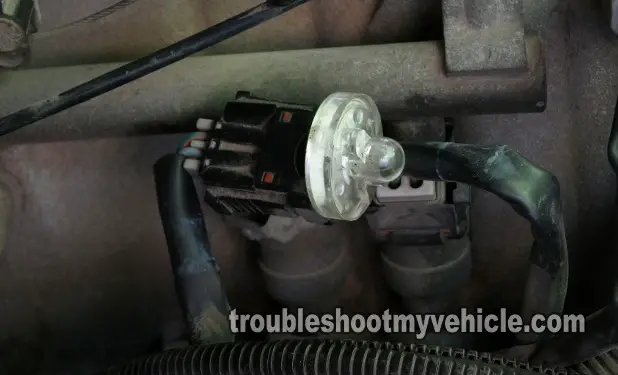
Perform a Noid Light test on the fuel injector's connector.
This is a very important test, because it checks to see if the fuel injector is getting power and is being activated by the PCM (see image 2 of 2 in the image viewer above).
If the Noid Light flashes ON and OFF, then the fuel injector is getting both power and an activation signal.
If the Noid Light DOES NOT flash ON and OFF, then power or the activation signal is missing. - 7
Swap the fuel injector.
See the section: TEST 2: Swapping Fuel Injectors for more details about this.
The purpose of all of the my tests (above) are to eliminate the ignition system and engine mechanical condition first before attempting to blame or suspect a bad fuel injector.
And I can tell you that this diagnostic strategy has saved me from replacing some good fuel injectors and being able to nail down the ones that are bad.
Tech Tip: Always Replace Injector O-Rings
If you're removing a fuel injector —whether to replace it or simply test it by swapping it out — there's one golden rule you should always keep in mind: Never put it back in with the same O-rings.
Let me explain why. Those O-rings are essential for forming a tight, leak-proof seal between the injector and the fuel rail. Once the injector is pulled out, the O-rings can get nicked, stretched, or slightly deformed — even if they look OK at first glance.
Reusing them might seem like no big deal, but it seriously raises the chances of a dangerous fuel leak. And if there's one thing you don't want mixing with heat or sparks, it's gasoline under pressure. That's a recipe for disaster.
Here's what to do instead:
- Always install brand new O-rings that match your injector and vehicle specs (make, model, and engine type).
- Apply a light coat of clean motor oil to the new O-rings. This makes installation smoother and helps avoid tearing or pinching them as you press the injector back into the fuel rail.
This extra bit of care only takes a few minutes but can prevent major problems — including the risk of fire. Bottom line: O-rings are inexpensive. Dealing with fuel leaks? Not so much.
Related Test Articles
So you tested all of the fuel injectors, and all passed the resistance test AND your Dodge pickup or SUV is still misfiring, well the following article might help:
- How To Diagnose Misfire Codes (Dodge 3.9L, 5.2L, 5.9L)
- How To Test Engine Compression (Chrysler 3.9L, 5.2L, 5.9L)
More Dodge 3.9L, 5.2L, 5.9L Tutorials
I've been adding a lot of 3.9L V6 and 5.2L/5.9L V8 tutorials for both the full-size Dodge Ram pickups and vans. You can find all the new tutorials in these new indexes:
3.9L V6 Pickups And Vans:
5.2L/5.9L V8 Pickups And Vans:
OLD INDEX: This is the old index (that I'm no longer adding tutorials to):
Here's a sample of the tutorials you'll find in the old index:
- How To Test A No Start Condition (Dodge 3.9L, 5.2L, 5.9L).
- How To Test The Crank Sensor (1994-1996 3.9L, 5.2L, 5.9L Chrysler).
- How Can I Tell If My Automatic Transmission Needs An Overhaul?
- How To Test The MAP Sensor (P0107, P0108) (Dodge 3.9L, 5.2L, 5.9L).
- How To Diagnose Misfire Codes (Dodge 3.9L, 5.2L, 5.9L).

If this info saved the day, buy me a beer!


