")
If the crankshaft position (CKP) sensor fails, in your 4.8L, 5.3L or 6.0L GM vehicle, it's not gonna start. In this in-depth tutorial, I'll show you how to test it using a multimeter (in Volts DC mode).
In case you're wondering, crankshaft position sensor test in this tutorial is an on-car test. It's not possible to do a simple resistance (Ohms) test of the CKP sensor. Why? Well, it's because this CKP sensor is a Hall Effect type and these have to be dynamically tested (to find out if they're good or not).
Contents of this tutorial:
- Important Tips And Suggestions.
- Symptoms Of A Bad CKP Sensor.
- Should I Test The CKP Sensor Or Just Replace It?
- Where To Buy The CKP Sensor And Save.
- How The CKP Sensor Works.
- CKP TEST 1: Testing The CKP Signal With A Multimeter.
- CKP TEST 2: Making Sure The CKP Sensor Is Getting 12 Volts.
- CKP TEST 3: Making Sure The CKP Sensor Is Getting Ground.
- Related Test Articles.
Tools You'll Need:
- Multimeter.
- Jack
- Jack Stands
- 1/2 inch Ratchet Wrench
Important Tips And Suggestions
TIP 1: To perform the test, you'll need to manually turn the engine. The best point, to turn the engine with a 1/2 ratchet wrench and a socket, is the crankshaft pulley.
You'll need to lift the vehicle to gain access to the crank pulley. Use jack stands to hold up the vehicle. DO NOT trust the jack. Think safety all of the time and take all necessary safety precautions (including using safety glasses).
TIP 2: Do not turn the engine with the starter motor, when doing the CKP sensor test. The only way to see the ON/OFF voltage pulses (that the CKP sensor creates) on the multimeter is by turning the engine by hand. You won't see these ON/OFF pulses if you use the starter motor.
TIP 3: If your GM vehicle starts and runs then you can conclude that the CKP sensor is good, and this tutorial will not help you.
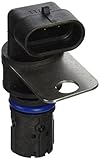
TIP 4: Since this is an on-car test of the CKP sensor, DO NOT remove the CKP sensor to test it. In the photo you'll notice it's out but this is just to make it easier to explain the test connections.
Symptoms Of A Bad CKP Sensor
The CKP sensor plays a crucial role in getting the engine started and keeping it running by providing the PCM with vital information about the crankshaft's position and speed. This information is essential for controlling the ignition timing and fuel injection.
The one symptom that's gonna be staring you right in the face, when the CKP fails, is the engine not-starting in your GM pick up or van or SUV.
More specifically, you'll see one or all of the following symptoms when the CKP sensor fails:
- No spark from all ignition coils: The PCM relies on the CKP sensor signal to time the ignition system. Without this signal, the ignition system will fail to produce spark, leading to an engine no-start condition.
- No fuel injector pulses: The CKP sensor signal is used to time the fuel injectors. A failure here means the injectors won't pulse properly, preventing the engine from starting due to a lack of fuel delivery.
- Diagnostic Trouble Codes (DTCs): You'll see on of these specific codes directly pointing to issues with the CKP sensor's operation:
- P0335: No Crank Sensor Signal Detected.
- P0336: Inconsistent Crank Sensor Signal Detected.
The thing to remember when diagnosing a CKP sensor, is that if you have spark or fuel injector pulses, the CKP sensor is OK and not the cause of your engine's no-start issue.
On last thing that's important to keep in mind is that the CKP sensor can experience intermittent failures. In this case, the sensor may operate correctly most of the time, but it occasionally malfunctions, causing a sudden engine shutdown while the vehicle is running.
When the CKP sensor fails intermittently, it may provide inaccurate or erratic signals to the PCM, leading to momentary lapses in ignition timing or fuel delivery. As a result, the engine will either run in 'Limp Home' mode or may stall unexpectedly, leaving with you with an unforgettable heart-pounding moment (as you try to maneuver to a safe stopping point on the side of the road).
Should I Test The CKP Sensor Or Just Replace It?
When faced with a CKP sensor diagnostic trouble code (DTC) and symptoms indicating a faulty CKP sensor (like the engine not starting), it's not uncommon to simply replace it without testing it first. There are a couple of reasons for this.
- The CKP Sensor Isn't Expensive: CKP sensors are relatively inexpensive compared to other vehicle components. Because of this, it's often more tempting to just swap out the sensor rather than investing the time and effort into testing it.
- Saving Time: The CKP sensor can be quite time-consuming, especially if the problem is intermittent or hard to reproduce. For some individuals or shops, replacing the CKP sensor outright might seem like a quicker fix, especially if they're dealing with multiple vehicles or have limited time available for diagnostics.
Whether or not to replace the CKP sensor without testing it ultimately depends on factors such as cost, time constraints, and your level of diagnostic expertise. Sometimes, it might be more efficient to go straight for the replacement, but in other cases, thorough testing could save you time and money in the long run.
If you want to simply replace the CKP sensor, you can find my recommendations here: Where To Buy The CKP Sensor And Save.
Where To Buy The CKP Sensor And Save
Check out the following links and comparison shop the original AC Delco (Delphi) crankshaft position sensor on your GM van (pick up or SUV):


Not sure if the above crankshaft position sensor fits your particular GM vehicle? Don't worry, once you click on the links and arrive on the site, they'll make sure it fits! If it doesn't, they'll find you the right one.
How The CKP Sensor Works
The crankshaft position sensor, on your 4.8L, 5.3L, 6.0L GM vehicle, is a Hall-Effect three wire crankshaft position sensor. As such it has 3 wires coming out of its connector.
This also means that this type of CKP sensor creates an ON/OFF DC voltage signal that can be easily measured with a multimeter, an oscilloscope, and even an LED Light. In this article, I'll show you how to test the CKP sensor with a multimeter.
Each one of the three wires that connect to it have a specific job to do. In a nutshell this is what happens when you turn the key and crank the engine:
- One wire delivers power in the form of 12 Volts from the PCM.
- This is the wire labeled with the letter C.
- Another delivers Ground. This Ground is provided inside the PCM, too.
- This is the wire labeled with the letter B.
- As the engine turns, a reluctor wheel on the crankshaft activates the CKP sensor into creating its ON/OFF voltage signal 24 times per crankshaft revolution.
- This crank signal is fed to the PCM on:
- Wire labeled with the letter A.
- The PCM now uses this crank signal to:
- Activate the 8 COP coils to spark.
- Activate all 8 fuel injectors to start spraying fuel into the cylinders.
- Maintain the fuel pump activated after its initial start.
- With fuel and spark now present, the engine now starts.
The most important thing to know, is that if the CKP sensor goes bad, your 4.8L, 5.3L, 6.0L GM vehicle vehicle will 'crank but not start'.
CKP TEST 1: Testing The CKP Signal With A Multimeter
In case you're wondering, the CKP sensor is located on the passenger side of the engine, right beside the starter motor (or behind the starter motor, depending on your point of view).
To be able to test the CKP sensor you'll need to remove the starter motor. The starter motor can remain off of the engine for the remainder of the test.
IMPORTANT: You'll need to raise the van and place it on jack stands to access the CKP sensor. Don't trust the jack alone to keep the van up in the air, use jack stands to ensure your safety!
OK, let's get started:
- 1
Disable the fuel system. You can easily do this by removing the fuel pump relay that's located in the underhood fuse box.
IMPORTANT: This is an important safety precaution! Don't skip this step. - 2
Locate the CKP sensor and disconnect it from its connector.
- 3
Remove some of the plastic wire loom protector and/or the black electrical tape that shields the three wires of the CKP sensor.
Remove enough of this electrical tape insulation to gain comfortable access to the three wires it protects.
NOTE: Do not remove the CKP sensor from the engine block. - 4
Connect the black multimeter test lead to the negative (-) battery post.
- 5
Disconnect the CKP sensor from its electrical connector..
- 6
Connect the red multimeter to the wire identified with the letter A in the image above, of the three wire connector.
You'll need to use a wire-piercing probe to connect the red multimeter test lead the CKP sensor signal wire.
To see what a what wire piercing probe tool looks like, click here: Wire Piercing Probe.
This is the wire that delivers the crank signal to the PCM. Don't worry about the particular color this wire should be on your vehicle. You'll be able to identify it easily with the photo in the image viewer. - 7
Place the multimeter in Volts DC mode.
- 8
Reconnect the CKP sensor to its electrical connector. The crankshaft position sensor must be connected to its electrical connector for this test to work.
- 9
When everything is set up, have a helper turn the crankshaft pulley by hand in a clock-wise direction using a ratchet and the appropriate size socket on the crankshaft pulley bolt.
IMPORTANT: Do not use the starter motor to crank the engine, since this will defeat the accuracy of this test. - 10
The multimeter will register an ON/OFF voltage.
OFF will be 0 Volts and ON will be 10 Volts.
Alright, let's find out if you have a bad CKP sensor on your hands or not. Choose from the CASES below that best match your specific results:
CASE 1: The multimeter registered the ON/OFF DC voltage as the crankshaft pulley was hand-turned: This is the correct and expected result and tells you that the CKP sensor is working good. The CKP sensor is not the cause of your no-start condition.
CASE 2: The multimeter DID NOT register the ON/OFF pulses as the crankshaft pulley was hand-turned: Recheck all of your connections. If still no ON/OFF 10 Volt pulses on the multimeter, it looks like the CKP sensor is bad.
The next step is to check that the crankshaft position sensor is getting power. This comes in the form of 12 Volts. Go to: CKP TEST 2: Making Sure The CKP Sensor Is Getting 12 Volts.