Testing the oxygen sensor (commonly referred to as O2 sensors) on your 4.3L, 5.0L, or 5.7L GM vehicle is not that hard to do.
Since oxygen sensors are not cheap and sometimes the PCM (Powertrain Control Module = Fuel Injection Computer) accuses them of being bad, when they aren't, testing them is a good idea and this article will help you.
Your 4.3L, 5.0L, or 5.7L GM pick up, van , SUV, or mini-van comes equipped with several oxygen sensors, this article concentrates on testing the two that are before the catalytic converter (O2S11 and O2S21).
Contents of this tutorial:
Important Suggestions And Tips
TIP 1: To take advantage of the testing info in this article, you'll need a scan tool. This scan tool must have Live Data capability. Now, you don't need the GM factory scan tool or a professional technician level scan tool since I've written this article for use with a generic scan tool (Don't have a scan tool? Need a scan tool? Check out my recommendation: Actron CP9580 Scan Tool).
TIP 2: The testing procedure I'm gonna' show you here is done with the oxygen sensors in action. Which means that you'll be testing them with the engine running. Therefore, take all necessary safety precautions and think safety all of the time.
Symptoms Of A Bad Oxygen Sensor
The effects of a bad oxygen sensor can be very subtle since they usually do not cause serious drive-ability problems. Here are the most common symptoms:
- The check engine light (CEL) will be illuminated on your instrument cluster.
- The diagnostic trouble codes lighting up the CEL usually are:
- P0131 Upstream Heated Oxygen Sensor (HO2S11) Circuit Out Of Range Low Voltage (Bank 1).
- P0133 Upstream Heated Oxygen Sensor (HO2S11) Circuit Slow Response (Bank 1).
- P0151 Upstream Heated Oxygen Sensor (HO2S21) Circuit Out Of Range Low Voltage (Bank 2).
- P0153 Upstream Heated Oxygen Sensor (HO2S21) Circuit Slow Response (Bank 2).
- Really bad gas mileage.
- Won't pass state mandated emission testing.
Oxygen Sensor Basics
In this section, I'm gonna' go into some working theory of how the O2 sensor works in plain English. If you need a more technical and detailed explanation, you can Google it, since I'm only gonna' concentrate on the basics you need to know to diagnose them.
The job of the pre-catalytic converter oxygen sensors is to help the PCM fine tune the amount of fuel that's injected into the engine. If the PCM injects too much, the O2 sensors will let it know and the PCM responds by injecting less. If it doesn't inject enough, they'll make it aware of it and the PCM will inject more.
The O2 sensors accomplish this by producing anywhere from 0.100 Volts to a maximum of 1 Volt of direct current that is sent directly to the PCM. The PCM, after receiving these voltages, does its 'little song and dance' and translates the voltage amount (depending on the exact voltage the O2 sensor is producing) as either to much fuel is being injected or not enough.
Here are some more specifics:
- If the PCM injects too much fuel, the oxygen sensor responds by producing a voltage above 0.500 Volts. This voltage can go as high as 0.900 to 1.0 Volt.
- This is considered a Rich condition.
- As soon as the PCM sees the Rich condition it's causing (according to the oxygen sensor's feedback), the PCM injects less fuel. The oxygen sensor immediately reports the change so that the less fuel the PCM injects into the engine, the smaller the voltage that the O2 sensor's voltage produces. Its voltage can go as low as 0.050 to 0.100 Volts.
- This is considered a Lean condition.
- This process of injecting more or less fuel and the O2 sensors reporting the change to the PCM goes on the entire time the engine is running (and if all of the components are working correctly).
- The really cool thing is that you can observe these changes using a scan tool in its Live Data mode, and this is how I'm gonna' show you how to test them.
- A correctly working O2 sensor will produce a voltage that will switch between a Lean and Rich condition several times every few seconds. So, if the voltage output of the O2 sensor stays fixed (when testing it), the O2 sensor has failed.
If the pre-cat O2 sensors are bad, they will not be able to sense how Rich or Lean the exhaust gas is and consequently the PCM will not be able to fine tune the fuel injection to meet emission (pollution) standards. Not only that, your gas mileage will suffer (see: Symptoms Of A Bad Oxygen Sensor).
What Is O2S11 And O2S21?

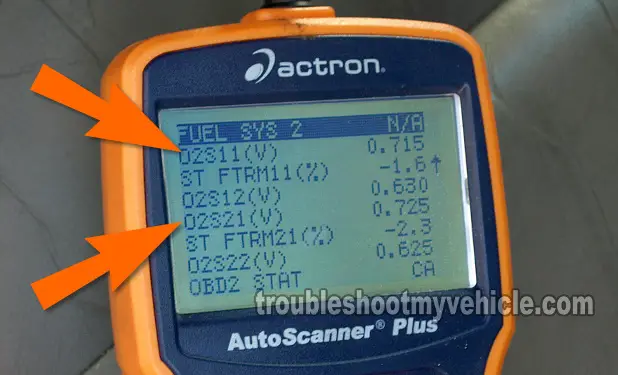
On your scan tool (when it's in Live Data mode), the pre-catalytic converter oxygen sensors are identified as O2S11 and O2S21.
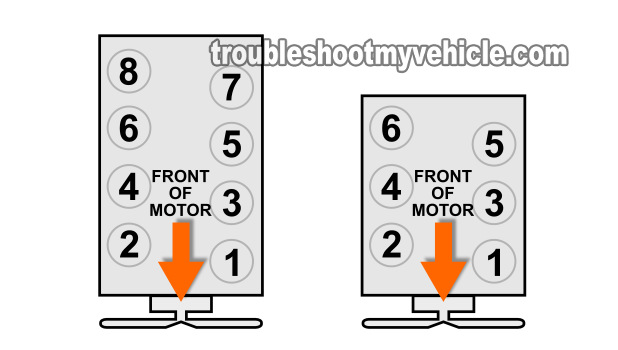
O2S11 is shorthand for Oxygen Sensor Bank 1 Sensor 1. On the 5.0L and 5.7L V8 engines, Bank 1 is the engine bank that houses cylinders 1, 3, 5, and 7. On the 4.3L V6 engine, Bank 1 is the one that houses cylinders 1, 3, and 5.
O2S21 is shorthand for Oxygen Sensor Bank 2 Sensor 1. On the 5.0L and 5.7L V8's, Bank 2 is the one that contains the cylinders 2, 4, 6, and 8. On the 4.3L V6 engine, Bank 2 is the one that has cylinders 2, 4, and 6.
The part that refers to them as Sensor 1 simply means that they are located before the catalytic converter. When the O2 sensors are located behind the catalytic converter, they are referred to as Sensor 2, as in O2S12 and O2S22.
Testing The Performance Of The Oxygen Sensor

To test the oxygen sensors, the very first thing you'll do is to induce a Rich condition.
You'll manually create this Rich condition by spraying a little carburetor cleaner into an available vacuum hose while the engine is running.
If the O2 sensors are good, they'll both produce 0.900 Volts on the scan tool once the carb spray enters in the engine.
Alright, this is what you'll need to do:
- 1
Connect your scan tool to the diagnostic connector under the dash.
Don't have a scan tool? Need a scan tool? Check out my recommendation: Actron CP9580 Scan Tool. - 2
Start the engine.
The engine must run for about 15 minutes to get the O2 sensors to activate. - 3
Scroll down to the PIDs that are labeled O2S11 and O2S21.
These are the PIDs that will show you the voltages the O2 sensors are creating. - 4
Take a look at the voltage readings for O2S11 and O2S21.
If the engine has been running for about 15 minutes, and the 02 sensors are OK, you should see the voltages moving between 0.200 Volts and 0.900 Volts.
If the voltages are not moving between 0.100 and 0.900 Volts, don't worry about it just yet, continue on to the next step. - 5
With the engine running, spray a little carburetor cleaner into a vacuum hose (that has engine vacuum) while you observe your scan tool's display screen.
You're not going to be able to spray carb cleaner into the throttle as the engine is running, because if you were to do this, the engine will die as soon as you disconnect the air duct from it (to spray into it).
If you spray too much, the engine will stall. If this happens to you, just restart the engine and repeat the step and spray less carb cleaner spray. - 6
You should see the voltage numbers of O2S11 and O2S21 immediately spike to 0.800 to 0.900 Volts as you spray some short burst of carb cleaner into the vacuum hose.
As long as you're spraying, these voltage number should stay there. - 7
When you stop spraying, the O2 sensors values should come down and within a few seconds, they should start oscillating between 0.100 Volts to 0.900 Volts.
If they don't, don't worry about yet.
OK, the test is done, let's take a look at what your test results mean:
CASE 1: O2S11 and O2S21 voltage numbers spiked to 0.900 Volts when you sprayed carb spray into the vacuum hose. This tells you that both oxygen sensors are OK at this point in time. They do not need to be replaced, since what is causing the PCM to think they are fried is something else.
For more info on this, go to the section: Oxygen Sensor Codes Keep Coming Back.
CASE 2: O2S11 voltage numbers DID NOT spike to 0.900 Volts when you sprayed carb spray into the vacuum hose. This confirms that Bank 1 Oxygen Sensor 1 is no longer working. You can replace the oxygen sensor.
CASE 3: O2S21 voltage numbers DID NOT spike to 0.900 Volts when you sprayed carb spray into the vacuum hose. This confirms that Bank 2 Oxygen Sensor 1 is no longer working. You can replace the oxygen sensor.
