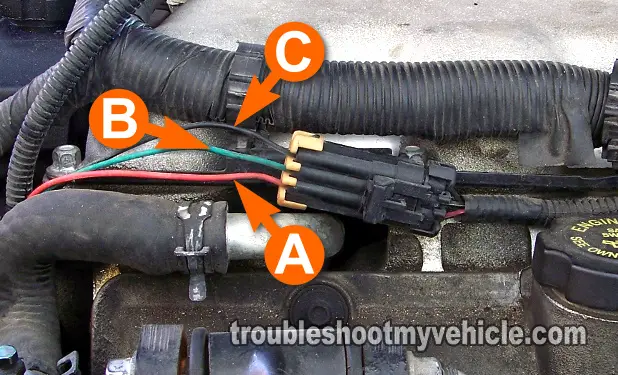
Circuit Descriptions Of The Cam Sensor

Each of the three wires (circuits) of the camshaft position sensor has a specific signal to carry.
One wire provides power (which comes in the form of 12 Volts). Another feeds a Ground Path.
The last one is the one that carries the cam sensor signal to the PCM.
Below you'll find a short description of each that tie in with the photo in the image viewer:
Circuit A:
- This wire feeds the camshaft position sensor with 12 Volts.
- Power is only supplied with the Key On Engine Off or Key On Engine Running. Care must be taken not to short this wire to Ground, or damage to the PCM will result.
Circuit B:
- This wire carries the camshaft position signal that the camshaft position sensor generates.
- The CAM signal is sent directly to the PCM.
Circuit C:
- This wire feeds the camshaft position sensor with Ground.
- This Ground is provided by the PCM internally. Care must be taken not to short this wire to power, or damage to the PCM will result.
TEST 1: Testing The CMP Signal With A Multimeter

The camshaft position (CMP) sensor is located right behind the power steering pump. Thankfully, the engineers at GM had the brain to have the CMP sensor's connector located in plain view, right in front of the intake manifold!
To successfully diagnose the camshaft position (CMP) sensor on your 3.1L or 3.4L equipped car or mini-van (Buick, Chevrolet, Oldsmobile, or Pontiac), you'll need to jack up the car to be able to hand-turn the crankshaft pulley. This involves using a jack stand to hold up the car (or mini-van) and safeguard your safety. Don't trust just the jack!!!
NOTE: The camshaft position sensor must remain connected to its electrical connector for this test to work. You'll need to use a back probe on the connector or a wire piercing probe on the wire. You can see an example of this tool here: Wire Piercing Probe.
OK, let's get started:
PART 1:
- 1
Raise the front passenger side of you car or mini-van onto a jack stand (for safety).
- 2
Remove the front passenger-side wheel. If the wheel spins as you're trying to break the lug nuts loose, have someone sit inside the vehicle and step on the brake pedal. This will keep the wheel from moving and facilitate the removal of the lug nuts.
- 3
Remove the plastic water splash shield that protects the crankshaft pulley and serpentine belt from water.
- 4
Locate the CMP sensor's connector. This connector is located on top of the front cylinder head valve cover and in front of the upper intake manifold plenum. It may be necessary to remove some of the plastic wire loom protector that shields the three wires of the camshaft position (CMP) sensor.
PART 2:
- 5
Place the multimeter in Volts DC mode.
- 6
Connect the red multimeter test lead to the green (GRN) wire of the 3-wire connector.
The GRN wire is the signal wire that transmits the camshaft position sensor signal to the PCM and is the one labeled with the letter B in the photo.
Remember, the CMP sensor must remain connected to its engine wiring harness connector. - 7
Connect the black multimeter test lead to the battery negative (-) terminal.
PART 3:
- 8
Turn the crankshaft pulley by hand in a clock-wise direction while you keep you eyes on the multimeter.
NOTE: Do not use the starter motor to crank the engine. - 9
If the CMP sensor is working correctly, the multimeter will register an ON/OFF voltage of 9.5 to 10 Volts DC once every two revolutions of the crankshaft. OFF is when the multimeter displays 9.5 to 10 Volts DC and ON is 0 Volts DC.
To be a little more specific: Your multimeter will register 9 to 10 Volts most of the time you're turning the crank pulley. When the camshaft position sensor is activated (and if it's working correctly) by the pole piece on the camshaft, then this voltage will go down to 0 Volts.
Remember, the multimeter will only register the 0 Volts only once per two complete turns of the crankshaft pulley.
OK, now it's time to see what your test result means. Choose from the CASES below that best match your specific results:
CASE 1: The multimeter registered 9.5 to 10 Volts DC and the 0 Volt pulse as the crankshaft pulley was hand-turned two full revolutions. This is the correct and expected test result and it indicates that the camshaft position sensor is working fine.
CASE 2: The multimeter DID NOT register the ON/OFF 9.5 to 10 Volts DC and 0 Volts pulse as the crankshaft pulley was hand-turned two full revolutions This result indicates that the camshaft position (CMP) sensor is not creating a signal.
But before replacing the CMP sensor, you need to verify that it's getting power (12 Volts). The wire that feeds the cam sensor with the power it needs is the wire labeled with the letter A. For this test go to: TEST 2: Making Sure The CMP Sensor Is Getting 12 Volts.
